background image

4

24)  To avoid damage to this product, never place or store 

the TV in direct sunlight; hot, humid areas; or areas 

subject to excessive dust or vibration.

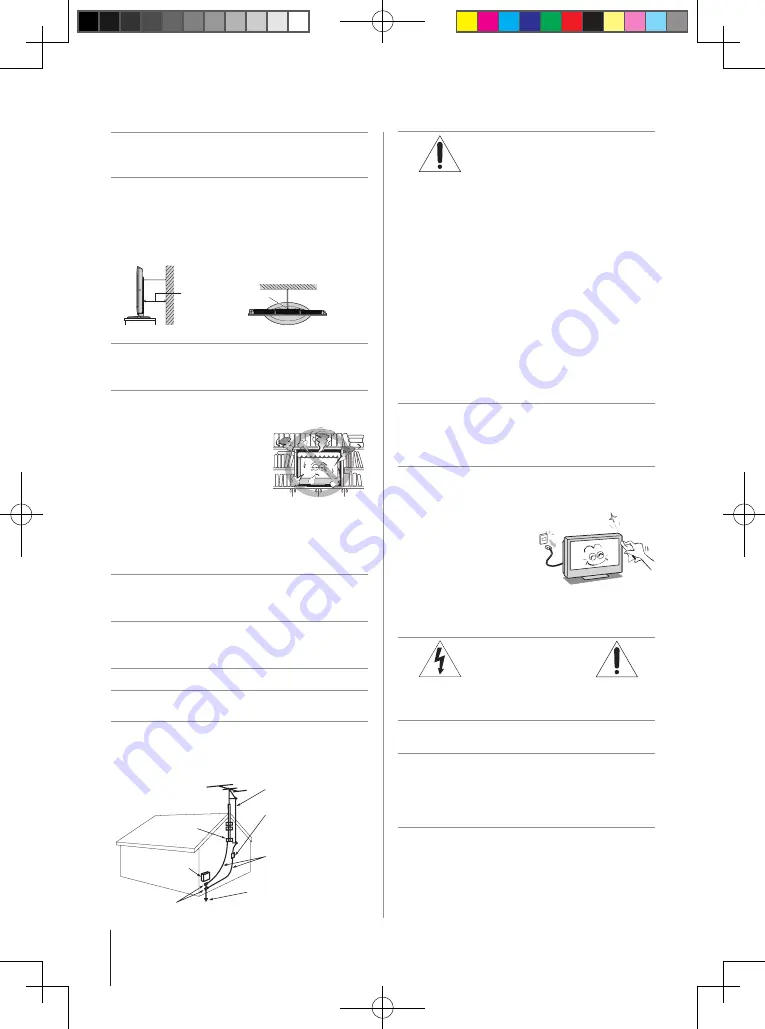
25)  Always place the TV on the floor or a sturdy, level, 

stable surface that can support the weight of the unit. 

To secure the TV, use a sturdy strap from the hook(s) 

on the rear of the TV to a wall stud, pillar, or other 

immovable structure. Make sure the strap is tight, 

secure, and parallel to the floor.

p

o

V

T

e

d

i

s


V

T

4"  

min.

Hook

Sturdy strap (as short as possible)

26)  The apparatus shall not be exposed to dripping or 

splashing and that no objects filled with liquids, such 

as vases, shall be placed on the apparatus.

27)  Never block or cover the slots or openings in the TV 

cabinet back, bottom, and sides. Never place the TV:
•  on a bed, sofa, rug, or 

similar surface;

•  too close to drapes, 

curtains, or walls; or

•  in a confined space such 

as a bookcase, built-in 

cabinet, or any other place with poor ventilation.

The slots and openings are provided to protect the 

TV from overheating and to help maintain reliable 

operation of the TV. Leave a space of at least 4 (four) 

inches around the TV.

28)  Always place the back of the television at least four 

(4) inches away from any vertical surface (such as a 

wall) to allow proper ventilation.

29)  Never allow anything to rest on or roll over the power 

cord, and never place the TV where the power cord is 

subject to wear or abuse.

30)  Never overload wall outlets and extension cords.
31)  Always operate this equipment from a 120 VAC, 60 

Hz power source only.

32)  Always make sure the antenna system is properly 

grounded to provide adequate protection against 

voltage surges and built-up static charges (see 

Section 810 of the National Electric Code).

Antenna lead-in wire

Antenna discharge unit  

(NEC Section 810-20)

Grounding conductors  

(NEC Section 810-21)

Power service grounding 

electrode system  

(NEC Art 250 Part-H)

Ground clamp

Electric service 

equipment

Ground clamps

33) 

DANGER: RISK OF SERIOUS 

PERSONAL INJURY OR DEATH!


•  Use extreme care to make sure you are never in 

a position where your body (or any item you are 

in contact with, such as a ladder or screwdriver) 

can accidentally touch overhead power lines. 

Never locate the antenna near overhead power 

lines or other electrical circuits.

•  Never attempt to install any of the following 

during lightning activity: a) an antenna system; 

or b) cables, wires, or any home theater 

component connected to an antenna or phone 

system.

Care

For better performance and safer operation of your TOSHIBA 
TV, follow these recommendations and precautions:

34)  If you use the TV in a room whose temperature is 

32 °F (0 °C) or below, the picture brightness may 

vary until the LCD warms up. This is not a sign of 

malfunction.

35)  Always unplug the TV before cleaning. Gently wipe 

the display panel surface (the TV screen) using a dry, 

soft cloth only (cotton, flannel, etc.). A hard cloth may 

damage the surface of the 

panel. Avoid contact with 

alcohol, thinner, benzene, 

acidic or alkaline solvent 

cleaners, abrasive cleaners, 

or chemical cloths, which 

may damage the surface. Never spray volatile 

compounds such as insecticide on the cabinet. Such 

products may damage or discolor the cabinet.

36) 

WARNING:


RISK OF ELECTRIC SHOCK!

Never spill liquids or push objects of any kind into 

the TV cabinet slots.

37)  While it is thundering, do not touch the 

connecting cables or apparatus.

38)  For added protection of your TV from lightning 

and power surges, always unplug the power 

cord and disconnect the antenna from the TV if 

you leave the TV unattended or unused for long 

periods of time.

39)  ALWAYS unplug the TV to completely disconnect 

from mains power. When the TV is turned off using 

the on/off switch, it is not completely disconnected 

from power and a minute amount of current is still 

consumed.

(continued)

40E200U2_EN-2nd.indb   4

2010/3/31   上午 10:20:08

Summary of Contents for 40E200U2

Page 1: ... cable provider or satellite provider 2010 TOSHIBA CORPORATION All Rights Reserved Owner s Record The model number and serial number are on the back of your TV Record these numbers in the spaces below Refer to these numbers whenever you communicate with your Toshiba dealer about this TV Model number Serial number HDA51C4020I Owner s Manual Integrated High Definition HIGH DEFINITION TELEVISION LCD ...

Page 2: ...ease keep these safety tips in mind The Issue The home theater entertainment experience is a growing trend and larger flat panel displays are popular purchases However flat panel displays are not always supported on the proper stands or installed according to the manufacturer s recommendations Flat panel displays that are inappropriately situated on dressers bookcases shelves desks speakers chests...

Page 3: ...electric shock or fire NEVER allow your body to come in contact with Wide blade any broken glass or liquid from the damaged television The LCD panel inside the TV contains glass and a toxic liquid If the liquid comes in contact with your mouth or eyes or your skin is cut by broken glass rinse the affected area thoroughly with water and consult your doctor ALWAYS contact a service technician to ins...

Page 4: ...Section 810 21 Power service grounding electrode system NEC Art 250 Part H Ground clamp Electric service equipment Ground clamps 33 DANGER RISK OF SERIOUS PERSONAL INJURY OR DEATH Use extreme care to make sure you are never in a position where your body or any item you are in contact with such as a ladder or screwdriver can accidentally touch overhead power lines Never locate the antenna near over...

Page 5: ...ulated due to environmental considerations For disposal or recycling information contact your local authorities or the Electronics Industries Alliance www eiae org Choosing a location for your LCD TV To Display your LCD TV on the included Pedestal Stand Observe the following safety precautions 1 Read and Follow the pedestal assembly instructions included with the pedestal CAUTION Before beginning ...

Page 6: ...moval of the pedestal stand 3 Once you have removed all four screws holding the pedestal stand in place remove the pedestal stand from the TV CAUTION Always place the TV on the floor or a sturdy level stable surface that can support the weight of the unit To secure the TV use a sturdy strap from the hook s on the rear of the TV to a wall stud pillar or other immovable structure Make sure the strap...

Page 7: ...radio TV technician for help Caution Changes or modifications to this equipment not expressly approved by Toshiba could void the user s authority to operate this equipment Important notes about your LCD TV The following symptoms are technical limitations of LCD Display technology and are not an indication of malfunction therefore Toshiba is not responsible for perceived issues resulting from these...

Page 8: ...mode 36 Adjusting the picture quality 37 Using the closed caption mode 37 Base closed captions 37 Digital CC Settings 38 CC Selector 38 Adjusting the audio 38 Muting the sound 38 Using the digital audio selector 38 Selecting stereo SAP broadcasts 39 Adjusting the audio quality 39 Selecting the optical audio output format 39 Using the Dolby Digital Dynamic Range Control feature 40 Using the Locks m...

Page 9: ...eam HD high resolution component video inputs page 15 QSound audio technologies page 53 Digital Audio Out optical audio connection with Dolby Digital optical output format page 39 CableClear digital picture noise reduction page 52 PC IN Analog RGB computer terminal page 18 19 Channel Labeling allows you to put the Call Letters e g ABC HBO etc on the screen along with the station numbers so you alw...

Page 10: ...evices to your TV 4 BEFORE connecting cables or devices to the TV learn the functions of the TV s connections and controls pages 11 12 5 Connect your other electronic device s to the TV pages 13 19 6 Install the batteries in the remote control page 20 7 See Learning about the remote control page 21 for an overview of the buttons on the remote control 8 AFTER connecting all cables and devices plug ...

Page 11: ...onnections Model 40E200U2 is used in this manual for illustration purposes 1 2 3 7 8 9 4 5 6 11 12 10 1無 Green LED and TOSHIBA Logo LED Power LED Green Power indicator TOSHIBA Logo LED On or Off page 24 2無 Remote sensor Point the remote control toward this remote sensor Remote control effective range on page 20 3無 POWER Press to turn the TV on and off If the TV stops responding to the controls on ...

Page 12: ... pulse code modulation format for connecting an external Dolby Digital decoder amplifier A V receiver or home theater system with optical audio input 6無 VIDEO 1 IN Standard composite video and standard audio inputs plus for connecting devices with composite video Note Standard composite video cable carry only video information separate audio cables are required for a complete connection 7無 ColorSt...

Page 13: ...r picture performance than a standard composite video HDMI cable with HDMI Logo HDMI High Definition Multimedia Interface cable is for use with devices with an HDMI output An HDMI cable delivers digital audio and video in its native format This cable carries both video and audio information therefore separate audio cables are not required for a complete HDMI device connection page 16 and page 19 N...

Page 14: ...iew the antenna or Cable signal Select the ANT CABLE video input source on the TV To view basic and premium Cable channels Turn OFF the VCR Select the ANT CABLE video input source on the TV Tune the TV to channel 3 or 4 whichever channel the Cable box output is set to Use the Cable box controls to change channels To view the VCR Turn ON the VCR Select the VIDEO 1 video input source on the TV To vi...

Page 15: ...s not have component video connect a standard A V cable to VIDEO 2 on the side panel If your DVD player has HDMI video see page 16 To view antenna or Cable channels Select the ANT CABLE video input source on the TV To view the DVD player Turn ON the DVD player Select the ColorStream HD video input source on the TV To view satellite programs using the component video connections Turn on the satelli...

Page 16: ...the HDMI audio mode page 27 HDMI device TV back panel To view the HDMI device video Select the HDMI 1 HDMI 2 HDMI 3 or HDMI 4 video input source on the TV To select the video input source press INPUT on the remote control page 21 To connect a DVI device you will need one HDMI to DVI adapter cable HDMI type A connector per DVI device For proper operation the length of an HDMI to DVI adapter cable s...

Page 17: ...ture may not operate properly For proper operation it is recommended that you use HDMI cables with the HDMI Logo Before controlling the device s After completing the above connections set the REGZA LINK Setup menu as you desire page 49 The connected devices must also be set For details see the operation manual for each device The REGZA LINK feature uses the CEC technology as regulated by the HDMI ...

Page 18: ...erly creating a high noise level that may damage speakers or headphones THIS DAMAGE IS NOT COVERED BY YOUR WARRANTY The DIGITAL AUDIO OUT terminal may not output some digital audio sources because of copy restrictions Manufactured under license from Dolby Laboratories Dolby and the double D symbol are trademarks of Dolby Laboratories Connecting a personal computer PC With either the PC IN or HDMI ...

Page 19: ...not be able to pause during multi angle scenes Signal names for mini D sub 15 pin connector Pin No Signal name Pin No Signal name Pin No Signal name 1 R 6 Ground 11 Reserved 2 G 7 Ground 12 SDA 3 B 8 Ground 13 H sync 4 Reserved 9 5V 14 V sync 5 Reserved 10 Ground 15 SCL To connect a PC to the HDMI terminal on the TV When connecting a PC to the HDMI terminal on the TV use an HDMI to DVI adapter cab...

Page 20: ... and regulations If the remote control does not operate correctly or if the operating range becomes reduced replace batteries with new ones When necessary to replace batteries in the remote control always replace both batteries with new ones Never mix battery types or use new and used batteries in combination Always remove batteries from the remote control if they are dead or if the remote control...

Page 21: ...aption page 38 12無 MUTE reduces or turns off the sound page 38 13無 VOL adjusts the volume level 14無 INFO displays TV status information as well as program details when available page 50 15無 EXIT closes on screen menus 16無 ENTER activates highlighted items in the main menu system 17無 CH RTN returns to the last viewed channel or source page 33 18無 Arrow buttons pqtu When a menu is on screen these bu...

Page 22: ...T1 T2 T3 T4 Digital CC Settings Opens the Digital CC Setup menu Input Labeling Opens the Input Labeling menu Channel Labeling Opens the Channel Labeling menu Menu Language English Français Español Channel Browser Setup Opens the Channel Browser Setup menu REGZA LINK Player Control Opens the REGZA LINK Player Control Locks Enable Rating Blocking Off On Edit Rating Limits Opens the Edit Rating Limit...

Page 23: ...ation Opens the System Information screen Navigating the menu system You can use the buttons on the remote control or TV control panel to access and navigate your TV s on screen menu system Press to open the menu system When a menu is open use the up down left right arrow buttons pqtu on the remote control or TV control panel to move in the corresponding direction in the menu Press to save your me...

Page 24: ...w will appear every time you turn on the TV Selecting the menu language You can choose from three different languages English French and Spanish for the on screen display of menus and messages To select the menu language 1無 Press and open the Preferences menu highlight Menu Language 2無 Press t or u to select your preferred menu language 3無 Press to close the Preferences menu Chapter 5 Setting up y...

Page 25: ...e lineup changes significantly To program channels automatically 1無 Configure the antenna input source if you have not already done so page 24 2無 Press and open the Setup menu 3無 Highlight Installation and press 4無 A new set of Installation menu icons will appear as shown below Open the Terrestrial menu highlight Channel Program to bring up the Start Scan and press again to begin channel programmi...

Page 26: ...2無 Highlight the label to be deleted and press 3無 Highlight Yes from the deletion confirmation window and press To add a channel to the channel memory Highlight the checked box next to the channel number you want to add and then press to remove the tick To manually add digital subchannels on a physical channel Use the Channel Numbers and the Dash on the remote control to enter the channel number f...

Page 27: ... on page 44 Viewing the digital signal meter You can view the digital signal meter in the ANT CABLE digital TV input source only To view the digital signal meter 1無 Press and open the Setup menu 2無 Highlight Installation and press 3無 A new set of Installation menu icons will appear Open the Terrestrial menu highlight Signal Meter and press 4無 Press pqtu to select the antenna input and digital chan...

Page 28: ...n to normal viewing Press Reset Factory Defaults To reset all settings and channels to their factory default values 1無 Press and open the Setup menu 2無 Highlight Installation and press A new set of Installation menu icons will appear 3無 Open the System Status menu highlight System Information and press 4無 Press tu to scroll through the menu bar to select Factory Defaults 5無 Highlight Yes and press...

Page 29: ...t HDMI 1 HDMI 2 HDMI 3 or HDMI 4 If the connected CEC device has any connected devices a separate device selection popup window will appear Chapter 6 Using the TV s features Press repeatedly to highlight the desired input source and then press Note When selecting REGZA LINK input sources from the popup window using some REGZA LINK devices may automatically turn on When selecting input sources usin...

Page 30: ...ll your channels and inputs This feature allows you to Navigate the contents of all of your inputs Keep a list of your favorite channels see Favorites Browser below Keep a history of the last 32 channels or inputs viewed Quickly surf and tune your recently viewed channels inputs from the Channel Browser History List illustrated on the next page Surf via Browse mode to immediately tune channels as ...

Page 31: ...e ANT CABLE channel list the Inputs list the REGZA LINK list or the favorite channels inputs in the Favorites list Elements of the ChannelBrowser 1無 Current list History ANT CABLE Inputs Favorites or REGZA LINK 2無 Input type 3無 Channel or input currently being viewed 4無 Channel or input that is currently highlighted in the browser 5無 Channels stored in the History List 6無 Channel labels To toggle ...

Page 32: ...or details on configuring the antenna input Once 32 channels or inputs are stored in the History List the oldest item will be removed from the list when a new channel or input is tuned Turning off the TV will clear the History List Setting the Channel Tuning Mode This feature allows you to choose how tuning will be handled for analog and digital channels when the TV is in Antenna mode Note To use ...

Page 33: ...ck feature temporarily memorizes one channel to the button so you can return to that channel quickly from any other channel by pressing To memorize a channel to the button 1無 Tune the TV to the channel you want to program into the button 2無 Press and hold for about 2 seconds until the message Memorized appears on screen The channel has been programmed to the button 3無 You can then change channels ...

Page 34: ...en edges either scroll the picture TheaterWide 2 and 3 only or try viewing the program in Full or Natural picture size Picture Size Natural Some program formats will display with sidebars and or bars at the top and bottom TheaterWide 1 for 4 3 format programs The center of the picture remains close to its original proportion but the left and right edges are stretched wider to fill the screen Pictu...

Page 35: ...gs 1無 Press and open the Picture menu 2無 Highlight Theater Settings and press 3無 In the Picture Size field select either TheaterWide 2 or TheaterWide 3 you cannot scroll in any other mode 4無 Press to highlight the Picture Scroll field 5無 Press or to scroll the picture up and down as needed 6無 To save the new settings highlight Done and press To revert to the factory defaults highlight Reset and pr...

Page 36: ... feature 1無 When viewing the TV press to make the picture a still picture 2無 To return to the moving picture press again or any other button Note If the TV is left in FREEZE mode for more than 15 minutes the FREEZE mode will automatically be released and the TV will return to moving picture Using the FREEZE function for any purpose other than your private viewing may be prohibited under the Copyri...

Page 37: ...adjusting the picture settings from highlight Reset and press The picture qualities you adjusted are automatically saved in the Preference mode Selecting the picture mode until Reset is selected Using the closed caption mode Base closed captions The closed caption mode has two options Captions An on screen display of the dialogue narration and sound effects of TV programs and videos that are close...

Page 38: ... change to another analog channel the closed caption setting will automatically change back to the current Base CC Mode setting You can also use the CC Selector to select digital closed caption services if available When such services are not available the CC Selector presents a default list of services If the selected service is not available the next best service will be used instead To select c...

Page 39: ...e SAP on you will see the current program on the screen but hear the other language instead of the program s normal audio If you have SAP on and the station you are watching is not broadcasting a second audio program the station s normal audio will be output However occasionally there is no sound at all in SAP mode If this happens set the MTS feature to Stereo mode Adjusting the audio quality You ...

Page 40: ... Press the Channel Number buttons to enter a new four digit code enter the code a second time to confirm and press The Locks Active screen appears if the PIN code is already stored Use the Number buttons to enter your four digit code and press If the wrong PIN code is entered the message Incorrect PIN code please try again appears Highlight Retry and press Enter the code again and press When the c...

Page 41: ...digit PIN code and press 4無 Press to highlight Enable Rating Blocking 5無 Press to select On and press 6無 Press to highlight Edit Rating Limits and press The Edit Rating Limits screen appears 7無 Highlight Alt RS and press The Edit Alternate Ratings screen will appear Note The Alt RS button will only be available if an additional rating system is currently available It may take several minutes for t...

Page 42: ...system for movies Ratings Description and Content themes X X rated For adults only NC 17 Not intended for anyone 17 and under R Restricted Under 17 requires accompanying parent or adult PG 13 Parents Strongly Cautioned Some material may be inappropriate for children under 13 PG Parental Guidance Suggested Some material may not be suitable for children G General Audience Appropriate for all ages No...

Page 43: ...if you play video tapes via an ANT CABLE input Off Unlocks all video inputs and channels 3 and 4 4無 Press Using the GameTimer You can use the GameTimer to set a time limit for playing a video game 30 120 minutes When the GameTimer expires the TV enters Input Lock mode and locks out the input source for the video game device To set the GameTimer 1無 From the Locks menu press to display the PIN code ...

Page 44: ...n is disrupted momentarily when adjusting the PC settings This is not a sign of malfunction Mode Description Horizontal Position Moves the picture left right The adjustment range is within 50 from center Vertical Position Moves the picture up down The adjustment range is within 10 from center Clock Phase Helps to reduce noise and sharpen the picture The adjustment range is within 16 from center Sa...

Page 45: ...opyright content Toshiba cannot and does not grant such permission Depending on the file size and amount in your USB storage device it may take some time for loading to view A message will display on screen when loading files from the USB storage device To select the Auto Start function 1無 Press and or to select the Setup menu 2無 Press to select Media Player and then press 3無 Select USB and then p...

Page 46: ... the previous photo 2無 Press to rotate the image 90 clockwise Press to rotate the image 90 counterclockwise Slideshow This view allows you to watch a slideshow of the photos In this mode only files located in the selected directory will be played 1無 To start slideshow press in the Single View mode 2無 Press to view the previous next photo To set Interval Time and Repeat settings 1無 Press to open th...

Page 47: ...ct a music file and press to start playback 4無 Press to move back the photo view mode now the music is playing in the background Contents Description Description Photo Photo list Multi view See page 46 Sorting To sort the folders and files 1無 Press to open the Quick Menu from Multi View mode 2無 Press or to select Sort 3無 Press or to select Title New or Old to set the sorting rule Title File sortin...

Page 48: ...setting may be cleared To display the remaining sleep time Press Note A message will display on screen when there is one minute remaining on the sleep timer To cancel the sleep timer Repeatedly press until it is set to 0 minute Using REGZA LINK This is a new feature that uses CEC technology and allows you to control Toshiba REGZA LINK compatible devices from the TV remote via HDMI connection page ...

Page 49: ...Receiver input source You can also use this function when the audio receiver is connected to the TV s DIGITAL AUDIO OUT terminal not HDMI connection In this case select a digital audio input mode on the Audio Receiver These functions depend on the device connected Other REGZA LINK functions When the Enable REGZA LINK and each item in the REGZA LINK Setup menu are set to On the following functions ...

Page 50: ...status when HDMI input mode Dolby Digital or PCM Video resolution Aspect ratio of incoming video signal 4 3 or 16 9 V Chip rating status Game Timer if set To close the RECALL screen Press again To display TV status information using INFO Press on the remote control The following additional information will display for off air digital channels if applicable Title Duration Detailed description Note ...

Page 51: ...ory set picture modes Sports Standard Movie or PC and then change the static gamma setting the picture mode automatically changes to Preference Chapter 7 Using the TV s advanced features Selecting the color temperature You can change the quality of the picture by selecting from three preset color temperatures Cool Medium and Warm as described below Mode Picture Quality Cool blueish Medium neutral ...

Page 52: ...無 Highlight Noise Reduction and press 3無 Press or to highlight the MPEG Noise Reduction field and then press or to select either Off Low Middle or High 4無 To save the new settings highlight Done and press To revert to the factory defaults highlight Reset and press Using 1080p PC Mode You can use this function to output clear word image on the TV screen when a PC is connected to the HDMI terminal N...

Page 53: ...ntation over regular stereo speakers To adjust the QSound settings 1無 Put the TV in STEREO mode Selecting stereo SAP broadcasts on page 39 2無 Press and open the Sound menu 3無 Highlight Advanced Audio Settings and press 4無 Press or to highlight the QSound feature and then press or to turn the QSound effect On or Off 5無 To save the new settings highlight Done and press To revert to the factory defau...

Page 54: ...rence in the TV picture page 52 Video Input Selection problems If the Input Selection window does not appear when you press on the remote control or TV press a second time which will change to the next video input source and display the Input Selection window Cannot view external signals or channel 3 or 4 If you cannot view signals from external devices connected to VIDEO 1 VIDEO 2 ColorStream HDM...

Page 55: ...roblems If the program or video you selected is not closed captioned no captions will display page 37 If text is not available a black rectangle may appear If this happens turn off the closed caption feature page 37 A closed caption signal may not display correctly in the following situations a when a videotape has been dubbed b when the signal reception is weak or c when the signal reception is n...

Page 56: ...4 15 2 cm Video Audio Terminals VIDEO AUDIO INPUT VIDEO 1 V p p 75 ohm negative sync AUDIO 150 mV rms 30 modulation equivalent 22 k ohm or greater ColorStream component video HD INPUT VIDEO Y 1V p p 75 ohm PR 0 7 V p p 75 ohm PB 0 7 V p p 75 ohm Suggested formats 1080i 720p 480p 480i AUDIO 150 mV rms 22 k ohm or greater HDMI INPUT HDMI compliant type A connector HDCP compliant Suggested formats Se...

Page 57: ...68 60 015Hz 47 712kHz 85 500MHz SXGA 1280 1024 60 020Hz 63 981kHz 108 000MHz HDMI signal formats Format Resolution V Frequency H Frequency Pixel Clock Frequency VGA 640 480 59 940Hz 31 469kHz 25 175MHz SVGA 800 600 60 317Hz 37 879kHz 40 000MHz XGA 1024 768 60 004Hz 48 363kHz 65 000MHz WXGA 1280 768 59 870Hz 47 776kHz 79 500MHz 1360 768 60 015Hz 47 712kHz 85 500MHz SXGA 1280 1024 60 020Hz 63 981kHz...

Page 58: ...ipt or other proof of the original purchase date is required for Warranty service 2 All warranty servicing of this LCD Television must be performed by an Authorized TACP Service Station 3 The warranties from TACP are effective only if this LCD Television is purchased and operated in the U S A or Puerto Rico 4 Removal and reinstallation of product that is mounted in such a manner as to impede norma...

Page 59: ...Television Complete and mail the enclosed product registration card or register your LCD Television online at http support toshiba ca warranty Registration of your LCD Television will enable TCL to contact you in the unlikely event of a product safety notice Failure to complete the product registration does not diminish your warranty rights THE ABOVE WARRANTIES ARE SUBJECT TO THE FOLLOWING CONDITI...

Page 60: ...istributor dealer or company is authorized to change modify or extend the terms of these warranties in any manner whatsoever Arbitration and Dispute Resolution To the extent not precluded by law any claim dispute controversy or disagreement whether for breach of warranty breach of contract tort including negligence under a statute or under any other law or form of action against any of the Related...

Page 61: ...between this limited warranty on the one hand and any statement in the packaging of the Television or in any other document enclosed with or used in the context of the promotion or sale of the Television on the other hand the provisions of this limited warranty shall prevail How to Obtain Warranty Services If after following all of the operating instructions in this manual checked the Troubleshoot...

Page 62: ...RIO L3R 8H2 CANADA TEL 905 470 5400 MONTREAL 18050 TRANS CANADA KIRKLAND QUEBEC H9J 4A1 CANADA TEL 514 390 7766 VANCOUVER 6932 GREENWOOD STREET BURNABY B C V5A 1X8 CANADA TEL 604 303 2500 CableClear ColorStream GameTimer and TheaterWide are registered trademarks of Toshiba America Consumer Products L L C Channel Browser DynaLight and SurfLock are trademarks of Toshiba America Consumer Products L L...

Reviews: