background image

8

Getting started

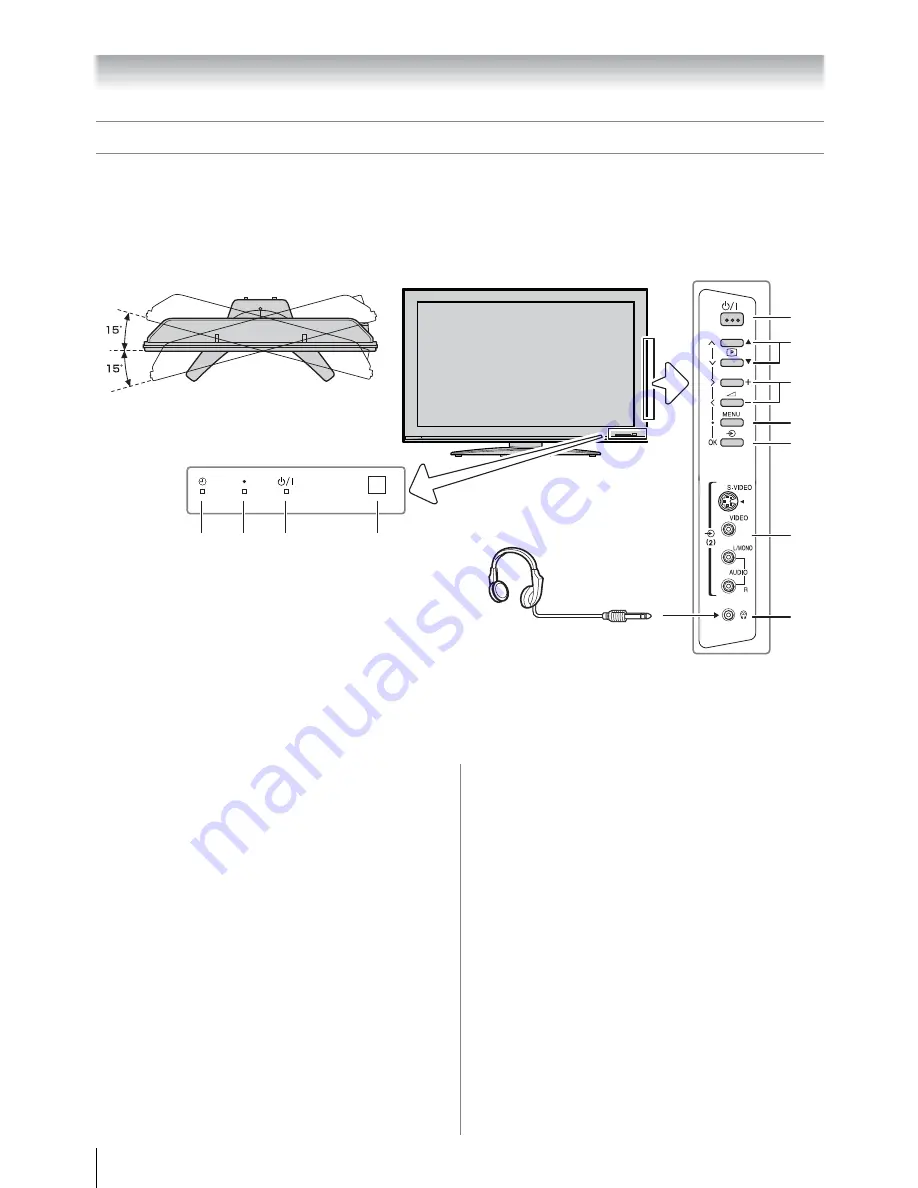
TV front and side panel controls

• You can operate your TV using the buttons on the side panel or the remote control. The back and side of the panel provide the 

terminal connections to connect other equipment to your TV (

-

 “Connecting your TV” pages 33 - 37).

• For the use of each control, see the pages in brackets.

1 3  4 

11 

10 


TV top view 

TV front view 

Right side view 

You can swivel the TV screen.(Except 52X3000A) 
Swivel angle: 15 degrees to left and right. 


Headphones 
(Not supplied) 

1

4


(Alarm Timer LED)

 — Timer indicator (

-

 page 25).

2


(DTV timer LED)

 — Digital TV timer Recording 

Indicator (

-

 page 24).

3

!


(Power LED)

 — Power indicator (

-

 page 11).

4

(Remote sensor)

 — Point the remote control toward 

this remote sensor (

-

 page 7).

5

!


(Power on/Standby)

 — Press to turn the TV on/

standby (

-

page 11).

6

pBb


(Program position)

 — When no menu is on-

screen, these buttons select the program position. 
(

-

 page 15).

Uu


(MENU up/down)

 — When a Analog TV menu is 

on-screen, these buttons function as up/down menu 
navigation buttons (

-

 page 12).

7

2

 – + 

(Volume)

 — When no menu is on-screen, these 

buttons adjust the volume level (

-

 page 10).

I


(MENU left/right)

 — When a Analog TV menu is on-

screen, these buttons function as left/right menu 
navigation buttons or adjust settings (

-

 page 12).

8

MENU

 — Press to access the TV SETUP menu  

(

-

 page 12).

9

o


(Input source selection)

 — When no menu is on-

screen, this button selects the input source (

-

 page 25).

OK

 — When a Analog TV menu is on-screen, this button 

functions as the next menu navigation button (

-

 page 

12, 25).

10

o


(2) (Video 2 input terminals)

 — Optional S-video 

or standard video and standard audio inputs (

-

 page 35).

11

D


(Headphone jack)

 — For use with headphones.

Note:

When the Headphone jack is being used, the sound from 
all speakers will be muted, and normal sound will be 
output to the headphones only.

Summary of Contents for 37X3000A

Page 1: ...s in the spaces provided below Refer to them whenever you call upon your TOSHIBA dealer regarding this product Model number Serial number 37X3000A 42X3000A 46X3000A 52X3000A VX1A000575A0 DVB registration identification reference number 4730 37X3000A 4731 42X3000A 4941 46X3000A 4732 52X3000A Trademark of the DVB Digital Video Broadcasting Project ...

Page 2: ...ecting the stereo programs analog only 22 Selecting the bilingual programs analog only 22 Adjusting the sound quality 22 Using the SRS WOW surround sound 23 Using the stable sound 23 Using the bass boost 23 Activating blue screen 23 Adjusting the brightness of side panel 23 The timers 24 Setting the Time zone digital only 24 Program Timer digital only 24 Setting the Alarm digital only 25 Setting t...

Page 3: ...ff which may cause injury or damage 4 Never block or cover the slots and openings in the cabinet Never place the TV so that it is facing upward or on its side Never place the TV in a closet bookcase or other similar area where the ventilation is poor Never drape a newspaper tablecloth or curtain on the TV When installing the TV against a wall always keep the TV at least 10 cm away from the wall Ne...

Page 4: ...down or drops it may cause injury or electric shock Use 1 Never place hot objects or open flame sources such as lighted candles or nightlights on or close to the TV High temperatures can melt plastic and lead to fires 2 The apparatus shall not be exposed to dripping or splashing and that no objects filled with liquids such as vases shall be placed on the apparatus When liquids are spilled or small...

Page 5: ... suffer an electric shock Service 1 Never repair modify or disassemble the TV by yourself It may cause a fire or an electric shock Consult a service technician for inspection and repairs 2 When a malfunction occurs or if smoke or an unusual odor comes from the TV turn off the TV and remove the power plug from the outlet immediately Make sure that the smoke or smell has stopped then contact a servi...

Page 6: ...ot light up The LCD display panel is manufactured using an extremely high level of precision technology however sometimes some pixels of the screen may be missing picture elements or have luminous spots This is not a sign of a malfunction 4 About Interference The LCD display may cause interference in image sound etc of other electronic equipment that receives electromagnetic waves e g AM radios an...

Page 7: ...s Dispose of batteries in a designated disposal area Never throw batteries into a fire Attention should be drawn to the environmental aspects of battery disposal Never mix battery types or combine used batteries with new ones Notes If the remote control does not operate correctly or if the operating range becomes reduced replace both batteries with new ones If the batteries are dead or if you will...

Page 8: ...Bb Program position When no menu is on screen these buttons select the program position page 15 Uu MENU up down When a Analog TV menu is on screen these buttons function as up down menu navigation buttons page 12 7 2 Volume When no menu is on screen these buttons adjust the volume level page 10 I i MENU left right When a Analog TV menu is on screen these buttons function as left right menu navigat...

Page 9: ...14 o PC HDMI1 AUDIO input terminals PC audio input terminals are shared with HDMI 1 analog audio input terminals and their use can be configured in the SET UP menu page 33 36 15 A Antenna input terminal Analog antenna signal input page 7 16 o RGB PC input terminal For use when connecting a personal computer PC page 37 17 o HDMI1 and o HDMI2 input terminals High Definition Multimedia Interface inpu...

Page 10: ...t on Superimpose Teletext off pages 28 To display on screen information page 16 Initial index function for Teletext analog only page 28 Picture mode selection page 19 Picture size selection page 18 Digital subtitle on off page 31 Stereo bilingual selection page 22 To display the Audio Track menu digital only To access sub pages when in teletext analog only page 26 Picture still page 19 When in TV ...

Page 11: ...ower cord to prevent the TV from turning on in your absence Tuning the TV for the first time digital only Before switching on the TV put your decoder and media recorder to Standby if they are connected and ensure the antenna is connected To setup the TV use the buttons on the remote control as detailed on page 10 1 Press the Welcome screen will appear This screen will appear the first time that th...

Page 12: ...nction Back Watch TV Select Function Back Watch TV Select Function PROFILE Audio Preference Time Format Time Zone Transparency DIGITAL SETTINGS I Plate Display Time 1 sec GMT 08 30 24 hr 24 hr 70 SYSTEM Password Restore Factory Setting DIGITAL SETTINGS PROGRAM Channel List Favorite Mode Parental Rate EPG Timer Timer Alarm Alarm DIGITAL SETTINGS No Block Back Watch TV Select Function SCAN Auto Scan...

Page 13: ...dically to ensure that all new services are added All stored programs and settings including Timer entries favorites and locked programs will be lost 1 Press M and or to select the SCAN menu 2 Use to select Auto Scan 3 Press Q If Password Status page 29 is Enabled Password menu will be displayed Enter your password using the number buttons or press 0000 which is the default password 4 The Select L...

Page 14: ...ng signal may cause erroneous readings If you use an antenna booster and find that you still get a low signal level your booster gain may be set too high In this case adjust the gain accordingly You may also see the No Signal on the screen when the signal level is low Quality refers to the quality of the received digital signal A high value of quality means that there are few errors in the signal ...

Page 15: ...PU or P u The 8 mark will appear beside a program position number when you use the Number button on the remote control E Channel search operation Press to search up the band or to search down the band Press or repeatedly until your desired channel is displayed When a station satellite is found it will be displayed NEVER PRESS ANY OTHER BUTTONS WHILE THE SET IS TUNING F Auto Fine Tuning Press or to...

Page 16: ...l audio status Note The program position selection change between different format channels takes several seconds Switching between two program positions You can switch two program positions without entering actual position number each time 1 Select the first program position you want to view 2 Select the second program position with the Number buttons 0 9 3 Press The previous channel will be disp...

Page 17: ...shorter duration than the value set in the Display Time setting Setting the Time Format From the PROFILE menu press or to select Time Format then press or to select the time to be displayed 24hr or AM PM format Sorting program position analog only The TV is capable of receiving a number of different channels depending upon where you live Program sorting is an easy way of storing each channel on th...

Page 18: ... will eliminate or reduce the black bars on all the sides of the screen by zooming in and selecting the image without distortion 4 3 Use this setting to view a true 4 3 broadcast Super Live 1 When receiving 4 3 format signal this setting will enlarge the image to fit the screen by stretching the image vertically and horizontally holding the better proportions at the center of the image Cinema 1 Wh...

Page 19: ...n the pictures are running on the input source Audio continues to be output as well To return to a moving picture press R again Notes If you use this function except for the purpose of your private viewing and listening it may infringe the copyright protected by the copyright laws In the PC input mode page 25 this function is not available Adjusting the picture position analog only Adjustment to t...

Page 20: ...menu press or to select DNR on the 2nd page 2 Press or to select Auto Off Low Middle or High Selecting the color temperature You can change the tone of the picture by selecting from three preset color temperatures Cool Normal or Warm 1 From the Picture settings menu press or to select Color Temperature on the 2nd page 2 Press or to select mode you prefer Cool Lends a blue hue to the picture Normal...

Page 21: ...480i and 576i signals 1 Press M then press or to display the PICTURE menu 2 Press or to select Cinema mode then press or to select On or Off Note When a DVD movie with subtitle is playing back this mode may not work correctly Using the auto format When the TV receives a true HDMI signal picture and the auto format is On it will automatically be displayed in HDMI signal format irrespective of the T...

Page 22: ...setting is in Mono mode the Dual menu is not selectable The Dual menu setting status remains even if the TV is turned off Selecting the stereo programs analog only 1 When a stereo program is received d Stereo appears 2 Press S to select the stereo monaural mode d Stereo and e Mono appear cyclically on the screen Selecting the bilingual programs analog only 1 When a bilingual program is received j ...

Page 23: ...able sound on the 2nd page 3 Press or to select On or Off Note The Stable sound effect is active only when the sound outputs from the speaker Using the bass boost 1 From the SOUND menu press or to select Bass boost on the 2nd page 2 Press or to select On 3 Press to select Bass boost level 4 Press or to adjust the Bass boost level 5 To turn off the Bass boost press or to display Bass boost then pre...

Page 24: ...l appear indicating the change of current channel The menus and other channels will not be available during the timed program unless the program timer is cancelled When the program timer expires the TV switches to the channel from which it is switched from If timer action occurs when the TV is in standby the TV will turn on but no picture is seen and no sound is heard Selected digital channel will...

Page 25: ...s set to activate on a TV mode other than DTV the Alarm will perform normally If you do not press any button on the side panel of the TV or the remote control within 2 hours after Alarm is activated the TV will enter standby automatically Setting the sleep timer The Sleep timer is especially useful if you want the TV to turn itself off after a selected period of time 1 Press M then press or to dis...

Page 26: ...P menu and FUNCTION menu are not selectable Teletext general information button Pressing once will bring up the teletext screen Press again to superimpose the teletext over a normal broadcast picture Press again to return to normal TV mode You need to return to normal viewing if you wish to change channels When you first press to access the text service the first page you see will be the initial p...

Page 27: ...her information on your particular text system s see the broadcast teletext index page or consult your local Toshiba dealer Using LIST mode 1 Press to access teletext The four choices at the bottom of the screen are now number 100 200 300 and 400 which have been programmed into the TV s memory 2 To view these pages use the colored prompt buttons e g press the Green button to view page 200 3 If you...

Page 28: ...and then D is pressed a normal picture will be displayed The TV will indicate when the page is present by displaying the title bar of the text page at the top of the screen Press to view the page Note It will not be possible to change program position while in Teletext mode you will have to cancel the teletext first by pressing to return to a normal TV picture To select the time display If you pre...

Page 29: ...be locked to prevent viewing of unsuitable films and programs These can only accessed with a password Default password is 0000 Setting the Password 1 Press M then press or to select the SYSTEM menu 2 Press or to select Password then press Q 3 Enter your password using the number buttons or press 0000 which is the default password 4 Press or to select Set Password then press Q 5 Use the Number butt...

Page 30: ... entered before they can be accessed 8 Press the Red button to mark the selected channel for skip Skipped channels will not appear in the Navigation List Favorite EPG Timer and Alarm Note Broadcasters may from time to time update the service information of their channels If there is any change in the channel information or broadcasting parameters the favorite lock and skip status of the channels m...

Page 31: ...subtitle whenever such information is available in the channel you are viewing You may use I Plate to check if subtitle is currently available In Australia you may also view Subtitle by directly entering page 801 in Teletext However by doing so the TV remains in Teletext mode and you cannot change the channels because PU and Pu will change Teletext pages rather than channels To view subtitle it is...

Page 32: ...to this TV When you select a Dolby Digital or MPEG audio track in Audio Track the sound is converted to the PCM 2ch format and output MPEG Audio Level 1 From Audio Preference press or to select MPEG Audio Level 2 Press or to adjust the MPEG audio level from 10dB to 0dB This setting will not be applicable to Dolby Digital audio Note Manufactured under license from Dolby Laboratories Dolby and the d...

Page 33: ...minal to the AC 3 RF input of a Dolby Digital Receiver with a built in Dolby Digital decoder Connect the DIGITAL AUDIO output terminal to the OPTICAL or COAXIAL input of a Receiver or Processor Refer to the owner s manual of the connected equipment as well When you connect the TV to other equipment be sure to turn off the power and unplug all of the equipment from the wall outlet before making any...

Page 34: ... connecting the TV to an amplifier equipped with a digital audio optical or coaxial input and speaker system right and left front speakers When using this setup select PCM in Digital Output menu TO Digital Audio output terminal To Optical or Coaxial type digital audio input Optical or Coaxial digital cable not supplied Amplifier equipped with Dolby Digital decoder TV back view Front speaker Surroun...

Page 35: ... is only operable with L PCM on 32 44 1 48 kHz and 16 20 24 bits If there is no sound when using HDMI use the analog audio cables to connect the TV and the HDMI device and select Analog in HDMI1 audio of the AV connection menu page 36 Connecting an HDMI or a DVI device The HDMI input on your TV receives digital audio and uncompressed digital video from an HDMI device or uncompressed digital video ...

Page 36: ...t PC or HDMI1 Setting the HDMI1 audio mode You can select sound of an HDMI or DVI device connected to the HDMI1 input terminals page 35 from three modes Auto Digital or Analog Note This function is available only when the PC HDMI1 audio mode is set to HDMI1 1 From the AV connection menu press or to select HDMI1 audio 2 Press or to select Auto Digital or Analog When the sound is not audible If no s...

Page 37: ...r these signal formats are converted to match the number of pixels of the LCD panel Therefore the TV may not display small text properly Notes Some PC models cannot be connected to this TV There is no need to use an adapter for computers with DOS V compatible mini D sub 15 pin terminal A bar may appear in the upper lower right or left side of the screen or parts of the picture may be obscured depe...

Page 38: ... 1 Press M then press or to display the SET UP menu 2 Press or to select PC Setting 3 Press Q to display the PC Setting menu 4 Press or to select an option you want to adjust Press or to adjust the settings as required Adjusting the clock phase of the picture If the clock phase which synchronize the PC signal and LCD display is not optimized the picture will blur This function enables you to adjus...

Page 39: ...just buy and start to use this TV a flickering may be caused in the screen In this case switch off the TV then switch on it again to cure the condition The cold cathode fluorescent lamp used for the back light on this TV has longevity When the brightness of the screen comes down or the flickers of the screen are caused or some parts of the screen do not light up it may reach the end of its life Co...

Page 40: ...s block until PIN entered Block All Transmitted rating hex code 0 x 00 0 x 01 0 x 02 0 x 03 0 x 04 0 x 05 0 x 06 0 x 07 0 x 08 0 x 09 0 x 0A 0 x 0B 0 x 0C 0 x 0D 0 x 0E 0 x 0F Australian parental guide code Not Classified P Pre school C Children s G General PG Parental Guidance Recommended M Mature Audience 15 R Restricted 18 MA Mature Adult Audience 15 AV Adult Audience Strong violence 15 On Scree...

Page 41: ...Hz Bandwidth 6 7 8 MHz Demodulator COFDM FFT Mode 2K 8K Constellation QPSK 16QAM 64 QAM Guard Interval 1 4 1 8 1 16 1 32 Inner Coding Rate 1 2 2 3 3 4 5 6 7 8 COMPONENT VIDEO INPUT terminals the signal format 480i 480p 576i 576p 720p 50 60 Hz 1080i 50 60 Hz These signal formats are converted to match the number of pixels of the LCD panel Color system analog TV system PAL SECAM NTSC 3 58 4 43 Count...

Page 42: ...1 Batteries 2 Clip 1 This is used to fix the TV to a wall pillar etc page 4 Design and specifications are subject to change without notice Never service or remodel the TV by yourself It may expose you to a fire hazard or dangerous voltages o 1 Input Component video Y PB CB PR CR Phono jacks A V o 2 Input 4 pin S video Phono jacks A V O AV OUTPUT Output Phono jacks A V o RGB PC Input Mini D sub 15 ...

Page 43: ...43 Note ...

Page 44: ......

Reviews: