background image

3560/70 DISPLAY

5 - 6

Nov. 1997 © TOSHIBA

5.3

Relationship between Copier Conditions and Operator’s Actions

_

: Machine operates or indicates in accordance with the operator

’s

 action.

– : Operation is ignored.

(1)

By pressing the ENERGY

 SA

VER key or the PRINT

 key

, the energy-saving mode will be cancelled.

(2)

During copying, avoid changing exposure as far as possible.

(3)

The function of the CLEAR/ST

OP

 key changes in the following manner according to the machine status.

During copying

.........

Interruption of the copying (Stop function

.....

The copy quantity indicator will not

change.)

When not copying

....

When pressed once, the copy quantity indicator returns to “1”.

(4)

During copying, avoid sheet bypass feeding because of possible paper jamming.

Note:

The interrupt mode will be automatically cancelled when the machine is not used for 45 seconds.

REPRO-

DUCTION

RA

TIO

selection

key

Digital

keys

PRINT

key

Condition

Operation

CLEAR/

ST

OP

key

COPY

SIZE

key

EXPOSURE

key

ORIGINAL

SIZE

key

INTER-

RUPT

key

ENERGY

SA

VER

key

Sheet

bypass

W

arming up

_________

Ready

__________

Reproduction-ratio

_________

changing

Copying

_

––

_

––

_

_

Add paper

_________

Add toner

_________

Key copy counter not

_________

inserted (optional)

Bypass misfeed

––––––––––

Replace toner bag

________

Clear paper

––––––––––

Service call

––––––––––

Interrupt mode

_

––

_____

_

Energy-saving mode

_

–––––––

_

Summary of Contents for 3560

Page 1: ...the Contents and display bookmarks created for the document Click a bookmark s name to go to the Page marked by that bookmark Click the Thumbnails and Page button to open the overview area and display thumbnail images of each document page Click a thumbnail to go to the page marked by that thumbnail Copyright TOSHIBA CORPORATION 1995 ALL RIGHTS RESERVED ...

Page 2: ...Also provide proper ventilation as the copier emits a slight amount of ozone To insure adequate working space for the copying operation keep a minimum clearance of 80 cm 32 on the left 80 cm 32 on the right and 10 cm 4 in the rear After having installed the copier be sure to push the carrying handles into the copier and fasten them with screws 3 Service of Machines Basically be sure to turn the ma...

Page 3: ...s it is recommended to follow the relevant local regulations or rules 7 When parts are disassembled reassembly is basically the reverse of disassembly unless otherwise noted in this manual or other related documents Be careful not to reassemble small parts such as screws washers pins E rings toothed washers in the wrong places 8 Basically the machine should not be operated with any parts removed o...

Page 4: ...it lb Special _ _ OHP film paper etc Copy process Indirect electrophotographic process dry Type Desk top console when the pedestal is used Exposure Type Slit exposure with fixed table Acceptable originals Kind Sheets books and 3 dimensional objects When the document feeder is used Sheet originals only 60 g m2 90 g m2 16 lb 24 lb Maximum size A3 Ledger 1 SPECIFICATIONS ACCESSORIES OPTIONS SUPPLIES ...

Page 5: ...duction and enlargement in 1 steps Manual feeding represents the value when the size is set CPM Cassette manual LCF Paper size 3560 3570 3560 3570 A4 B5 A5 R 35 35 35 35 LT ST R A4 R B5 R 26 26 LT R B4 FOLIO 22 22 LG Computer A3 19 19 LD Reduction 15 15 15 15 Enlargement Mode CPM Original Copy Number of copies 3560 70 1 1 1 set 30 3 set 33 5 set 34 1 2 1 set 10 3 set 19 5 set 24 2 2 1 set 8 3 set ...

Page 6: ...tic density detection and replenishment Toner cartridge replacement Exposure Automatic control and manually selectable 9 steps Weight Copier 1 73 or 2 92 kg with 2 cassettes and the platen cover 1 3560 2 3570 ADU 10 kg Power source 115 V 60 Hz 12A For the U S A and Canada 220 240 V 50 60 Hz 8A For Europe Power consumption 1 5 kW 115 V 1 7 kW 220 V 240 V Counter 7 digit total counter Machine size ...

Page 7: ...002A Automatic document feeder ADF MR 3006A RADF MR 2008 ADF Paper feed pedestal PFP KD 1003 1 cassette KD 2009 2 cassettes Paper feed unit MY 1006 Large capacity feeder LCF MP 1501LT MP 1501A4 MP 4001LT MP 4001A4 Sorter MG 1003B 10 bins MG 2012 20 bins MG 1004A 10 bins staple MG 2009A 20 bins MG 2010 20 bins staple Key copy counter MU 8 MU 10 6 digit 1 4 Supplies Drum OD 3560 Developer ZD 3560 To...

Page 8: ...ts Location Diagram 2 1 1 Sectional view A Front view This diagram includes an installed ADU 1 EL 2 ENEM 3 4 EO 5 FT 6 EQ EP ER 7 8 AQ BT ES ES 9 AT FK AK DO CS DT CR FL FM DQ DN CP GK GT AM FR FR AO AP AN FQ AR BK AL AS BM BL BN BO BP BQ BR BS CT CK CL CN CO CM CQ DM FN FO DK FP DL DS DP DR FS ET EK ...

Page 9: ...aper stop switch 1 S7 FM Paper stop switch 2 S16 FN Paper empty switch 2 S14 FO Cassette tray FP Cassette size switch 2 S15 FQ Exit ADU selection gate FR Exit roller FS ADU option GT Exit fan M7 GK Bottom fan M8 No Name 1 Carriage 1 2 Mirror 1 3 Reflector 4 Light distribution adjustment plates 5 Exposure lamp 6 Carriage 2 7 Mirror 2 8 Mirror 3 9 Mirror unit AT Mirror 4 AK Mirror 5 AL Mirror 6 AM S...

Page 10: ...Nov 1997 TOSHIBA 2 3 3560 70 GENERAL B Rear side view GP FR ES EN HQ CT HN HM GS IT IT IM IN HS HL GR HK HT HR IT IK HP HO IO IP GQ IQ IL IN ...

Page 11: ...nit ALGN roller paper feeding drive HM Belt for fuser drive HN Main motor M1 HO Lens motor M3 HP Mirror motor M4 HQ Thermistor 2 THMS2 HR Dev unit drive gear HS Aligning roller IT Paper feed belt IK Manual feed clutch CLT4 IL Transport roller clutch CLT1 IM Transport roller drive belt IN Cassette feed clutch CLT3 5 IO Optical fan M6 12 IP Document motor M11 IQ Optical fan M15 ...

Page 12: ... 5 3560 70 GENERAL BN AL AQ AT AS BO BR BP AK 7 8 2 3 BT 1 4 BQ 6 BL AO BM AN CQ AM 9 CR BS 5 CL CN CT CK CO DT CP CS AR CM BK AP DK 2 1 2 Electrical parts layout A DC electrical parts except motors Front side Rear side ...

Page 13: ...Heat roller thermistor 2 THMS2 HTR CR Drum thermistor DRM THMS CS Tray up switch T UP1 SW S28 DT Tray up switch T UP2 SW S29 DK Separation claw solenoid SCRP SOL SOL1 No Name 1 Control panel key PC board PWA KEY2 2 Control panel key PC board PWA KEY1 3 Liquid crystal module LCD 4 Total counter T CTR 5 Logic PC board PWA LGC 6 Auto paper sensor 2 APS R 7 Auto paper sensor 3 APS C 8 Auto paper senso...

Page 14: ...N MOT M2 DO Lens motor LNS MOT M3 DP Mirror motor MRR MOT M4 DQ Toner motor TNR MOT M9 DR Document motor DCM MOT M11 DS Tray up motor 1 T UP1 MOT M13 No Name ET Tray up motor 2 T UP2 MOT M14 EK Optical fan F OPT FAN F M12 EL Optical fan R OPT1 FAN R M6 EM Exit fan EXIT FAN M7 EN Bottom fan BTM FAN M8 EO Optical fan R OPT2 FAN R M15 Option Front side Rear side ...

Page 15: ...HTR U1 Option FO Exposure lamp EXPO LAMP FP Thermofuse FU EXPO FQ Fuse PC board PWA FUS Option FR Damp heater U2 D HTR U2 Option No Name EP SW power supply PS ACC EQ Door switch DOOR SW S2 ER Main switch MAIN SW S1 ES Lamp regulator PC board PWA LRG FT Heater lamp HTR LAMP FK Damp heater L D HTR L Option FL Thermostat K THERMO Front side Rear side ...

Page 16: ...1 Drives the upper cassette tray to Brush motor 12 36 lift up down M14 T UP2 MOT Tray up motor 2 Drives the lower cassette tray to Brush motor 12 36 lift up down M15 OPT2 FAN R Optics fan R Cools the optical system IC motor Z80 5 8 2 2 Symbol and Function of Electrical Parts 1 Motors Symbol Code name Remarks Function Parts list Page Item CLT1 RGT1 CLT Transmits transport roller drive 13 17 Transpo...

Page 17: ...r Photointerruptor 29 8 S10 HOME SW Home switch Detects home position of the Photointerruptor 11 8 optical system S11 LNS SW Lens switch Detects home position of the lens Photointerruptor 11 8 unit S12 MRR SW Mirror switch Detects home position of the mirror Photointerruptor 11 8 unit S13 T FUL SW Detects when the used toner bag Push switch 10 25 Toner full switch is full S14 EMP2 SW Detects lack ...

Page 18: ...osure PC board FUS PWA FUS Fuse PC board Fuse for the damp heater circuit 7 31 5 Heaters and lamps 6 PC boards Symbol Code name Function Remarks Symbol Code name Function Remarks Parts list Page Item EXP EXPO LAMP Exposes the original Halogen lamp 19 13 Exposure lamp 300W HTR HTR LAMP Heater lamp Fixing Halogen lamp 26 6 900W 100V series 1030W 200V series ERS ERS LAMP Discharges the drum Fuse type...

Page 19: ...aise transformer transfer efficiency ACC PS ACC Power supply for whole copier 8 7 Power supply for all power Symbol Code name Function Remarks 8 Solenoid Symbol Code name Function Remarks 9 Others Parts list Page Item ATS SNR ATC Reads toner density with a magnetic 24 33 Auto toner sensor sensor THMS1 THMS1 HTR Detects temperature of the heat roller 27 19 Heat roller thermistor 1 THMS2 THMS2 HTR D...

Page 20: ...Nov 1997 TOSHIBA 2 13 3560 70 GENERAL 2 3 Wire Harness Location Diagram A Location diagram for upper unit ...

Page 21: ...3560 70 GENERAL 2 14 Nov 1997 TOSHIBA B Location diagram for lower unit ...

Page 22: ...over the inner cover the upper exit cover and the left top cover have slightly been changed 2 The control panel has slightly been changed to accommodate a graphic touch panel COSMOS Skip OK Cancel Texts from 2 15 in the 3560 70 Service Manual are the same as texts from 2 15 to 2 19 in the 2060 2860 70 Service Manual Do you refer to the 2060 2860 70 Service Manual ...

Page 23: ...s for the 2060 2860 except for the transfer value Transfer value 2060 2860 3560 70 DC 5 25KV DC 5 10KV COSMOS Skip OK Cancel Texts from 3 1 in the 3560 70 Service Manual are the same as texts from 3 1 to 3 3 in the 2060 2860 70 Service Manual Do you refer to the 2060 2860 70 Service Manual ...

Page 24: ...he above item 4 is the same one as for the 2060 2860 except for page 4 3 COSMOS Skip OK Cancel Texts from 4 1 in the 3560 70 Service Manual are the same as texts from 4 1 to 4 13 in the 2060 2860 70 Service Manual Do you refer to the 2060 2860 70 Service Manual ...

Page 25: ...ed SCN MAIN MOT EXIT SW EXPO HVT M OFF OFF ON ON ON ON ON ON ON ON ON FWD ON OFF LOW LOW High High High 0 1 1 37 0 71 0 44 2 11 2 13 2 40 3 72 3 80 4 52 3 93 2 82 1 02 2 12 2 71 3 81 4 10 5 87 7 27 7 30 3 68 2 53 2 41 1 99 0 84 0 2 0 1 0 72 5 62 2 03 1 47 2 46 2 10 2 35 2 86 2 86 4 05 3 79 3 06 4 16 3 16 3 98 2 89 2 29 1 20 OFF 0 1 RGT BWD FWD CW BWD BWD ...

Page 26: ... recommended a graphic symbol lights or flashes and the message indicating that condition is displayed 5 1 Detailed Drawing of the Control Panel and the Display Panel For the U S A and Canada LD ORIGINAL ZOOM COPYSIZE LG LT ST OTHER TIMER ENERGYSAVER IMAGEMODE LIGHT AUTO DARK FUNCTION CLEAR CLEAR STOP PRINT AMS APS INTERRUPT 200 100 50 FC HELP 1 2 3 4 5 6 7 8 9 0 C Details of the display panel For...

Page 27: ...dicated operator s instructions for The set number is cleared to 1 by copying conditions are awaited pressing the CLEAR STOP key Returns to the initial condition Manual copying is possible if no key input is given for 45 seconds 3 COPYING Now copying After completion of copying the copy Indicated by pressing the quantity indicator returns to the PRINT key initially set number Copy quantity indicat...

Page 28: ...is PRESS INFO the toner in the toner cartridge closed runs out When this message is displayed it is not possible to copy 9 INSERT Key copy counter withdrawn Released and returned to normal Indicated when the key copy conditions by inserting the key KEY COPY COUNTER counter is withdrawn when the copy counter machine is READY or during copying C below When it is removed after pressing the PRINT key ...

Page 29: ... Misfeed from LCF PFP Indicated when paper fed from a cassette does not arrive at the paper stop switch within a set time C and F below 13 MISFEED Original jammed Open the ADF feed cover and Indicated when an original is remove the jammed original IN DOC FEEDER jammed in the optional document feeder D below 14 MISFEED IN SORTER Paper jammed in the sorter Remove the paper jammed in the Indicates wh...

Page 30: ...ism Turn off the machine remove the motors switches or sensors are cause of the fault and turn the CALL abnormal machine back on 17 TIME FOR PERIODIC Indication of PM cycle Maintenance and inspection by a Indicated when it is time for qualified service technician MAINTENANCE periodic maintenance and inspection Capable of copying ...

Page 31: ...en pressed once the copy quantity indicator returns to 1 4 During copying avoid sheet bypass feeding because of possible paper jamming Note The interrupt mode will be automatically cancelled when the machine is not used for 45 seconds REPRO DUCTION RATIO selection key Digital keys PRINT key Condition Operation CLEAR STOP key COPY SIZE key EXPOSURE key ORIGINAL SIZE key INTER RUPT key ENERGY SAVER ...

Page 32: ...ule is an STN black and white mode transmissive type LCD with a 320 240 dot display capacity It includes a driver LSI frame print board and lateral CFL backlighting STN Super Twisted Nematic 2 Block diagram CP D0 D1 D2 D3 FRAME LOAD D OFF VDD VSS Vo VEE power supply IC3 IC4 120 120 SW LCD PANEL 320x240 DOTS IC1 160 IC2 160 ...

Page 33: ...haracter codes Stored in the PROM on the PNL board Each character on the liquid crystal is made up of 16 16 dots or 16 8 dots The whole panel consists of 320 240 dots Graphic data is written by the main CPU to the liquid crystal controller at the RAM address corre sponding to the position at which it is to be displayed The LCD controller then sends the data to the LCD AD15 AD0 UD3 UD0 D3 D0 D7 D0 ...

Page 34: ...ts up for displaying automatic paper sensing When DSPON0 signal becomes L level transistor Q3 is turned ON Further when IC1 pin16 D8 becomes L level current flows from 5VD to LP6 APS through the transistor In this way LP6 APS lights up FRAME LOAD LOAD FRAME CP D0 D3 240 1 2 240 1 2 240 1 2 1 tF 1 tF CPx 320 4 pulses 5VD R60 R61 Q3 R APS LP6 R17 DSPON0 L L 16 D8 IC1 ...

Page 35: ... 23 18 13 8 LTL16KG LTL16KG LTL16KG LTL16KG LTL16KG LTL16KG LTL16KG LTL16KG LTL16KG LTL16KG LTL16KG LTL16KG LTL16KG LP1 LP2 LP3 LP4 LP5 LP6 LP7 LP8 LP9 LP10 LP11 LP12 LP13 P 3 P 2 P 1 P 0 P USER APS 0 3 0 2 0 1 0 0 O USER AMS FC IC1 7932M SGD GND VDD R211 R181 R201 R191 21K 21K 21K 21K R131 R101 R121 R111 LEDAT LELTH0 LERST LECLK DSPON0 3B4 3B4 3B4 3B4 3B4 21K 21K 21K 21K 1 2 1 2 1 2 1 2 1 2 C5 C3...

Page 36: ...ed to output terminals of D1 D16 in parallel R201 R211 R221 R191 R181 R171 R161 R151 R141 R131 R121 R111 R101 R91 2100 2100 2100 2100 2100 2100 2100 2100 2100 2100 2100 2100 2100 2100 K K K K K K K K K K K K K K A A A A A A A A A A A A A A 6 7 9 10 11 12 14 15 16 17 19 20 21 22 24 25 5 D16 D15 D14 D13 D12 D11 D10 D9 D8 D7 D6 D5 D4 D3 D2 D1 SOUT LAST L R SIN LATCH BEO STB CK VDD VSSL VSSD3 VSSD2 VS...

Page 37: ...1 15 9 6 APS Automatic paper selection IC1 16 7 EXPO2 Exposure display2 IC1 16 10 7 0 3 Original size IC1 17 8 EXPO3 Exposure display3 IC1 17 11 8 0 2 Original size IC1 19 9 EXPO4 Exposure display4 IC1 19 12 9 0 1 Original size IC1 20 10 EXPO5 Exposure display5 IC1 20 13 10 0 0 Original size IC1 21 11 EXPO6 Exposure display6 IC1 21 14 11 0 USER Original size User adjustment IC1 22 12 EXPO7 Exposur...

Page 38: ...STEM The above item 6 is the same one as for the 2060 2860 COSMOS Skip OK Cancel Texts from 6 1 in the 3560 70 Service Manual are the same as texts from 6 1 to 6 6 in the 2060 2860 70 Service Manual Do you refer to the 2060 2860 70 Service Manual ...

Page 39: ...2860 3560 70 R51 P7 8 9 R12 R55 P7 8 9 R14 R58 P7 8 9 R18 C24 P7 8 C10 IC15 P7 8 IC41 IC18 P7 12 IC21 IC19 P7 12 IC35 IC30 P7 12 IC37 J1 B13 P7 14 J1 B4 IC19 P7 14 IC35 IC30 P7 14 IC37 IC10 P7 14 IC18 IC19 P7 16 17 IC35 IC18 P7 16 17 IC21 COSMOS Skip OK Cancel Texts from 7 1 except for 7 7 4 in the 3560 70 Service Manual are the same as texts from 7 1 to 7 35 in the 2060 2860 70 Service Manual Do ...

Page 40: ...L 7 2 Nov 1997 TOSHIBA 7 7 4 Optical fan rear 1 Remove the upper rear cover 2 Remove the connectors 2 and the screws 4 Two optical fans can be removed together with the COV FAN R Optical fan rear Connector COV FAN R ...

Page 41: ... 2860 However number of IC is changed refer to the circuit diagram Example 2060 2860 3560 70 IC13 P8 7 IC9 IC12 P8 7 IC3 COSMOS Skip OK Cancel Texts from 8 1 in the 3560 70 Service Manual are the same as texts from 8 1 to 8 15 in the 2060 2860 70 Service Manual Do you refer to the 2060 2860 70 Service Manual ...

Page 42: ...IC is changed refer to the circuit diagram Example 2060 2860 3560 70 IC30 P9 15 16 IC37 IC19 P9 15 16 IC35 IC40 P9 15 16 IC46 IC18 P9 16 IC21 COSMOS Skip OK Cancel Texts from 9 1 in the 3560 70 Service Manual are the same as texts from 9 1 to 9 16 in the 2060 2860 70 Service Manual Do you refer to the 2060 2860 70 Service Manual ...

Page 43: ...er to the circuit diagram Example 2060 2860 3560 70 Q3 P10 14 Q2 IC19 P10 14 IC35 Q8 P10 14 Q10 R21 P10 14 R157 R22 P10 14 R156 D3 P10 14 D2 IC40 P10 15 IC46 IC19 P10 15 IC35 IC30 P10 15 IC37 2060 2860 3560 3570 COSMOS Skip OK Cancel Texts from 10 1 in the 3560 70 Service Manual are the same as texts from 10 1 to 10 15 in the 2060 2860 70 Service Manual Do you refer to the 2060 2860 70 Service Man...

Page 44: ...en changed due to the addition of separation claws and a separation claw solenoid Separation claw When the drum has been removed COSMOS Skip OK Cancel Texts from 11 1 except for 11 4 3 11 4 4 and 11 4 5 in the 3560 70 Service Manual are the same as texts from 11 1 to 11 6 in the 2060 2860 70 Service Manual Do you refer to the 2060 2860 70 Service Manual ...

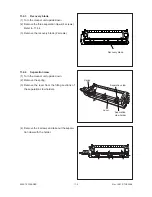
Page 45: ...fer to 11 4 4 3 Remove the recovery blade 2 screws 11 4 4 Separation claw 1 Turn the cleaner unit upside down 2 Remove the spring 3 Remove the lever from the fitting sections of the separation claw holders 4 Remove the 4 screws and take out the separa tion claw with the holder Recovery blade Spring Separation claw Separation claw holder Lever ...

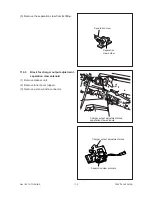
Page 46: ...claw solenoid 1 Remove cleaner unit 2 Remove inner cover upper 3 Remove a screw and a connector 5 Remove the separation claw from its fitting Separation claw solenoid Charger output adjustment block Separation claw Separation claw holder Charger output adjustment block separation claw solenoid ...

Page 47: ...etc are changed refer to the circuit diagram Example 2060 2860 3560 70 R136 P12 6 R34 R86 P12 6 R24 R81 P12 6 R23 R66 P12 6 R22 C34 P12 6 C14 IC12 P12 6 IC35 COSMOS Skip OK Cancel Texts from 12 1 in the 3560 70 Service Manual are the same as texts from 12 1 to 12 14 in the 2060 2860 70 Service Manual Do you refer to the 2060 2860 70 Service Manual ...

Page 48: ... B 11C5 11C5 VDD 1 10W22K R20 1 2 VDD GND RR11 4 7K 4 3 2 5 1 GND 1 10W1M R76 1 2 GND C18 1000P 50 2 1 3300P 50 C57 1 2 12D8 R88 1 10W4 7K 1 2 1 10W4 7K R239 2 1 R39 1 10W4 7K 1 2 1 10W4 7K R241 2 1 R158 1 10W4 7K 1 2 1 10W4 7K R64 2 1 1 10W4 7K R43 1 2 R233 1 10W22K 1 2 1 10W22K R40 2 1 R235 1 10W22K 1 2 1 10W22K R154 2 1 R63 1 10W22K 1 2 R44 1 10W22K 2 1 1 10W820 R105 1 2 VDD R77 1 10W470 1 2 1 ...

Page 49: ... 9 IC31 11 10 C94 1000P 50 1 2 C95 1000P 50 1 2 IC22 3 4 IC12 11 10 1 10W22K R167 2 1 13B8 11E2 11E4 9E2 GND 1 10W470 R128 1 2 R108 1 10W4 7K 1 2 4 7K 22K RR7 8 6 4 1 9 7 5 3 2 4 7K 22K RR8 2 3 5 7 9 1 4 6 8 11A3 13A8 IC22 12 13 IC31 3 4 IC31 12 13 IC27 11 10 IC27 2 1 IC31 5 6 IC14 10 11 11E2 IC22 9 8 IC22 11 10 11E2 13A8 IC22 2 1 R170 1 10W22K 1 2 13B8 13B8 1 10W22K R166 1 2 1E5 1E5 1A4 C93 1000P...

Page 50: ...12 1 2 IC12 4 3 13A3 13A3 IC12 5 6 13A3 VDD IC15 6 2 1 10 9 7 12 13 5 15 14 11 3 4 5D8 IC13 2 1 2E2 2E2 1 10W4 7K R124 2 1 R118 1 10W4 7K 1 2 1 10W4 7K R125 2 1 1 10W4 7K R162 1 2 R33 1 10W22K 1 2 7D8 2A2 13A3 GND 4 7K RR4 4 3 2 1 5 9 8 7 6 VDD 2200P 50 C52 1 2 1 10W1M R92 1 2 12M X3 3 1 2 R161 1 10W4 7K 1 2 R97 1 10W4 7K 2 1 R151 1 10W4 7K 2 1 13B3 13 3 13B3 13A3 13A5 4C1 4A1 2A5 2F3 13B3 13B3 7E...

Page 51: ...0 2 1 R89 1 10W100 2 1 R2 1 10W100 2 1 1SS184 D24 K A1 A2 D23 1SS184 A2 A1 K 1SS184 D22 K A1 A2 D21 1SS184 A2 A1 K D20 1SS184 A2 A1 K 1SS184 D19 K A1 A2 13C3 12D5 9D2 3B8 4 13 12C5 12C5 12B5 12C5 12C5 12B5 12B5 13A5 13A5 13A5 13A5 13A5 13A5 13A5 13A5 GND 13C3 13C3 13C3 GND 1 10W100 R244 1 2 IC7 3 17 15 11 13 12 16 4 2 6 8 19 1 18 14 9 7 5 3A8 RGCLT CL FDCLT CL FDCLT CU TRMCL B TRMCL A TRMCU B TRMC...

Page 52: ... 2 1 R223 1 10W4 7K 1 2 R219 1 10W4 7K 2 1 1 10W22K R224 2 1 R217 1 10W22K 1 2 1 10W22K R221 2 1 R220 1 10W22K 1 2 R155 1 10W4 7K 1 2 1 10W4 7K R201 2 1 R210 1 10W4 7K 1 2 1 10W4 7K R215 2 1 R211 1 10W4 7K 1 2 1 10W470 R203 1 2 R208 1 10W22K 2 1 R189 1 10W22K 1 2 R214 1 10W22K 2 1 R213 1 10W22K 1 2 1 10W4 7K R209 1 2 1 10W4 7K R204 2 1 R202 1 10W4 7K 1 2 R197 1 10W4 7K 2 1 1 10W4 7K R195 2 1 1 10W...

Page 53: ...8 10 11 0 2 A W E2 B1 B2 E1 FT M48T58 VDD 100 IC36 SKT 20 2 1 10 12 13 14 15 16 17 18 3 4 5 6 7 8 9 19 31 29 28 27 26 25 24 23 39 38 37 36 35 34 33 32 22 21 20 IC40 25 7 10 27 5 15 24 6 3 1 26 2 23 21 4 9 8 12 13 11 16 18 17 19 20 22 2A4 13 6 1E7 2D6 8C5 1A7 2A1 1A1 1F3 1A1 2A1 VDD SKT IC37 70 19 18 17 16 15 13 12 11 1 27 5 20 10 9 8 7 6 4 3 25 24 21 23 2 22 26 WR WR A0 A1 A2 A3 A4 A5 A6 A7 A8 A9 ...

Page 54: ... 2 IC26 6 5 13B5 1 10W4 7K R192 1 2 1 10W68 R190 1 2 02CZ3 3X D18 K A IC26 9 8 D17 1SS184 A2 A1 K 1 10W4 7K R152 1 2 1 10W4 7K R87 2 1 R104 1 10W4 7K 1 2 1 10W3 3K R191 1 2 1 10W330 R46 1 2 2SA1428Y Q1 E C B VDD RN2401 Q9 C E B RN1401 Q11 E C B 4 7 16 C4 2 1 GND 1 10W22K R103 1 2 R153 1 10W22K 1 2 0 1 25 C65 1 2 IC18 1 2 IC26 11 10 IC32 6 5 4 1A7 1A1 GND 1A3 1A5 3C1 VDD GND 11B3 2E1 3B1 4A1 11B5 1...

Page 55: ...1 2 1 10W4 7K R146 2 1 1 10W4 7K R142 1 2 1 10W4 7K R143 2 1 1 10W4 7K R173 1 2 1 10W4 7K R144 2 1 1 10W4 7K R177 1 2 1 10W4 7K R183 2 1 1 10W4 7K R182 1 2 1 10W4 7K R176 2 1 1 10W4 7K R181 1 2 1 10W4 7K R174 2 1 1 10W4 7K R139 2 1 1 10W4 7K R140 1 2 R141 1 10W4 7K 2 1 13E8 13D8 13E8 13C8 13E8 13C8 13D8 13D8 13D8 13E8 13D8 13C8 13D8 13C8 13D8 13C8 13D8 1A4 1A3 12A3 VDD 12C3 GND 8 13 2A2 2A2 2A1 11...

Page 56: ... 2 C8 0 1 25 2 1 0 1 25 C44 1 2 C67 0 1 25 2 1 12B8 2A7 2A6 11A3 13A8 4B8 9 13 11C5 GND 12C3 1F4 12C3 12D3 12C3 12C3 2A5 2A5 2A5 2A5 11E8 11D8 11D8 11A8 11A8 11A8 11B8 1A7 1A7 1A7 1A7 1A7 1A7 1A6 1A6 11A8 11A8 11A8 11A8 1E5 1E5 1E5 1E5 11D8 11B5 11C5 2A5 1A8 1A8 1A8 11C3 2A7 2A7 11E4 11B5 2A5 13D5 3C8 1E6 11B3 1S1834 D3 A K 1S1834 D1 K A 2W100 R4 1 2 2W100 R3 2 1 2W100 R6 1 2 2W100 R5 2 1 IC19 18 ...

Page 57: ...R7 1 2 11D5 1 10W3 9K R49 1 2 1F5 1F5 1F5 1F4 VDD 1 10W330 R50 1 2 13 10 1F2 11E8 11B3 11D8 11D8 11D8 11D8 GND 8A8 12B3 GND 11E5 11E5 11E5 IC39 6 7 8 3 15 13 9 16 14 11 5 4 1 2 10 1S1834 D2 K A D12 1S1834 A K 1S1834 D11 K A D10 1S1834 A K 1S1834 D9 K A D8 1S1834 A K 1S1834 D7 K A D5 1S1834 A K 1S1834 D6 K A 1S1834 D4 A K Q6 RN2401 C E B RN2401 Q10 B E C 1 10W1K R157 2 1 1 10W3 3K R156 2 1 2SD1417 ...

Page 58: ...D8 9D8 9D8 10A8 10A8 10B8 10B8 2F4 1A4 9A8 9B8 9B8 9C8 9C8 9C8 9C8 2A1 1A6 2F4 2A1 2A2 2A2 10C4 8B1 5E1 1F4 8A8 1E6 VDD 9A4 7D8 2F3 9C4 GND 9D4 9A8 2F4 2E8 9E4 2A5 1A4 VDD 10D8 10C8 10D8 2A6 2A6 2A6 2A4 2A4 1A3 2A4 2E5 GND 1C1 1A1 1A3 2F4 1C2 1E6 9B4 9C4 9A4 9D4 LELTH TNRMOT 24V RGTCLTCS 24V EXTFAN0 BTMFAN MMOT BRK MPLL OK SGE EXPPWM FMOT REF PNLRST SCRPSOL SGD BZON PLTNSW 24V 5VD DG CTR CNT CTRON...

Page 59: ... 9E4 9E4 8A8 9E4 8A8 9E4 VDD 5B1 5B1 5B1 4C8 4C8 5C1 5C1 5B1 5B1 4C8 4C8 4D8 5E1 5E1 5D1 5E1 4D8 5D1 5D1 7D1 1E5 8E5 12A3 1A6 1A6 1A6 2F4 1E5 1A8 1A2 1E6 1A3 1A2 1E6 1A3 1A2 1E6 1A2 1A2 1A3 4D8 22 50 C6 2 1 2E7 1A4 SGE 24VF SSR 24V AESIN OPTFAN1 APSC APST MACK S SRXD RGTCLTCL DG STXD S CNT MREQ S SREQ SACK MACK DF DFTXD DFRXD DF CNT MREQ DF DFREQ DFACK APSF APS2 APS1 APS0 SIZCU3 SSR SSR ZCINT ACOF...

Page 60: ...00 0 1 25 2 1 C64 0 1 25 2 1 C72 0 1 25 2 1 C47 0 1 25 2 1 C88 0 1 25 2 1 0 1 25 C48 2 1 C61 0 1 25 2 1 0 1 25 C49 2 1 C87 0 1 25 2 1 C80 0 1 25 2 1 C86 0 1 25 2 1 C55 0 1 25 2 1 0 1 25 C68 2 1 0 1 25 C63 2 1 C45 0 1 25 2 1 0 1 25 C71 2 1 0 1 25 C56 2 1 C69 0 1 25 2 1 0 1 25 C81 2 1 0 1 25 C85 2 1 0 1 25 C51 2 1 0 1 25 C42 2 1 C58 0 1 25 2 1 0 1 25 C60 2 1 C43 0 1 25 2 1 0 1 25 C16 2 1 0 1 25 C33 ...

Page 61: ...0W4 7K 1 2 R44 1 10W4 7K 2 1 1 10W4 7K R31 1 2 1SS193 D2 K A D3 1SS193 A K 1SS193 D8 K A GND R10 1 10W10K 1 2 1 10W10K R11 2 1 R12 1 10W10K 1 2 1 10W10K R14 2 1 1 10W10K R15 2 1 R16 1 10W10K 1 2 1 10W10K R17 2 1 R13 1 10W10K 1 2 IC8 10 11 R23 1 10W10K 1 2 1 10W10K R24 2 1 R25 1 10W10K 1 2 1 10W10K R26 2 1 R27 1 10W10K 1 2 1 10W10K R28 2 1 R29 1 10W10K 1 2 1 10W10K R30 2 1 2C1 3A2 VDD RM3 4 7K 1 5 ...

Page 62: ... 71 70 100 99 11 10 6 7 8 12 3 4 5 13 46 14 15 16 17 18 19 20 21 22 23 24 25 26 27 28 62 61 60 59 58 57 56 55 54 53 52 51 50 49 48 64 87 86 90 89 98 97 96 95 88 63 65 66 67 44 43 41 39 38 37 36 35 34 33 32 31 30 94 93 92 91 42 40 47 45 9 72 73 75 82 29 GND VDD 3B2 1A2 IC12 5 6 5E8 IC6 8 9 5E8 5E8 IC12 8 9 IC12 11 10 5E8 L2 BLM21A102S 2 1 IC12 12 13 L6 BLM21A102S 1 2 VDD GND 4A2 R57 1 10W4 7K 2 1 I...

Page 63: ...SRAM32KX8 1E6 2A1 1A7 1A2 1E3 1A2 1E3 1E4 VDD VDD SKT 100 IC11 20 2 1 10 12 13 14 15 16 17 18 3 4 5 6 7 8 9 19 31 29 28 27 26 25 24 23 39 38 37 36 35 34 33 32 22 21 3 5 SKT 100 IC10 20 2 1 10 12 13 14 15 16 17 18 3 4 5 6 7 8 9 19 31 29 28 27 26 25 24 23 39 38 37 36 35 34 33 32 22 21 20 IC9 22 20 19 17 18 16 11 13 12 8 9 4 21 23 2 26 1 3 6 24 15 5 27 10 7 25 1 10W470 R49 2 1 R52 1 10W470 1 2 R36 1 ...

Page 64: ...7 1 10W680 1 2 IC17 7 4 3 8 1 2 9 5 4 2SA1428Y Q3 E C B 100 16 C4 2 1 2A8 5B6 5E2 1E4 1E4 47 16 C6 2 1 VDD 1E3 47 50 C3 2 1 1A2 IC15 6 5 0 1 25 C39 2 1 IC15 3 4 Q2 2SA1428Y B C E IC6 13 12 Q1 2SA1428Y B C E C21 0 1 25 1 2 C1 47 16 1 2 5E4 5F4 1E4 R48 1 10W680 2 1 5B6 5D8 0 1 50 C38 2 1 E1 2 1 5B6 C12 0 1 50 1 2 IC14 4 11 8 9 10 IC14 4 11 1 2 3 IC14 5 6 7 11 4 5B6 5E2 5D8 GND VDD IC14 12 13 14 11 4...

Page 65: ...1 1A2 1A1 GND VDD 4E4 4F4 1E5 1E5 1E6 1E6 1E6 1E6 1E6 1E6 VDD 1A1 1A1 1A1 1A2 4F4 4C2 4B2 4E4 1A5 1B4 1B4 1B4 1B4 1B4 1B4 1B4 1B4 1E6 1E6 1E6 1E6 1E6 2B8 2B8 2A8 2A8 2B8 2B8 2B8 2B8 4A7 4C7 2C8 VDD 0 1 25 C22 1 2 47 16 C5 2 1 0 1 25 C28 2 1 0 1 25 C14 2 1 GND KEY1 KEY2 LGC SGD LGC VEE 75902 1351F0A 71256S 71256S 27C240 27C240 HC14 7407 7407 7407 7407 LCD CTR TOUCH PNL TOUCH PNL SCN2 SCN3 LELTH1 PA...

Page 66: ...8 3 2 27 4 29 0 1 50 C1 2 1 C4 33P 50 2 1 33P 50 C3 1 2 C5 33P 50 2 1 3 1 1K R12 2 1 100 R6 2 1 R4 100 1 2 100 R2 2 1 R17 100 1 2 100 R16 2 1 R9 100 1 2 100 R8 2 1 R5 100 1 2 100 R3 2 1 R7 100 1 2 100 R14 2 1 R15 100 1 2 100 R1 2 1 GND 1K R10 2 1 R13 1K 1 2 3B4 3B4 3B4 R11 1K 1 2 3B4 1K R21 2 1 3B4 LTL16KG LP1 K A LP2 LTL16KG A K LTL16KG LP3 K A LP4 LTL16KG A K LTL16KG LP5 K A LP6 LTL16KG A K LTL1...

Page 67: ... 1 4 3 B3F 1000 S8 3 4 1 2 S9 B3F 1000 2 1 4 3 B3F 1000 S10 3 4 1 2 S11 B3F 1000 2 1 4 3 B3F 1000 S12 3 4 1 2 S13 B3F 1000 2 1 4 3 B3F 1000 S14 3 4 1 2 B3F 1000 S15 3 4 1 2 B3F 1000 S16 3 4 1 2 S17 B3F 4000 2 1 4 3 B3F 1000 S18 3 4 1 2 S19 B3F 1000 2 1 4 3 B3F 1000 S20 3 4 1 2 B3F 1000 S21 3 4 1 2 S22 B3F 1000 2 1 4 3 S23 B3F 1000 2 1 4 3 S24 B3F 1000 2 1 4 3 S25 B3F 4000 2 1 4 3 B3F 1000 S26 3 4 ...

Page 68: ...8 7 6 3 4 5 B A A 2 1 F LGC CN12 53325 8V J69 8 1 2 3 4 5 6 7 3 3 1A2 GND VDD 1B2 1B2 1B2 1B2 2E7 2D2 2D2 2C2 2C2 2B2 2B2 2A2 2A2 2E7 2E7 2E7 J70 53325 12V 12 1 9 8 7 6 5 4 3 2 10 11 DSPON0 SGD LELTH0 LERST LECLK LEDAT SCN7 SCN6 SCN5 SCN4 SCN3 SCN2 SCN1 SCN0 RETK15 RETK14 RETK13 RETK12 DSPON0 LELTH0 LERST LECLK LEDAT SCN7 SCN6 SCN5 SCN4 SCN3 SCN2 SCN1 SCN0 RETK15 RETK14 RETK13 RETK12 LGC ...

Page 69: ... 18 13 8 6 7 9 10 11 12 14 15 16 17 19 20 21 22 24 25 5 26 28 3 2 27 4 29 0 1 50 C1 2 1 C4 33P 50 2 1 33P 50 C2 1 2 C5 33P 50 2 1 1K R7 2 1 GND 1K R5 2 1 R8 1K 1 2 1 2 1 2 1 2 R6 1K 1 2 1 2 1K R3 2 1 3B4 C3 33P 50 1 2 100 R20 2 1 R21 100 1 2 100 R22 2 1 R19 100 1 2 100 R18 2 1 R17 100 1 2 R16 100 1 2 R15 100 1 2 R14 100 1 2 R13 100 1 2 R12 100 1 2 R11 100 1 2 R10 100 1 2 R9 100 1 2 LTL16KG LP2 K A...

Page 70: ...A KEY2 2 3 F E C B D 3 2 4 5 6 1 7 E D C 8 7 6 3 4 5 B A A 2 1 F SWAA SWAA SWAA SWAA SWAA SWAA 2 3 3C4 3C4 3C4 3C4 3C4 3C4 B3F 1000 S1 3 4 1 2 S2 B3F 1000 2 1 4 3 S3 B3F 1000 2 1 4 3 B3F 1000 S4 3 4 1 2 B3F 1000 S5 3 4 1 2 B3F 1000 S6 3 4 1 2 SCN3 RETK12 INT P S SCN8 SCN3 SCN8 RETK13 RETK14 RETK15 RETK12 RETK13 RETK14 RETK15 PHOTO E D AUTO E U ...

Page 71: ... 3 F E C B D 3 2 4 5 6 1 7 E D C 8 7 6 3 4 5 B A A 2 1 F CN6 CN10 LGC LGC 2B2 2C7 2C7 2C7 2C7 1 2 1 2 1 2 1 2 1A2 1E3 1E3 3 3 VDD GND 2A2 53325 6V J72 1 2 3 4 5 6 53325 10V J71 1 10 9 8 7 6 5 4 3 2 RETK15 RETK14 RETK13 RETK12 LELTH1 LERST LECLK LEDAT SGD DSPON1 TH TH SCN8 SCN3 RETK15 RETK14 RETK13 RETK12 LELTH1 LERST LECLK LEDAT DSPON1 TH TH SCN8 SCN3 ...

Page 72: ...Nov 1997 TOSHIBA 13 25 3560 70 CIRCUIT DIAGRAMS 13 3 Power Supply Circuit PS ACC A 115 V ...

Page 73: ...3560 70 CIRCUIT DIAGRAMS 13 26 Nov 1997 TOSHIBA B 230 V ...

Page 74: ...he 24VA E I J DC voltages are turned ON Each of these power circuit is provided with overcurrent protection fuses excluding 5V and an overcurrent protection unit is provided in the circuit to protect the copier s power circuit in case of an overload or a power output short When these functions are in operation remove the cause of the overload or short When a fuse has blown replace the fuse Or when...

Page 75: ...fan M6 12 15 Bottom fan M8 toner motor M9 document F8 motor M11 aligning clutch CLT2 transport clutch CLT1 feed clutch CLT3 5 total counter 24VD E PFP pedestal 24VI ADU F9 24VJ LCF 24VF RADF F4 24VG Sorter F5 24VH Reset switch main switch drive remote monitoring F6 A DC voltage check DC output voltages can be checked on following connector pin Voltage Connector Pin 24VA J529 1 24VB J534 2 24VC J53...

Page 76: ...R ON OFF 14 5 Output Sequence Reg 1 Option 24V Zero cross Reg 2 Copier 24V AC input 5V ACOFF 21 6V or more 21 6V or more 10ms 120ms 4 75V or more 0 200ms 21 6V or more 21 6V or more 4 75V or more 20ms or more 10ms or more 500ms or less ...

Page 77: ...Nov 1997 TOSHIBA 15 1 3560 70 PC BOARD 15 PC BOARD ASSEMBLY 15 1 PWA LGC ...

Page 78: ...3560 70 PC BOARD 15 2 Nov 1997 TOSHIBA 15 2 PWA PNL ...

Page 79: ...Nov 1997 TOSHIBA 15 3 3560 70 PC BOARD 15 3 PWA KEY KEY1 KEY2 ...

Page 80: ...3560 70 PC BOARD 15 4 Nov 1997 TOSHIBA 15 4 PWA ERS ...

Page 81: ...Nov 1997 TOSHIBA 15 5 3560 70 PC BOARD 15 5 PS ACC A 1 115V ...

Page 82: ...3560 70 PC BOARD 15 6 Nov 1997 TOSHIBA A 2 230V ...

Page 83: ...Nov 1997 TOSHIBA 15 7 3560 70 PC BOARD 15 6 PS HVT Guide bias output Main charge output Grid output Faston terminal for the developer unit bias output Separation output Transfer output ...

Page 84: ...2 J523 4 J526 3 J524 2 J523 2 J523 1 J521 J522 1 Breaker 100V 15A 200V 10A Main SW Thermostat Fuse 1A Lamp regulator Exposure lamp Thermo fuse Heater lamp Thermostat 1 Fuse 100V 10A 200V 6 3A Main SW 16 WIRE HARNESS CONNECTION DIAGRAM 16 1 AC Wire Harness Door SW Relay 1 1 Parts inside the switching power supply 1 1 Copier 24V Motor clutch high voltage etc Door SW Option 24V 5V DF Sorter RMS etc T...

Page 85: ...GND GND SFBSW PTXD GND GND PRXD PACK PREQ PERR MERR P MREQ P MACK P K CTR J239 J1A 14 2 13 3 12 4 11 5 10 6 9 7 7 9 6 10 5 11 4 12 3 13 2 14 1 15 8 8 1 2 3 4 5 6 7 8 9 10 J18 10 1 9 2 8 3 7 4 6 5 5 6 3 8 2 9 1 10 4 7 J275 J60 J60 J61 J63A 12 11 10 9 8 7 5 4 3 2 1 6 10 13 9 8 7 5 4 3 2 1 6 1 2 3 4 5 6 8 9 10 11 12 7 J69 8 7 6 5 4 3 1 2 B 1 2 3 4 5 6 8 9 10 11 12 7 J70 12 11 10 9 8 7 5 4 3 2 1 6 J64...

Page 86: ...ND 2 2 11 VDD 1 1 2 1 12 MMOT DIR 1 2 13 TFULSW 2 2 14 GND 1 1 15 OPT1 FAN R 16 24V 17 OPT2 FAN R 18 24V 19 EXIT1 FAN 20 24V EXT FAN BTM FAN PS ACC J529 T FULL SW OPT1 FAN R OPT2 FAN R J2B J242 J43 J103 J121 J47 J201 2 2 1 1 J209 J202 J204 MAIN MOT 12 1 6 6 1 11 2 5 5 2 10 3 4 4 3 9 4 3 3 4 8 5 2 2 5 7 6 1 1 6 6 7 6 6 7 5 8 5 5 8 4 9 4 4 9 3 10 3 3 10 2 11 2 2 11 1 12 1 1 12 2 1 13 1 2 14 6 1 3 1 ...

Page 87: ...SW 3 5 HTRTH 2 6 HTRTH 1 4 3 2 1 5 4 7 HTRTH2 3 2 8 10 11 HTRTH2 1 5 4 3 2 1 9 SSR THMS1 HTR THMS2 HTR SORTER SW 1 BIASVREF 2 HVMVREF 3 HVTM 4 HVTPRE 5 HVACVREF 6 HVTAC 7 HVTVREF 8 HVTDC PS HVT PS ACC J534 10 9 8 7 6 5 4 3 2 1 1 2 3 4 5 6 7 8 9 10 10 9 8 7 6 5 4 3 2 1 10 9 8 7 6 5 4 3 2 1 J7 J222 J511 6 6 1 SCNB 5 5 2 24V 4 4 3 SCND 3 3 4 SCNA 2 2 5 24V 1 1 6 SCNC 6 6 7 DCMO 5 5 8 DCMB 4 4 9 DCMC ...

Page 88: ...8 VDD 8 8 1 9 GND 9 7 3 10 PEMPCL 10 6 2 11 VDD 11 5 1 12 FEDCLTCL 12 4 1 13 24V 13 3 2 1 2 14 TRMCLA 14 2 2 15 TRMCLB 15 1 1 2 1 16 24V 2 2 17 RGTCLTCU 1 1 18 19 20 FED2 CLT EMP2 SW T UP2 SW SIZE2 SW T UP2 MOT RGT1 CLT J8B J115 J116 J117 J211 J547 J213 J234 For lower Cassette 1 SGE 6 2 5VE 5 3 ACOFF 4 4 ZCINT 3 5 SSR 2 6 SSR 1 1 24V 5 2 24V 2 3 24V 1 4 5 DG 4 6 DG 3 1 24V 11 2 DG 12 J10 J531 PS A...

Page 89: ...AES APS R 1 DFACK 1 2 DFREQ 2 3 MREQ DF 3 4 DF CNT 4 5 5 DFRXD 6 6 GND 7 7 DFTXD 8 8 GND 9 9 MACK DF 10 11 12 ADF FG J12 J236 1 SACK 1 2 SREQ 2 3 MREQ S 3 4 S CNT 4 5 5 SRXD 6 6 GND 7 7 8 STXD 10 8 GND 9 9 MACK S 10 11 12 PS ACC J532 PS ACC J533 SORTER FG J13 J237 1 AD CNT 10 2 ENDSW 9 3 SIDSW 8 4 PEMPAD 7 5 PJAM1AD 6 6 SIDM D 5 7 SIDM B 4 8 SIDM C 3 9 SIDM A 2 10 5VSW 1 1 APLL OK 10 2 AMOT BRK 9 ...

Page 90: ...DRV6 23 7 DRV5 22 8 DRV4 21 9 CLK D 20 10 CLK C 19 11 SIZE 0 18 12 SIZE 2 17 13 PFPRST 16 14 5VSW 15 1 SCSW E 14 2 SIZE 3 13 3 SIZE 1 12 4 RETS 0 11 5 RETS 1 10 6 RETS 3 9 7 RETS 2 8 8 SCSW D 7 9 SCSW C 6 10 RETS 7 5 11 RETS 6 4 12 RETS 5 3 13 RETS 4 2 14 PMOT REF 1 J16A J16B J248 PFP 1 24V 2 CTRON 3 CTR CNT 4 ZMDTCT 5 ENABLE 6 ERROR 7 A3DTCT 8 VDD 9 GND 10 DG J19 1 RMS7 2 RMS6 3 RMS5 4 RMS4 5 RMS...

Page 91: ...up Procedure for the 3560 1 Unpacking the copier carton box 4 30 2 Unpack the accessory package Remove the accessory package and other packing mate rial Below are accessories accessories vary according to the destination Bracket for fixing handle 2 Screw M3 6 black 2 Operator s manual pocket 1 22 Copy receiving tray 1 Plastic cover 4 Easy set up instruction 1 Operator s manual 1 Others vary accord...

Page 92: ...tand pushing the handles into the body Fix the handles by using the screws and the brackets included in the package 5 Pull out the cassette 6 Remove the packing materials and parts from inside of the cassette Developer bottle 1 17 Accessories vary according to the desti nation Power cord 1 22 ...

Page 93: ...Nov 1997 TOSHIBA 17 3 3560 70 INSTALLATION 7 Remove the paper from the package 9 Insert the cassette gently 8 Set the paper for each cassette ...

Page 94: ...3560 70 INSTALLATION 17 4 Nov 1997 TOSHIBA 10 Open the front cover 12 Open the upper unit 11 Remove the packing screws four ...

Page 95: ...ace Raise the lever located on each side of the process unit in the direction of the arrow Remove the developer unit from the process unit Note If the photoconductor is exposed to fluo rescent light or external light for long time it may suffer from light caused fatigue So be sure to cover the process unit with for example a suitable cloth 14 Remove the screw 1 and connector 1 then the process uni...

Page 96: ...8 Reinstall the top cover Be sure to install the top cover firmly 17 Pour in the developer material Note Before pouring in the developer material be sure to shake the developer bottle fully By rotating the magnetic roller check to make sure that the developer material is transported properly ...

Page 97: ...c ess unit move down the lever on each side to fix the developer unit Be careful not to catch your fingers be tween the two units when the upper unit is pressed down 21 Close the upper unit and the front cover 20 Reinstall the process unit into the machine Reinstall the screw and connector ...

Page 98: ...e auto toner sensor 1 When the power switch is turned on the auto toner sensor is automatically ad justed by the following procedure 2 UA is shown on the message display The automatic adjustment of the auto toner sensor starts 3 The machine starts its operation The value on the message display changes 4 About 2 to 3 minutes later the value on the message display stabilizes at 235 245 ...

Page 99: ...stment has finished abnor mally the machine stops its operation and displays the CALL SERVICE Then for the subsequent adjustment of the auto toner sensor follow the procedure described in the Service Manual 26 Shake the new toner cartridge to the right and to the left 5 or 6 times to loosen the toner inside 25 Procedure for installing the toner car tridge Open the front cover ...

Page 100: ...emove the seal from the new toner cartridge Do not shake the toner cartridge after removing the seal the toner may spill 29 Close the front cover 28 Install the new toner cartridge in the machine Push the toner cartridge fully in until it is locked securely ...

Page 101: ...l on the glass Final Check 32 Making copies from the cassette and the bypass check the following Paper feeding from the cassette is correct Paper feeding from the bypass feed guide is correct Automatic duplexer operation is correct if ADU is installed Light distribution is correct Fixing and cleaning are correct Exposure level is correct Control panel displays and key operation are correct ...

Page 102: ...utomatic paper selection APS Au tomatic magnification selection AMS Duplex mode if ADU is installed Enlarging and reducing modes Interrupting mode Dual page copying Edge erase copying User set Image shifting Copy mode memory Note The packing material should be disposed of properly ...

Page 103: ...packing ma terial Below are accessories accessories vary according to the destination Bracket for fixing handle 2 Screw M3 6 black 2 Large capacity feeder 1 5 1 Fixing parts for the large capacity feeder 1 5 5 Operator s manual pocket 1 24 Copy receiving tray 1 Plastic cover 4 Original feed tray 1 34 Easy set up instruction 1 Operator s manual 1 Others vary according to the destination 32 4 13 13 ...

Page 104: ...eep the machine horizontal and the handles firmly grasped when transporting 4 After setting the machine on the appropriate stand pushing the handles into the body Fix the handles by using the screws and the brackets included in the package 5 1 Remove the packing material inside of the large capacity feeder ...

Page 105: ... 17 15 3560 70 INSTALLATION 5 2 Remove the packing material from the pa per feeding side of the copy machine 5 3 Insert the pins of the copy machine into the hinge of the large capacity feeder 5 4 Install the connector ...

Page 106: ...the accessory package Harness cover A 1 5 6 Harness cover B 1 5 7 Clamp 1 Screw M4 8 black 1 Hinge fixing bracket 1 Screw M4 8 silver 1 Connector cover 1 Screw M4 8 silver 2 5 8 13 13 5 9 13 5 11 5 6 Install the harness cover A 5 7 Install the harness cover B ...

Page 107: ...e FG harness of the copy machine to the large capacity feeder by screw M4 8 black 1 Attach the clamp to the large capacity feeder 5 9 Fix the hinge fixing bracket by screw M4 8 silver 1 5 10 Attaching 2 connectors After attaching them fix the harness by clamp ...

Page 108: ...3560 70 INSTALLATION 17 18 Nov 1997 TOSHIBA 5 11 Fix the connector cover by screw M4 8 silver 2 6 1 Pull out the automatic duplexing unit 6 2 Remove the packing parts ...

Page 109: ...Nov 1997 TOSHIBA 17 19 3560 70 INSTALLATION 6 3 Remove the packing material 6 4 Push the automatic duplexing unit into the body carefully 7 Pull out the cassette ...

Page 110: ...97 TOSHIBA 8 Remove the packing materials and parts from inside of the cassette Developer bottle 1 19 Accessories vary according to the desti nation Power cord 1 24 9 Remove the paper from the package 10 Set the paper for each cassette ...

Page 111: ...Nov 1997 TOSHIBA 17 21 3560 70 INSTALLATION 11 Insert the cassette gently 12 Open the front cover 13 Remove the packing screws four ...

Page 112: ...997 TOSHIBA 14 Open the upper unit 15 Remove the pressure release bracket 2 pcs from the fuser unit Remove the toner cartridge Accessories vary according to the des tination 16 Remove the screw 1 and connector 1 then the process unit ...

Page 113: ...r is exposed to fluo rescent light or external light for long time it may suffer from light caused fatigue So be sure to cover the process unit with for example a suitable cloth 18 Remove the top cover of the developer unit 19 Pour in the developer material Note Before pouring in the developer material be sure to shake the developer bottle fully By rotating the magnetic roller check to make sure t...

Page 114: ...all the top cover Be sure to install the top cover firmly 21 After placing the developer unit in the proc ess unit move down the lever on each side to fix the developer unit 22 Reinstall the process unit into the machine Reinstall the screw and connector ...

Page 115: ...s be tween the two units when the upper unit is pressed down 23 Close the upper unit and the front cover 24 Connect the power cable to the outlet Install the operator s manual pocket Connect the ADF s connector to the con nector section marked ADF 25 Turn on the copier main switch ...

Page 116: ... The value on the message display changes 4 About 2 to 3 minutes later the value on the message display stabilizes at 235 245 5 The automatic adjustment of the auto toner sensor is complete and Install new cartridge is shown on the message display If the adjustment has finished abnor mally the machine stops its operation and displays the CALL SERVICE Then for the subsequent adjustment of the auto ...

Page 117: ...to the left 5 or 6 times to loosen the toner inside 29 Pull to remove the seal from the new toner cartridge Do not shake the toner cartridge after removing the seal the toner may spill 30 Install the new toner cartridge in the machine Push the toner cartridge fully in until it is locked securely ...

Page 118: ...SHIBA 31 Close the front cover 32 Install the 4 plastic covers to the outer cov ers The copy receiving tray should be installed in the slots in the exit cover 33 Unpacking the accessory package Original feed tray 1 34 Screw M4 6 silver 2 35 ...

Page 119: ...t as shown Place the test original 1 face up in the tray Adjust the side guides to the edges of the original Press PRINT to make a copy Fold the copy in half to check that the center line is cop ied in the center of the sheet If not loosen the two screws and adjust the position of the original feed tray Repeat the procedure until the center line on the copy is in the fold After the adjustment tigh...

Page 120: ...ht distribution is correct Fixing and cleaning are correct Exposure level is correct Control panel displays and key operation are correct Basic operations Special features Automatic paper selection APS Au tomatic magnification selection AMS Duplex mode if ADU is installed Enlarging and reducing modes Interrupting mode Dual page copying Edge erase copying User set Image shifting Copy mode memory No...

Page 121: ...cket MU 10 Key copy counter MU 8 1 Remove the upper feed cover Cut the window for the counter 2 Remove the blind plate 1 screw for the 200V machine 3 Pull out the harness connector from the open ing in the machine frame Disconnect the short connector from the har ness Note Remove the rear cover if the harness con nector is in the back etc Screw holes for the socket Harness connector Blind plate ...

Page 122: ...rt the socket connector into the harness connector 5 Install the counter socket to the frame 2 M3 screws 6 Reinstall the upper feed cover 7 Insert the key copy counter with its arrow mark facing up as shown Socket connector Harness connector Screws M3 ...

Reviews: