background image

Intr

oduction

Connecting

y

our T

V

Using the

Remote Contr

ol

Setting up

y

our T

V

Using the T

V’s

F

eatur

es

Appendix

Index

31

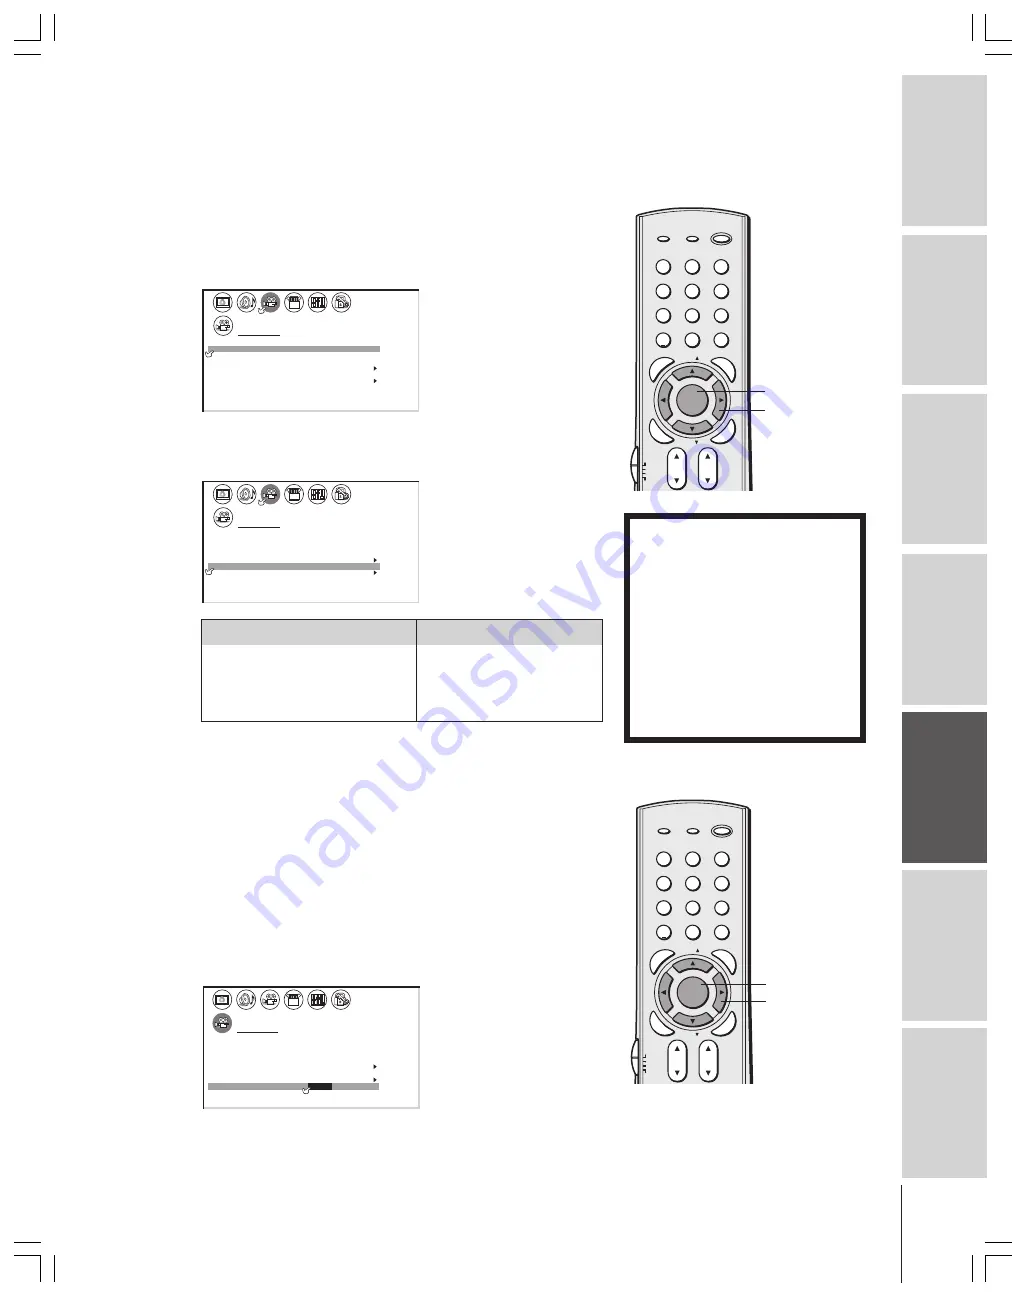
Using the auto aspect feature

When receiving 480i signal, the TV will automatically change the
picture size by reading aspect information (ID-1 data) from the input
signal. If the signal does not include aspect information (ID-1 data),
the picture size mode you set (pages 28–29) is selected.
To turn on the auto aspect:

1. Press MENU, and then press 

x

 or 

 until the THEATER menu

appears.

1

1

2

3

4

5

6

7

8

9

10

11

12

13

14

15

16

17

18

1

2

3

4

5

6

7

8

9

10

11

12

13

14

15

16

17

18

2

3

4

5

6

7

8

9 10 11 12 13 14 15 16 17 18 19 20 21 22 23 24 25 26 27 28 29 30 31 32 33 34 35

1

2

3

4

5

6

7

8

9 10 11 12 13 14 15 16 17 18 19 20 21 22 23 24 25 26 27 28 29 30 31 32 33 34 35

THEATER

P I CTURE S I ZE

P I CTURE

AUTO  ASPECT

C I NEMA   MODE

SCROLL

OFF

OFF

V I DEO

T r u B a s s

ON

ON

SRS   3D
FOCUS

WOW

2. Press 

y

 or 

z

 to highlight AUTO ASPECT, and then press 

x

 or

 to select ON.

1

1

2

3

4

5

6

7

8

9

10

11

12

13

14

15

16

17

18

1

2

3

4

5

6

7

8

9

10

11

12

13

14

15

16

17

18

2

3

4

5

6

7

8

9 10 11 12 13 14 15 16 17 18 19 20 21 22 23 24 25 26 27 28 29 30 31 32 33 34 35

1

2

3

4

5

6

7

8

9 10 11 12 13 14 15 16 17 18 19 20 21 22 23 24 25 26 27 28 29 30 31 32 33 34 35

THEATER

P I CTURE S I ZE

P I CTURE

AUTO  ASPECT

C I NEMA   MODE

SCROLL

OFF

ON

V I DEO

T r u B a s s

ON

ON

SRS   3D
FOCUS

WOW

Selecting the cinema mode

When you view a DVD movie (3:2 pulldown processed) from a DVD
player connected to the ColorStream (component video) or DVI/
HDCP inputs on the TV, smoother and more natural motion can be
obtained by setting the CINEMA MODE to FILM (auto).
To set the CINEMA MODE to FILM (auto):

1. Press MENU, and then press 

x

 or 

 until the THEATER menu

appears.

2. Press 

y

 or 

z

 to highlight CINEMA MODE.

3. Press 

x

 or 

 to select FILM (auto).

1

1

2

3

4

5

6

7

8

9

10

11

12

13

14

15

16

17

18

2

3

4

5

6

7

8

9

10

11

12

13

14

15

16

17

18

2

3

4

5

6

7

8

9 10 11 12 13 14 15 16 17 18 19 20 21 22 23 24 25 26 27 28 29 30 31 32 33 34

35

1

2

3

4

5

6

7

8

9 10 11 12 13 14 15 16 17 18 19 20 21 22 23 24 25 26 27 28 29 30 31 32 33 34 35

THEATER

T r u B a s s

FOCUS

SRS

3D

WOW

P I CTURE
AUTO  ASPECT

S I ZE

P I CTURE
C I NEMA  MODE

SCROLL

ON

OFF

OFF

ON

OFF

FILM

V I DEO

/

To set the CINEMA MODE to VIDEO (off ):

Press 

x

 or 

 to select VIDEO in step 3 above.

1

2

3

4

5

6

7

8

9

ENT

100

0

POWER

RECALL

CHRTN

FAV

FAV

TV / VIDEO

+10

PIC SIZE

EXIT

INFO

STOP

POP DIRECT CH MUTE

SLEEP

TV/VCR

PAUSE

FF

REW

SKIP / SEARCH

SPLIT

SWAP

POP CH

LIGHT

REC

CH SCAN

FREEZE

SOURCE

PLAY

TV
CBL/SAT
VCR
DVD

VOL

CH

FAVORITE

ENTE

R

DVDMENU

MENU

TO

P

ME

NU

GU

ID

E

CL

EA

R

E

N

TE

R

yzx


MENU

NOTICE OF POSSIBLE ADVERSE

EFFECTS ON TV PICTURE TUBE

Avoid displaying stationary images on
your TV screen for extended periods of
time. Fixed (non-moving) images (such
as still PIP/POP windows or black/gray
bars in wide-screen picture or PIP/POP
formats) can become permanently
engrained in the picture tube. 

This type

of damage is NOT COVERED BY
YOUR WARRANTY 

because it is the

result of misuse. See item 33 on page 4.

Aspect information (ID-1 data)

Picture size to be selected

4:3 Normal

Natural

16:9 Full

Full

4:3 Letter box

Theater Wide 2

Not Defined

User set mode

Note:

The autoaspect feature does not operate for
the antenna (cable) and DVI input sources.

1

2

3

4

5

6

7

8

9

ENT

100

0

POWER

RECALL

CHRTN

FAV

FAV

TV / VIDEO

+10

PIC

 SI

ZE

EXIT

INFO

STOP

POP DIRECT CH MUTE

SLEEP

TV/VCR

PAUSE

FF

REW

SKIP / SEARCH

SPLIT

SWAP

POP CH

LIGHT

REC

CH SCAN

FREEZE

SOURCE

PLAY

TV
CBL/SAT
VCR
DVD

VOL

CH

FAV

ORITE

ENTE

R

DVDMENU

MENU

TO

P

ME

NU

GU

ID

E

CL

EA

R

E

N

TE

R

yzx


MENU

Summary of Contents for 34HF83

Page 1: ...bers in the spaces below Refer to these numbers whenever you communicate with your Toshiba dealer about this TV Model number 34HF83 Serial number Introduction Connecting your TV Using the Remote Control Setting up your TV Using the TV s Features Appendix Index I S O 14001 FILE No A96 4 5 T O S H I B A A M E RICA CONSUMER PR O D U C T S L L C ...

Page 2: ...anager of the International CES Safety Precautions WARNING TO REDUCE THE RISK OF FIRE OR ELECTRIC SHOCK DO NOT EXPOSE THIS APPLIANCE TO RAIN OR MOISTURE Dear Customer Thank you for purchasing this Toshiba TV This manual will help you use the many exciting features of your new TV Before operating the TV please read this manual completely and keep it nearby for future reference NOTE TO CATV INSTALLE...

Page 3: ...instructions 5 Do not use this apparatus near water 6 Clean only with a dry cloth 7 Do not block any ventilation openings Install in accordance with the manufacturer s instructions 8 Do not install near any heat sources such as radiators heat registers stoves or other apparatus including amplifiers that produce heat 9 Do not defeat the safety purpose of the polarized or grounding type plug A polar...

Page 4: ...ture appear distorted or the color appear faded If this happens turn off the TV for 6 to 7 hours to allow the condensation to evaporate 31 For added protection of your TV from lightning and power surges always unplug the power cord and disconnect the antenna from the TV if you leave the TV unattended or unused for long periods of time 32 During normal use the TV may make occasional snapping or pop...

Page 5: ... 31 Using the POP double window feature 32 Switching the main and POP pictures 33 Freezing the POP picture 33 Adjusting the size of the double window 33 Pop double window aspect ratio 34 Using the programmed channel search function 34 Using the favorite channel search function 35 About the auto favorite feature 35 Using the LOCKS menu 36 Entering the PIN code 36 If you cannot remember your PIN cod...

Page 6: ... L MONO AUDIO VIDEO S VIDEO POWER VIDEO 3 IN OUT IN ANT 75 ANT 1 ANT 2 OUT L MONO AUDIO VIDEO S VIDEO VIDEO 1 PB PR Y COLOR STREAMHD 1 COLOR STREAMHD 2 R VIDEO S VIDEO VIDEO 2 L MONO AUDIO VIDEO R L VAR AUDIO R AUDIO R L PB PR Y AUDIO R L L MONO AUDIO R ON OFF AUDIO CENTER CHANNEL IN DVI HDCP IN R AUDIO L 1 2 3 4 5 6 7 8 9 ENT 100 0 POWER RECALL CHRTN FAV FAV TV VIDEO 10 P I C S I Z E E X I T INFO...

Page 7: ...ts use either component video cables or a DVI cable instead of a standard video or S video cable You still must connect the standard red and white audio cables for full system connection but do not connect the standard yellow video cable or an S Video cable at the same time Connecting a VCR This connection allows you to watch local channels and video programs play or record on the VCR while watchi...

Page 8: ...eed four coaxial cables one set of standard A V cables OUT IN ANT 75 ANT 1 ANT 2 OUT L MONO AUDIO VIDEO S VIDEO VIDEO 1 PB PR Y COLOR STREAMHD 1 COLOR STREAMHD 2 R VIDEO S VIDEO VIDEO 2 L MONO AUDIO VIDEO R L VAR AUDIO R AUDIO R L PB PR Y AUDIO R L L MONO AUDIO R ON OFF AUDIO CENTER CHANNEL IN DVI HDCP IN R AUDIO L OUT IN Cable box IN from ANT VIDEO AUDIO OUT to TV CH 3 L R L R CH 4 IN OUT Note Wh...

Page 9: ...DVI HDCP IN R AUDIO L VIDEO OUT OUT S VIDEO AUDIO OUT L R IN from ANT VIDEO OUT OUT S VIDEO AUDIO OUT L R TV From Antenna Stereo VCR From Satellite Dish DVD Player Satellite Receiver Note For the highest possible picture quality from a non component video DVD player satellite receiver use an S video cable If your DVD player or satellite receiver has component video see page 10 Do not connect an S ...

Page 10: ...VIDEO VIDEO 2 L MONO AUDIO VIDEO R L VAR AUDIO R AUDIO R L PB PR Y AUDIO R L L MONO AUDIO R ON OFF AUDIO CENTER CHANNEL IN DVI HDCP IN R AUDIO L CH 3 CH 4 VIDEO OUT S VIDEO AUDIO COMPONENT VIDEO OUT L R L R PR PB Y IN from ANT VIDEO AUDIO OUT to TV L R IN OUT Stereo VCR From Antenna TV DVD Player with component video Note For the highest possible picture quality use component video cables or a DVI...

Page 11: ...STREAMHD 1 COLOR STREAMHD 2 R VIDEO S VIDEO VIDEO 2 L MONO AUDIO VIDEO R L VAR AUDIO R AUDIO R L PB PR Y AUDIO R L L MONO AUDIO R ON OFF AUDIO CENTER CHANNEL IN DVI HDCP IN R AUDIO L IN from ANT VIDEO AUDIO OUT to TV CH 3 L R CH 4 IN OUT VIDEO OUT S VIDEO AUDIO COMPONENT VIDEO OUT L R L R PR PB Y Satelite IN DTV Receiver with component video Stereo VCR From Antenna From DTV Antenna TV Note For the...

Page 12: ...eo 3 front panel VCR2 Note If VCR1 has S video you can use an S video cable instead of the standard video cable for better picture performance Do not connect both a standard video cable and an S video cable to VIDEO 1 or VIDEO 2 at the same time or the picture performance will be unacceptable Do not connect the same VCR to the output and input jacks on the TV at the same time To dub or edit VCR 2 ...

Page 13: ...vice to the DVI HDCP1 input The DVI HDCP input on your TV is designed to accept HDCP program material in digital form from EIA CEA 861 compliant2 consumer electronic devices such as a set top box or DVD player equipped with a DVI D digital single link output connection 3 The DVI HDCP input is designed for best performance with 1080i high definition video signals The DVI HDCP input also will accept...

Page 14: ... internal speakers as center channel speakers You will need one set of standard A V cables one single standard audio cable for the audio center channel Note Refer to the instructions provided with your A V receiver for details about your surround sound system When the Audio Center Channel ON OFF switch is in the ON position the TV speakers will function only as center channel speakers Adjust the v...

Page 15: ...ol batteries 1 Remove the battery cover from the back of the remote control 2 Install two AA size batteries making sure to match the and signs on the batteries to the signs on the battery compartment 3 Reinsert the battery cover in the remote control until the tab snaps Note If your Toshiba TV remote control does not operate all the features of your other device use the original remote control for...

Page 16: ... original remote control 5 Remember to set the Device Switch back to TV to control the TV 6 For future reference write down the code s you used Remote control codes In some cases you may not be able to operate your device with the TV remote control Your other device may use a code that is not recognized by the TV remote control If this happens you will need to use the remote control provided with ...

Page 17: ... Video 056 059 061 081 Goldstar 005 010 014 054 056 065 067 Gradiente 018 065 Harman Kardon 005 Hitachi 024 025 035 037 042 063 070 080 JBL 076 JC Penney 005 006 007 008 009 010 023 024 025 026 035 056 061 063 065 Jensen 024 025 037 050 JVC 005 006 007 014 037 043 050 062 063 068 082 Kenwood 005 006 007 012 014 037 043 050 053 068 071 Kodak 010 LG 010 Lloyds 053 073 079 Logik 061 LXI 010 Magnasoni...

Page 18: ...box or satellite receiver set the Device Switch to CBL SAT VCR set the Device Switch to VCR DVD player or HTIB set the Device Switch to DVD Note Even after the TV remote control is programmed it may not operate certain features on your other device If this happens and you wish to use those features you will need to use the device s original remote control 1 2 3 4 5 6 7 8 9 ENT 100 0 POWER RECALL C...

Page 19: ...Pages 16 18 Set to TV to control the TV CH channel y z cycles through programmed channels page 24 Channel Numbers 0 9 100 allow direct access to channels page 24 VOL volume y z adjusts the volume level CH RTN returns to the memorized channel page 25 MENU allows access to on screen programming menus page 20 ENTER sets programmed menu information page 20 y z x select or adjust programming menus page...

Page 20: ...NU to display the menu system 2 Press x or to select a menu 3 Press y or z select an item 4 Press x or to select or adjust a setting SELECT P CTURE ANTENNA I MODE SPORTS ON OFF PREFERENCE CONTRAST BR GHTNESS I COLOR RESET SAVE NEW T I NT SHARPNESS 5 0 5 0 5 0 0 1 0 0 END EXIT MOVE SELECT P CTURE ANTENNA I MODE SPORTS PREFERENCE FLESH TONE ON OFF COOL OFF CableClear DNR DISPLAY FORMAT SAVE NEW COLO...

Page 21: ...26 27 28 29 30 31 32 33 34 35 1 2 3 4 5 6 7 8 9 10 11 12 13 14 15 16 17 18 19 20 21 22 23 24 25 26 27 28 29 30 31 32 33 34 35 SET UP LANGUAGE CLOCK ANT ADD ADD ERASE TV CH QUICK CONNECT GU I DE PROGRAM CABLE CABLE 1 ANT1 2 SET ENGL SH FRANCA I I ESPANOL S T I LT CORRECT I ON 0 3 Press x or to highlight your desired language Selecting the antenna input You can connect to two different antenna input...

Page 22: ...cable highlight CABLE 1 1 2 3 4 5 6 7 8 9 10 11 12 13 14 15 16 17 18 1 2 3 4 5 6 7 8 9 10 11 12 13 14 15 16 17 18 2 3 4 5 6 7 8 9 10 11 12 13 14 15 16 17 18 19 20 21 22 23 24 25 26 27 28 29 30 31 32 33 34 35 1 2 3 4 5 6 7 8 9 10 11 12 13 14 15 16 17 18 19 20 21 22 23 24 25 26 27 28 29 30 31 32 33 34 35 SET UP LANGUAGE CLOCK ANT ADD ADD ERASE TV CH QUICK CONNECT GU I DE PROGRAM TV CABLE CABLE 1 ANT...

Page 23: ...r erase Using the Quick Connect Guide The Quick Connect Guide automatically starts the first time the TV is turned on This feature provides on screen instructions to guide you through setting up your TV To mannually start the Quick Connect guide and change the current settings 1 Press MENU and then press x or until the SET UP menu appears 2 Press y or z to highlight QUICK CONNECT GUIDE 1 1 2 3 4 5...

Page 24: ...1 Press MENU then press x or until the SET UP menu appears 2 Press y or z to highlight TILT CORRECTION 3 Press x or to correct any tilt of the picture from 10 to 10 1 1 2 3 4 5 6 7 8 9 10 11 12 13 14 15 16 17 18 1 2 3 4 5 6 7 8 9 10 11 12 13 14 15 16 17 18 2 3 4 5 6 7 8 9 10 11 12 13 14 15 16 17 18 19 20 21 22 23 24 25 26 27 28 29 30 31 32 33 34 35 1 2 3 4 5 6 7 8 9 10 11 12 13 14 15 16 17 18 19 2...

Page 25: ...avorite Channel Programming feature Because this feature scans through only your favorite channels it allows you to skip other channels you do not normally watch To program your favorite channels 1 Press MENU and then press x or until the CUSTOM menu appears 2 Press y or z to highlight FAVORITE CH1 or FAVORITE CH2 1 1 2 3 4 5 6 7 8 9 10 11 12 13 14 15 16 17 18 1 2 3 4 5 6 7 8 9 10 11 12 13 14 15 1...

Page 26: ...OFF 2 TE FAVOR I CH1 TE V BACKGROUND I DEO CH L A B E L LABEL I NG 4 Press yzx to highlight the channel you want to clear then press ENTER 1 1 2 3 4 5 6 7 8 9 10 11 12 13 14 15 16 17 18 1 2 3 4 5 6 7 8 9 10 11 12 13 14 15 16 17 18 2 3 4 5 6 7 8 9 10 11 12 13 14 15 16 17 18 19 20 21 22 23 24 25 26 27 28 29 30 31 32 33 34 35 1 2 3 4 5 6 7 8 9 10 11 12 13 14 15 16 17 18 19 20 21 22 23 24 25 26 27 28 ...

Page 27: ...T I MER ON 00h00m SLEEP 0h00m CC FAVOR I CH OFF 2 TE FAVOR I CH1 TE V BACKGROUND I DEO CH L A B E L LABEL I NG 5 Press z to highlight LABEL 6 Press x or repeatedly to select a character for the first space and then press ENTER 1 1 2 3 4 5 6 7 8 9 10 11 12 13 14 15 16 17 18 1 2 3 4 5 6 7 8 9 10 11 12 13 14 15 16 17 18 2 3 4 5 6 7 8 9 10 11 12 13 14 15 16 17 18 19 20 21 22 23 24 25 26 27 28 29 30 31...

Page 28: ...n 480i 480p signal source 0 4 1080i 720p signal source fixed to 0 Natural Receiving 480i 480p signal source Natural The Natural picture size displays the picture in the conventional 4 3 aspect ratio with bars at the left and right Full This mode is to enjoy the wide screen format 16 9 aspect ratio yzx Note If you see the Full picture size for conventional TV picture format 4 3 aspect ratio the pic...

Page 29: ...2 13 14 15 16 17 18 1 2 3 4 5 6 7 8 9 10 11 12 13 14 15 16 17 18 2 3 4 5 6 7 8 9 10 11 12 13 14 15 16 17 18 19 20 21 22 23 24 25 26 27 28 29 30 31 32 33 34 35 1 2 3 4 5 6 7 8 9 10 11 12 13 14 15 16 17 18 19 20 21 22 23 24 25 26 27 28 29 30 31 32 33 34 35 THEATER P I CTURE S I ZE P I CTURE AUTO ASPECT C I NEMA MODE SCROLL OFF OFF V I DEO T r u B a s s ON ON SRS 3D FOCUS WOW Conventional picture on ...

Page 30: ...5 THEATER P I CTURE S I ZE P I CTURE AUTO ASPECT C I NEMA MODE SCROLL OFF OFF V I DEO T r u B a s s ON ON SRS 3D FOCUS WOW 4 Press x or to display the Scroll Adjustment mode SCROL L ADJUSTMENT 0 TO ADJUST 5 Press y or z to adjust the vertical position of the picture Normal center position SCROL L ADJUSTMENT 0 TO ADJUST To raise the picture press y SCROL L ADJUSTMENT 20 TO ADJUST To lower the pictu...

Page 31: ...nd then press x or until the THEATER menu appears 2 Press y or z to highlight CINEMA MODE 3 Press x or to select FILM auto 1 1 2 3 4 5 6 7 8 9 10 11 12 13 14 15 16 17 18 2 3 4 5 6 7 8 9 10 11 12 13 14 15 16 17 18 2 3 4 5 6 7 8 9 10 11 12 13 14 15 16 17 18 19 20 21 22 23 24 25 26 27 28 29 30 31 32 33 34 35 1 2 3 4 5 6 7 8 9 10 11 12 13 14 15 16 17 18 19 20 21 22 23 24 25 26 27 28 29 30 31 32 33 34 ...

Page 32: ...program you want to watch in the main window 3 Press SPLIT to display the POP window 4 Repeatedly press SOURCE to select the input source for the POP window VIDEO 1 VIDEO 2 VIDEO 3 ColorStream HD1 or ColorStream HD2 only you cannot select DVI in POP mode The current source will display in purple 5 You can play a tape as the POP picture or select a channel for the POP window using the VCR s channel...

Page 33: ...enew the still picture To erase the still POP window Press EXIT Adjusting the size of the double window When the input signals of the main and POP pictures are 480i you can adjust the size of each window Repeatedly press x or to change the size in 9 steps SWAP FREEZE Still picture NOTICE OF POSSIBLE ADVERSE EFFECTS ON TV PICTURE TUBE Avoid displaying stationary images on your TV screen for extende...

Page 34: ...y on page 22 1 Press CH SCAN The TV automatically enters POP mode and begins a seven picture scan of your programmed channels CABLE 10 3 4 5 6 7 8 9 10 2 Press yzx to select one of the seven pictures becomes a moving picture The main picture is always moving 3 Press ENTER to display the channel you selected in step 2 as a normal picture 3 4 5 6 7 8 9 Moving picture yzx CH SCAN NOTICE OF POSSIBLE A...

Page 35: ... seconds the TV starts the auto favorite channel search function See page 39 for details 3 4 5 6 7 8 TH I S PROGRAM HAS BEEN BLOCKED 9 TV EXCEEDS PUSH MUTE TO ENTER SET L I M I TS IN P PG L V CABLE Moving picture 1 2 3 4 5 6 7 8 9 ENT 100 0 POWER RECALL CHRTN FAV FAV TV VIDEO 10 P I C S I Z E E X I T INFO STOP POP DIRECT CH MUTE SLEEP TV VCR PAUSE FF REW SKIP SEARCH SPLIT SWAP POP CH LIGHT REC CH ...

Page 36: ...N code and then press ENTER 1 1 2 3 4 5 6 7 8 9 10 11 12 13 14 15 16 17 18 1 2 3 4 5 6 7 8 9 10 11 12 13 14 15 16 17 18 2 3 4 5 6 7 8 9 10 11 12 13 14 15 16 17 18 19 20 21 22 23 24 25 26 27 28 29 30 31 32 33 34 35 1 2 3 4 5 6 7 8 9 10 11 12 13 14 15 16 17 18 19 20 21 22 23 24 25 26 27 28 29 30 31 32 33 34 35 LOCKS BLOCK NG RESET I P I N CODE 1 1 1 0 1 1 2 3 4 5 6 7 8 9 10 11 12 13 14 15 16 17 18 1...

Page 37: ...en under 14 years of age D Intensely suggestive dialog L Strong coarse language S Intense sexual situations V Intense violence PG Parental Guidance Suggested This program contains material that parents may find unsuitable for younger children D Some suggestive dialog L Infrequent coarse language S Some sexual situations V Moderate violence G General Audience Most parents would find this program su...

Page 38: ...11 12 13 14 15 16 17 18 2 3 4 5 6 7 8 9 10 11 12 13 14 15 16 17 18 19 20 21 22 23 24 25 26 27 28 29 30 31 32 1 2 3 4 5 6 7 8 9 10 11 12 13 14 15 16 17 18 19 20 21 22 23 24 25 26 27 28 29 30 31 32 LOCKS V CH I P V CH LOCK I LOCK DEO ENABLE TV RAT MPAA I NG RAT I NG BLOCK I NG BLOCK I NG OPT I ON ON OFF OFF NEW FRONT PANEL LOCK GAME TIMER P I N CODE OFF 1 1 2 3 4 5 6 7 8 9 10 11 12 13 14 15 16 17 18...

Page 39: ...3 Press the Channel Number buttons to enter the channel you want to lock 4 Press ENTER 1 1 2 3 4 5 6 7 8 9 0 1 2 3 4 5 6 7 8 1 2 3 4 5 6 7 8 9 10 11 12 13 14 15 16 17 18 2 3 4 5 6 7 8 9 10 11 12 13 14 15 16 17 18 19 20 21 22 23 24 25 26 27 28 29 30 31 32 33 34 35 1 2 3 4 5 6 7 8 9 10 11 12 13 14 15 16 17 18 19 20 21 22 23 24 25 26 27 28 29 30 31 32 33 34 35 LOCKS V CH I P V CH I LOCK LOCK DEO 0 0 ...

Page 40: ...To unlock all locked channels at once Press y or z to highlight CLEAR ALL and then press x or 1 1 2 3 4 5 6 7 8 9 10 11 12 13 14 15 16 17 18 1 2 3 4 5 6 7 8 9 10 11 12 13 14 15 16 17 18 2 3 4 5 6 7 8 9 10 11 12 13 14 15 16 17 18 19 20 21 22 23 24 25 26 27 28 29 30 31 32 33 34 35 1 2 3 4 5 6 7 8 9 10 11 12 13 14 15 16 17 18 19 20 21 22 23 24 25 26 27 28 29 30 31 32 33 34 35 LOCKS V CHI P V CH I LOC...

Page 41: ...19 20 21 22 23 24 25 26 27 28 29 30 31 32 33 34 35 1 2 3 4 5 6 7 8 9 10 11 12 13 14 15 16 17 18 19 20 21 22 23 24 25 26 27 28 29 30 31 32 33 34 35 LOCKS V CH I P V I LOCK DEO ENABLE TV RAT MPAA I NG RAT I NG BLOCK I NG BLOCK I NG OPT I ON ON OFF CH LOCK NEW FRONT RANEL LOCK GAME TIMER OFF P I N CODE If a button on the front panel is pressed the message Not Available appears To unlock the front pan...

Page 42: ...ur new preference on page 43 To select the picture mode 1 Press MENU and then press x or until the PICTURE menu appears 2 Press z or y to select MODE 3 Press x or to highlight the mode you prefer 1 1 2 3 4 5 6 7 8 9 10 11 12 13 14 15 16 17 18 1 2 3 4 5 6 7 8 9 10 11 12 13 14 15 16 17 18 2 3 4 5 6 7 8 9 10 11 12 13 14 15 16 17 18 19 20 21 22 23 24 25 26 27 28 29 30 31 32 33 34 35 1 2 3 4 5 6 7 8 9 ...

Page 43: ...FERENCE PREFERENCE FLESH TONE ON OFF MEDI UM OFF CableClear DNR DISPLAY FORMAT SAVE NEW COLOR TEMPERATURE 1080 i Using the CableClear DNR feature This feature allows you to reduce visible interference in your TV picture This is useful when receiving a broadcast with a weak signal especially a Cable channel or playing back a video cassette or disc damaged by repeated use To turn on CableClear DNR 1...

Page 44: ...FORMAT 1080 i 540P PREFERENCE SAVE NEW Resetting your picture adjustments The RESET function adjusts the picture qualities you adjusted to the following factory settings 1 2 3 4 5 6 7 8 9 ENT 100 0 POWER RECALL CHRTN FAV FAV TV VIDEO 10 P I C S I Z E E X I T INFO STOP POP DIRECT CH MUTE SLEEP TV VCR PAUSE FF REW SKIP SEARCH SPLIT SWAP POP CH LIGHT REC CH SCAN FREEZE SOURCE PLAY TV CBL SAT VCR DVD ...

Page 45: ... source 1 1 2 3 4 5 6 7 8 9 10 11 12 13 14 15 16 17 18 1 2 3 4 5 6 7 8 9 10 11 12 13 14 15 16 17 18 2 3 4 5 6 7 8 9 10 11 12 13 14 15 16 17 18 19 20 21 22 23 24 25 26 27 28 29 30 31 32 33 34 35 1 2 3 4 5 6 7 8 9 10 11 12 13 14 15 16 17 18 19 20 21 22 23 24 25 26 27 28 29 30 31 32 33 34 35 CUSTOM I V DEO I 1 V DEO I 2 V DEO I 3 V DEO HD1 LABEL VCR DVD DTV SAT CBL CUSTOM DVI MENU Color Stream HD2 Co...

Page 46: ...e the TV to the desired program 2 Press MENU and then press x or to display CUSTOM menu 3 Press y or z to highlight CC 1 1 2 3 4 5 6 7 8 9 10 11 12 13 14 15 16 17 18 1 2 3 4 5 6 7 8 9 10 11 12 13 14 15 16 17 18 2 3 4 5 6 7 8 9 10 11 12 13 14 15 16 17 18 19 20 21 22 23 24 25 26 27 28 29 30 31 32 33 34 35 1 2 3 4 5 6 7 8 9 10 11 12 13 14 15 16 17 18 19 20 21 22 23 24 25 26 27 28 29 30 31 32 33 34 35...

Page 47: ... 4 5 6 7 8 9 10 11 12 13 14 15 16 17 18 1 2 3 4 5 6 7 8 9 10 11 12 13 14 15 16 17 18 2 3 4 5 6 7 8 9 10 11 12 13 14 15 16 17 18 19 20 21 22 23 24 25 26 27 28 29 30 31 32 33 34 35 1 2 3 4 5 6 7 8 9 10 11 12 13 14 15 16 17 18 19 20 21 22 23 24 25 26 27 28 29 30 31 32 33 34 35 T I MER 0 h 00m Every time you press the button the time will increase in 10 minute increments to a maximum of 3 hours 0h00m ...

Page 48: ... 9 10 11 12 13 14 15 16 17 18 2 3 4 5 6 7 8 9 10 11 12 13 14 15 16 17 18 19 20 21 22 23 24 25 26 27 28 29 30 31 32 33 34 35 1 2 3 4 5 6 7 8 9 10 11 12 13 14 15 16 17 18 19 20 21 22 23 24 25 26 27 28 29 30 31 32 33 34 35 SET UP LANGUAGE CLOCK ANT ADD ADD ERASE TV CH PROGRAM CABLE CABLE 1 ANT 0 9 2 5 1 2 SET ENGL SH I QUICK CONNECT GU I DE T I LT CORRECT I ON 0 To display the time on screen Press RE...

Page 49: ...ctivate MUTE See Using the closed caption feature on page 46 for more information Selecting stereo SAP broadcasts The multi channel TV sound MTS feature allows you to output to high fidelity stereo sound from your TV s internal speakers MTS also can transmit a second audio program SAP containing a second language music or other audio information when provided by individual stations When the TV rec...

Page 50: ... your desired bass expansion level HIGH LOW or OFF 1 1 2 3 4 5 6 7 8 9 10 11 12 13 14 15 16 17 18 2 3 4 5 6 7 8 9 10 11 12 13 14 15 16 17 18 2 3 4 5 6 7 8 9 10 11 12 13 14 15 16 17 18 19 20 21 22 23 24 25 26 27 28 29 30 31 32 33 34 35 1 2 3 4 5 6 7 8 9 10 11 12 13 14 15 16 17 18 19 20 21 22 23 24 25 26 27 28 29 30 31 32 33 34 35 THEATER T r u B a s s FOCUS SRS 3D WOW P I CTURE AUTO ASPECT S I ZE P...

Page 51: ...8 9 10 11 12 13 14 15 16 17 18 1 2 3 4 5 6 7 8 9 10 11 12 13 14 15 16 17 18 2 3 4 5 6 7 8 9 10 11 12 13 14 15 16 17 18 19 20 21 22 23 24 25 26 27 28 29 30 31 32 33 34 35 1 2 3 4 5 6 7 8 9 10 11 12 13 14 15 16 17 18 19 20 21 22 23 24 25 26 27 28 29 30 31 32 33 34 35 AUD O I CYCLONE CYC LEVEL ON ON OFF MA I N 7 0 OFF SPEAKERS AUD O OUT I STABLE SOUND 4 Press y or z to highlight CYC LEVEL 5 Press x o...

Page 52: ...17 18 19 20 21 22 23 24 25 26 27 28 29 30 31 32 33 34 35 1 2 3 4 5 6 7 8 9 10 11 12 13 14 15 16 17 18 19 20 21 22 23 24 25 26 27 28 29 30 31 32 33 34 35 AUD O I CYCLONE CYC LEVEL ON OFF MAIN P P O 7 0 ON SPEAKERS AUD O OUT I STABLE SOUND MAIN Outputs the sound of the main program through the AUDIO OUT jacks POP Outputs the sound of the POP program through the AUDIO OUT jacks Note Make sure the vol...

Page 53: ...7 8 9 10 11 12 13 14 15 16 17 18 1 2 3 4 5 6 7 8 9 10 11 12 13 14 15 16 17 18 2 3 4 5 6 7 8 9 10 11 12 13 14 15 16 17 18 19 20 21 22 23 24 25 26 27 28 29 30 31 32 33 34 35 1 2 3 4 5 6 7 8 9 10 11 12 13 14 15 16 17 18 19 20 21 22 23 24 25 26 27 28 29 30 31 32 33 34 35 AUD O I CYCLONE CYC LEVEL ON ON ON OFF P P O 7 0 SPEAKERS AUD O OUT I STABLE SOUND To turn off the StableSound feature Highlight OFF...

Page 54: ...off feature The TV will automatically turn itself off after approximately 15 minutes if it is tuned to a vacant channel or a station that completes its broadcast for the day This feature does not work in VIDEO mode Understanding the last mode memory feature If the power is cut off while you are viewing the TV the Last Mode Memory feature turns the TV on automatically when the power is resupplied I...

Page 55: ...quivalent 47 k ohm ColorStream component video INPUT Y 1V p p 75 ohm PR 0 7 V p p 75 ohm PB 0 7 V p p 75 ohm AUDIO 150 mV rms 47 k ohm VIDEO AUDIO OUTPUT VIDEO 1 V p p 75 ohm negative sync AUDIO 150 mV rms 30 modulation equivalent 4 7 k ohm VARIABLE AUDIO OUTPUT 0 300 mV rms 30 modulation equivalent 4 7 k ohm AUDIO CENTER CHANNEL INPUT 300 mV rms 30 modulation equivalent 10 k ohm DVI HDCP INPUT HD...

Page 56: ... TV VCR button on the remote control is set correctly Cannot receive above channel 13 Make sure the device switch on the remote control is set to the mode that corresponds with the signal source type cable company or outside antenna Black box appears on the screen The closed caption feature may be set to one of the Text modes T1 T2 T3 or T4 Turn closed captioning OFF Unable to select a certain cha...

Page 57: ... 4 Labor service charges for set installation setup adjustment of customer controls and installation or repair of antenna systems are not covered by these warranties Reception problems caused by inadequate antenna systems are your responsibility 5 Warranties extend only to defects in materials or workmanship as limited above and do not extend to any television or parts that have been lost or disca...

Page 58: ...ms are your responsibility 5 Warranties extend only to defects in materials or workmanship as limited above and do not extend to any television or parts that have been lost or discarded by you or to damage to television or parts caused by misuse accident Acts of God such as lightning or fluctuations in electric power improper installation improper maintenance or use in violation of instructions fu...

Page 59: ...uts 45 Language selection 21 Last mode memory 54 Locking channels 39 Locking video inputs 40 Locks menu 36 Menu system 20 MTS feature 49 MUTE button 49 O P ON timer 47 Picture adjustments COLOR TEMPERATURE 44 FLESH TONE 43 Picture mode 42 Picture quality 42 Picture out picture POP CH SCAN button 34 FREEZE button 33 POP CH zy buttons 32 POP DIRECT CH button 32 SOURCE button 32 SPLIT button 32 SWAP ...

Page 60: ...EAD OFFICE 82 TOTOWA ROAD WAYNE NJ 07470 U S A NATIONAL SERVICE DIVISION 1420 B TOSHIBA DRIVE LEBANON TN 37087 U S A TOSHIBA OF CANADA LTD HEAD OFFICE 191 McNABB STREET MARKHAM ONTARIO L3R 8H2 CANADA TEL 905 470 5400 SERVICE CENTERS TORONTO 191 McNABB STREET MARKHAM ONTARIO L3R 8H2 CANADA TEL 905 470 5400 MONTREAL 18050 TRANS CANADA KIRKLAND QUEBEC H9J 4A1 CANADA TEL 514 390 7766 VANCOUVER 22171 F...

Reviews: