Toshiba 32DL933B Owner'S Manual Download Page 45


English

   - 44 -

English

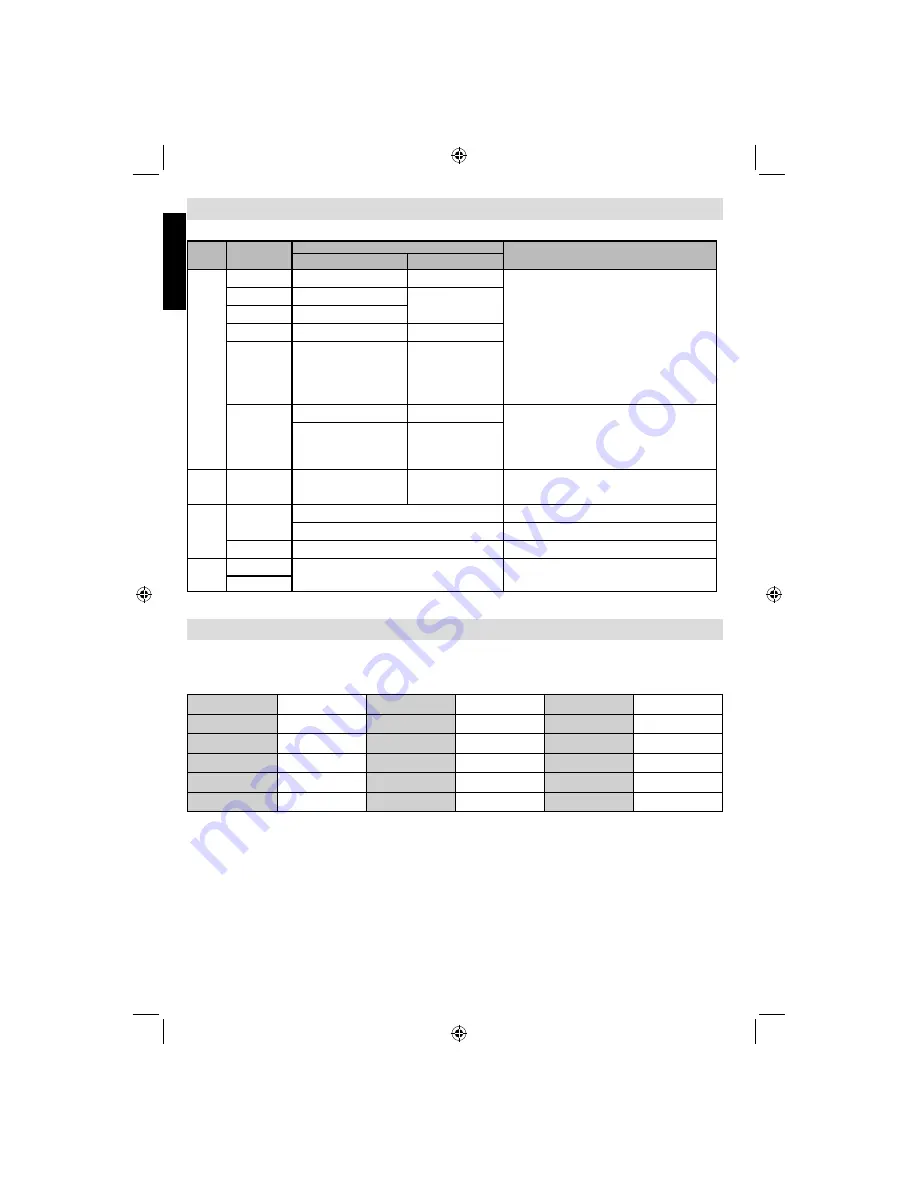
Appendix C: Supported File Formats for USB Mode

Media

File 

Extension

Format

Remarks                                        

(Maximum resolution/Bit rate etc.)

Video

Audio

Movie

.mpg, .mpeg

MPEG1, 2

MPEG Layer 1/2/3

max 1920x1080 @ 30

p 20Mbit/sec

.dat

MPEG1, 2

MPEG2

.vob

MPEG2

.mkv

H.264, MPEG1,2,4

EAC3 / AC3

.mp4

MPEG4, H.264

PCM/MP3

.avi

MPEG2, MPEG4

PCM/MP3

max 1920x1080 @ 30

p 20Mbit/sec

H.264

PCM

Music

.mp3

-

MPEG 1 Layer 1 / 2 

(MP3)

32kbps ~ 320kbps(Bit rate)

32kHz ~ 48kHz(Sampling rate)

Photo

.jpg .jpeg

Baseline JPEG

max WxH = 15360x8640      4147200bytes

Progressive JPEG

max WxH = 1024x768          6291456bytes

.bmp

-

max WxH = 9600x6400        3840000bytes

Subtitle

.sub

-

-

.srt

Appendix D: PIN Information 

Before connecting any external equipment, turn off all main power switches. If there is no switch, remove the 
mains plug from the wall socket. 
Signal information for Mini D-sub 15 pin connector 

Pin No.

Signal name

Pin No.

Signal name

Pin No.

Signal name

1

R

6

Ground

11

NC

2

G

7

Ground

12

NC

3

B

8

Ground

13

H-sync

4

NC*

9

NC

14

V-sync

5

NC

10

Ground

15

NC

* NC = not connected

01_MB62_[GB]_(01-TV)_IDTV_(IB_INTERNET)_(32155LED_1911UK)_NICKEL17_10078001_10078719.indd   44

01_MB62_[GB]_(01-TV)_IDTV_(IB_INTERNET)_(32155LED_1911UK)_NICKEL17_10078001_10078719.indd   44

05.05.2012   18:31:22

05.05.2012   18:31:22

Summary of Contents for 32DL933B

Page 1: ...OWNER S MANUAL 32DL933B 32DL934B DIGITAL Series Register your TV online at www toshiba co uk registration ...

Page 2: ...online at www toshiba co uk registration 01_MB62_ GB _ 01 TV _IDTV_ IB_INTERNET _ 32155LED_1911UK _NICKEL17_10078001_10078719 indd 1 01_MB62_ GB _ 01 TV _IDTV_ IB_INTERNET _ 32155LED_1911UK _NICKEL17_10078001_10078719 indd 1 05 05 2012 18 30 29 05 05 2012 18 30 29 ...

Page 3: ...to continue receiving your existing TV channels and also to pick up new ones Digital UK the body leading the digital TV switchover will advise you when you need to re tune during the switchover If you choose to connect your TV to satellite or cable with a digital box then it will not be affected by switchover and you won t need to re tune Keep this important information about how to re tune your T...

Page 4: ...process select Yes by using or and OK button 4 After auto channel scan type is set and selected and confirmed installation process will start and progress bar will move along The television will start to search for all available stations You must allow the television to complete the search This process may affect any saved information stored on your product Please consult your instruction manual o...

Page 5: ...red your address details the next page gives you an indication of which TV services you should receive based on your most likely transmitter You may be able to receive television services from more than one transmitter and you can check alternatives where available On the results page click on the pink button to see your full reception forecast and channel information for switchover 3 Click on the...

Page 6: ...lect Search Type as Digital by using or 8 Select Channel and use or to change the channel number 9 Press OK to start search 10 Press MENU button You should find that you now have your preferred service installed 01_MB62_ GB _ 01 TV _IDTV_ IB_INTERNET _ 32155LED_1911UK _NICKEL17_10078001_10078719 indd 5 01_MB62_ GB _ 01 TV _IDTV_ IB_INTERNET _ 32155LED_1911UK _NICKEL17_10078001_10078719 indd 5 05 0...

Page 7: ...ositions 23 Standby Notifications 23 Channel List Sorting Programmes Programme Locking 24 Viewing Channel List 24 Moving a Channel 24 Deleting a Channel 24 Renaming a Channel 24 Locking a Channel 24 Viewing Info Banner Electronic Programme Guide 25 Viewing Info Banner 25 Electronic Programme Guide 25 Language Selection 26 Language Settings 26 Preferred 26 Current 26 Digital Settings Parental Contr...

Page 8: ...o Start 37 USB Media Browser 37 Playing MP3 Files 38 Viewing JPEG Files 38 Slideshow Feature 39 Video Playback 39 Media Browser Settings 40 To Close the Media Player 40 Analogue Text Services 41 Analogue Text Services 41 Using Text Button TEXT 41 Acessing Sub Pages 41 Revealing Concealed Text 41 Holding a Page 41 To display an initial page 41 Appendix A PC Input Typical Display Modes 42 Appendix B...

Page 9: ...stallation operation or safety of your equipment DO be careful with glass panels or doors on equipment Do not DON T remove any fixed cover as this may expose danger ous voltages DON T obstruct the ventilation openings of the equipment with items such as newspapers tablecloths curtains etc Overheating will cause damage and shorten the life of the equipment DON T allow electrical equipment to be exp...

Page 10: ... iv intentional misuse of the product v use of the product in improper conditions vi loss and or damage caused to the product whilst in the possession of a third party vii any damage or loss caused as a result of the owner s failure and or neglect to follow the instructions set out in the owner s manual viii any loss or damage caused directly as a result of misuse or malfunction of the product whe...

Page 11: ...ight sides of screen IMPORTANT INFORMATION TV Installation If a television is not positioned in a sufficiently stable location it can be potentially hazardous due to falling Many injuries particularly to children can be avoided by taking simple precautions such as Only using furniture that can safely support the television Ensuring the television is not overhanging the edge of the supporting furni...

Page 12: ... thunder storm unplug the AC power cord and disconnect the aerial Caution Do not touch the aerial connector When you leave your home for a long period of time unplug the AC power cord for safety The unit becomes warm when in operation Do not place any covers or blankets on the unit in order to prevent overheating The ventilation holes should not be blocked Do not set up near radiators Do not place...

Page 13: ...ufacturer Note The bracket shown above is a sample image The bracket and fixings are not supplied with the TV A brick wall should not be used Removing the pedestal stand 1 Carefully lay the front of the unit face down on a flat cushioned surface with the stand hanging over the edge 2 Remove the screws 3 After the screws are removed hold the pedestal stand in place then remove the pedestal stand an...

Page 14: ... five metres or outside an angle of 30 degrees from the IR receiver If the operating range becomes reduced the batteries may need replacing Standby On mode Subtitle on off Switch to TV or DVD mode T o select TV programme number T o alter the volume T o mute the sound T o change channels Operation LED Programme guide T eletext Controls Mono Stereo Dual I II MENU On Off T eletext Analogue Digital br...

Page 15: ...me equipment may not operate correctly A wide variety of external equipment can be connected to the TV therefore the relevant owner s manuals for all additional equipment must be referred to for exact instructions If the TV automatically switches over to monitor external equipment return to normal TV by pressing the desired pro gramme position button To recall external equipment press button repea...

Page 16: ... transfers both video and audio Separate analogue audio cables are not required see illustration To view the HDMI device video press button to select HDMI1 or HDMI2 HDMI Input Socket Back HDMI device To Connect a DVI Device Connect an HDMI to DVI adaptor cable HDMI type A con nector to the HDMI input socket and audio cables to the RED and WHITE SIDE AV AUDIO inputs see illustration The recommended...

Page 17: ...onnecting a DVD Player Connecting to a DVD Player via YPbPr Some DVD players are connected through COMPONENT SOCKETS YPbPr In this case you must use the supplied Component YPbPr video connection cable for enabling connection First plug the single jack of the cable to the TV s YPbPr socket side Afterwards insert your YPbPr cable s not supplied connectors into the plural part of the supplied YPbPr v...

Page 18: ... not pull out USB memory while playing a file CAUTION Quickly plugging and unplugging USB devices is a very hazardous operation Especially do not repeatedly quickly plug and unplug the drive This may cause physical damage to the USB player and especially the USB device itself USB Memory Connection Plug your USB memory to the USB input of the TV SIDE VIEW USB USB memory NOTE The USB socket has limi...

Page 19: ...of keeping stand by mode Therefore it is highly recommended to activate Power Save Mode setting to reduce your annual power consumption And also it is recommended to disconnect the TV from the mains plug to save energy more when you do not use Please helps us to save environment by following these steps This television is designed to consume less energy Harmful substances and contents that are dan...

Page 20: ... main menu appears as a group of icons each for a menu option Press the Left or Right button to select a topic In sub menu screen mode the menu appears as a list Press the Up or Down button to select a topic To use the options press the Up and Down buttons on the remote control to move up and down through them and OK button Left or Right buttons to select the required choice Follow the on screen i...

Page 21: ...to continue and the following message will be displayed on the screen Select 6 Yes button by using Left or Right button and press OK button to continue Afterwards the following OSD will be displayed on the screen If you select 7 Cable option the following screen will be displayed You can select frequency ranges from this 8 screen For highlighting lines you see use Up or Down button You can enter t...

Page 22: ...n will be displayed Select Automatic Channel Scan Retune by using Up or Down button and press OK button Automatic Channel Scan options will be displayed You can select options by using Up or Down and OK buttons Auto Channel Scan Menu Operation Digital Searches and stores aerial DVB stations Analogue Searches and stores analogue stations Full Searches and stores both analogue and aerial DVB station...

Page 23: ...h a SCART lead or to tune in a station on another System To allocate a programme position on the television for a decoder and media recorder turn the decoder on insert a pre recorded film into the media recorder and press PLAY then manually tune After selecting search type as Analogue you can use Up or Down button to highlight an item and then press Left or Right button to set an option Enter the ...

Page 24: ...olume and Muting Sound Volume Press or button on the remote control to adjust the volume Move the menu wheel on the TV up or down to change the volume Sound Mute Press button once to turn the sound off and again to cancel Selecting Programme Positions To select a programme position use the numeric buttons on the remote control To change the channels using the menu wheel on the TV first press the m...

Page 25: ...untag all channels YELLOW button to tag untag channel Select the channel that you want to delete and select Delete option Press OK button to continue A warning screen will appear Select Yes to delete select No to cancel Press OK button to continue Renaming a Channel Select the channel that you want to rename and select Edit Name option Press OK button to continue Pressing Left or Right button move...

Page 26: ... of the channel and programme currently being viewed This may take a few moments to appear For information on a highlighted programme press button For details of other programmes currently available press navigation buttons to scroll up and down or scroll left right through the list As channels are selected details of the programme currently being broadcast will appear To set the timer for a selec...

Page 27: ...anguage with Left or Right button The chosen language will be seen in subtitles Teletext changes the preferred teletext language Guide By pressing Left or Right button change the guide language Current Audio if audio language is supported change the audio language by pressing Left or Right button Subtitle if subtitle is backed up alter the subtitle language with Left or Right button The chosen lan...

Page 28: ...d So the user can t add channels Note Factory set default PIN code is 0000 It is not available for France country setting Child Lock Press MENU button and select settings by using Left or Right button Press OK to continue Use Up or Down to select parental and then press OK to continue Enter the pin number Child Lock disables the menu wheel on the television All buttons on the remote control can st...

Page 29: ...lect Sharpness Colour Sets the colour value adjusting the colours Press MENU button and select Picture by using Left or Right button Press Up or Down button to select Colour Power Save Mode Enables or disables the power save mode Use Up or Down button to select Power Save Mode Press Left or Right button to set Power Save Mode as On or Off See the section Environmental Information in this manual fo...

Page 30: ... Films are recorded at a different number of frames per second to normal television programmes Press or buttons to select Film mode Press or buttons to set this feature Auto or Off Turn this feature to Auto when you are watching films to see the fast motion scenes clearly Colour Shift Adjust the desired colour tone Press MENU button and select Picture by using Left or Right button Press Up or Down...

Page 31: ...tting when watching a widescreen DVD widescreen video tape or a 16 9 broadcast when available Due to the range of widescreen formats 16 9 14 9 etc black bars may be visible on the top and bottom of the screen 4 3 Use this setting to view a true 4 3 broadcast 14 9 Zoom This option zooms to the 14 9 picture Subtitle When subtitles are included on a letterbox format broadcast this setting will raise ...

Page 32: ...creen In the PC Position menu press the Down button until H Position is highlighted Press the Left or Right button to adjust the value V Position V Vertical Position shifts the image vertically towards the top or bottom of the screen In the PC Position menu press the Down button until V Position is highlighted Press the Left or Right button to adjust the value Dot Clock Dot Clock adjustment correc...

Page 33: ...ne Press Left or Right button to select Volume Press Right button to increase headphone volume level Press Left button to decrease headphone volume level Headphone volume level can be adjusted between 0 and 63 Sound Mode This setting is used to set the sound mode Higlight Sound Mode by using Up or Down button Press Left or Right button to set You can select Mono Stereo Dual I or Dual II mode only ...

Page 34: ...ation see a service provider IMPORTANT Insert or remove the CI module only when the TV is SWITCHED OFF In order to watch certain digital channels a conditional access module CAM is necessary This module must be inserted in the CI slot of your TV Obtain the Conditional Access Module CAM and the viewing card by subscribing to a pay channel company then insert those to the TV using the following proc...

Page 35: ...a timer to be repeated as Once Daily or Weekly Use Left or Right button to select an option Change Delete Controls parental settings on timers Press GREEN button to save the timer Press RED button to cancel Editing a Timer Select the timer you want to edit by pressing Up or Down button When finished with editing press GREEN button to save You can press MENU button to cancel Deleting a Timer Select...

Page 36: ...ect Other Settings in the Settings menu and press OK button Operation Press Up or Down button to select an item Use Left or Right button to set an option Press OK button to view a sub menu Menu Timeout To set a specific display timeout for menu screens set a value for this option In the Other Settings menu select Menu Timeout and choose 15 sec 30 sec or 60 sec using Left or Right button Scan Encry...

Page 37: ...V Off You can set the timeout value of auto off feature After the timeout value is reached and the TV is not operated for selected time the TV will go off Press MENU button and select Settings by using Left or Right button Press OK button to continue Use Up or Down button to select Other Settings and then press OK button Select Auto TV Off using Up or Down button Broadcast Type Press MENU button a...

Page 38: ... is not recognized after power off on or First Time Installation plug the USB memory out and power off on the TV set Then plug the USB memory in again Do not use a USB Hub You must obtain any required permission from copyright owners to use copyright content Toshiba cannot and does not grant such permission Depending on the file size and amount in your USB memory it may take some time for loading ...

Page 39: ... be displayed as sorted and there is no need to sort files again by pressing RED button Viewing JPEG Files To view photo files from a USB Memory you can use this menu screen When you select Photos from the main options available image files will be filtered and listed on this screen If you select a subtitle file and press OK button you can select or deselect that subtitle file The following menu w...

Page 40: ...orts files by name Play button Plays all media files starting with the selected one YELLOW Button Change viewing style Loop Shuffle GREEN button Press once to disable Loop Press again to disable both Loop and Shuffle Press once more to enable only Shuffle Press again to enable all You can follow the disabled functions with the change of the icons BLUE Changes media options Play button Starts the v...

Page 41: ...nguage Sets supported subtitle language Subtitle Position Sets subtitle position as up or down Subtitle Font Size Sets subtitle font size max 54pt To Close the Media Player Press MENU button on the remote control USB Media Browser continued This TV allows you to enjoy photo music or video files stored on a USB memory 01_MB62_ GB _ 01 TV _IDTV_ IB_INTERNET _ 32155LED_1911UK _NICKEL17_10078001_10078...

Page 42: ... For further information on your particular text system s see the broadcast text index page or consult your local Toshiba dealer Below is a guide to the functions of the remote control text buttons Acessing Sub Pages If a text page has sub pages press and enter the sub page numbers 01 02 03 etc which can be selected using Left Right buttons at the bottom of the text page under the coloured links R...

Page 43: ...66Hz 72Hz 75Hz 85Hz 4 800x600 56Hz 60Hz 70Hz 72Hz 75Hz 85Hz 5 832x624 75 Hz 6 1024x768 60Hz 66Hz 70Hz 72Hz 75Hz 7 1152x864 60Hz 70Hz 75Hz 85 Hz 8 1280x768 60 HzA 9 1280x768 60 HzB 10 1280x768 75Hz 85Hz 11 1280x960 60Hz 75Hz 85Hz 12 1280x1024 60Hz 75Hz 85Hz 13 1360x768 60 Hz 14 1400x1050 60 HzA 15 1400x1050 60 HzB 16 1400x1050 75Hz 85Hz 17 1400x900 65Hz 75Hz 18 1600x1200 60 Hz 19 1680x1050 60 Hz 20...

Page 44: ...80i 60Hz 1080p 24Hz 1080p 25Hz 1080p 30Hz 1080p 50Hz 1080p 60Hz Note In some cases a signal on the LCD TV may not be displayed properly The problem may be an inconsistency with standards from the source equipment DVD Set top box etc If you do experience such a problem please contact your dealer and also the manufacturer of the source equipment 01_MB62_ GB _ 01 TV _IDTV_ IB_INTERNET _ 32155LED_1911...

Page 45: ...sive JPEG max WxH 1024x768 6291456bytes bmp max WxH 9600x6400 3840000bytes Subtitle sub srt Appendix D PIN Information Before connecting any external equipment turn off all main power switches If there is no switch remove the mains plug from the wall socket Signal information for Mini D sub 15 pin connector Pin No Signal name Pin No Signal name Pin No Signal name 1 R 6 Ground 11 NC 2 G 7 Ground 12...

Page 46: ...Stand fixing cover P Clip 32 Energy Efficiency Class A Visible Screen Size approx 80cm 32 On Mode Power Consumption approx 40W Annual Power Consumption approx 58 kWh Standby Power Consumption approx 0 50 W Screen Resolution pixels 1366 x 768 Display 16 9 Sound Output at 10 distortion 2 x 6 Power Consumption Model approx 65W Weight TV with stand 10 kg Gross weight 14 kg TV without stand 8 8 kg Test...

Page 47: ...s that products must be collected and disposed of separately from household waste Integrated batteries and accumulators can be disposed of with the product They will be separated at the recycling centres The black bar indicates that the product was placed on the market after August 13 2005 By participating in separate collection of products and batteries you will help to assure the proper disposal...

Page 48: ...e correct input by pressing A Digital Video Broadcast via an aerial antenna Q Why is the VCR DVD picture in black and white Q How are radio channels selected A Check the correct input has been chosen Check the correct input has been chosen A You can select them via the Channel List them Q Why is there a good video picture but no sound Q What can be done if the PIN number has been forgotten A Check...

Page 49: ...able Q Why does the active standby LED sometimes take longer to go out A Your subscription needs upgrading Contact your service provider A When put into standby the TV s active standby will automatically search all available channels for downloads provided Automatic Download is enabled The time taken to do this may vary EU Conformity Statement This product is marked with CE and complies therefore ...

Page 50: ...NTSC PAL playback according to disc content LPCM audio via coaxial digital audio output optional Multi Audio up to 8 support According to disc content Multi Subtitle up to 32 support According to disc content Multi Angle up to 9 support According to disc content 8 level parental control Fast forward and rewind in 5 different speeds 2x 4x 8x 16x 32x Slow motion playback in 4 different speeds 1 2x 1...

Page 51: ...the literature accompanying the appliance Notes on Discs On handling discs To keep the disc clean handle the disc by its edge Do not touch the surface Do not stick paper or tape on the disc If the disc is contaminated with any substance like glue remove before using it Do not expose the disc to direct sunlight or heat sources such as hot air ducts or leave it in a car parked in direct sunlight as ...

Page 52: ...ondensation occurs during the following cases When you bring the unit directly from a cold place to a warm place When you use the unit in a room where you just turned on the heater or a place where the cold wind from the air conditioner directly hits the unit In summer when you use the unit in a hot and humid place just after you move the unit from an air conditioned room When you use the unit in ...

Page 53: ... TV or DVD mode Zoom Repeat Title Menu Root Menu Pause Skip Next Skip Previous Play Stop Rapid Advance Rapid Reverse Note Buttons that are not indicated on the remote control illustration are not functional in DVD mode Eject Title Menu Audio language of the disc Root Menu if available 02_MB62_ GB _ 02 DVD _ IB_INTERNET _ 1911UK_WDIVX _10078001_10078719 indd 52 02_MB62_ GB _ 02 DVD _ IB_INTERNET _ ...

Page 54: ...t or right if available X Highlights a menu item Shifts the zoomed picture up or down if available Rapid reverse Rapid advance X Rapid reverse Rapid advance ANGLE Views the scene from different angles if available X X X SETUP Displays disc information Displays DVD setup menu during stop mode X Displays disc information Displays DVD setup menu during stop mode Displays disc information X Displays d...

Page 55: ... Usually a circulation will happen while switching 7 to another language that is you can cancel the subtitle by pressing SUBTITLE button a number of times until Subtitle Off appears on the screen When the power is turned on or the disc is 8 removed the language heard is the one selected at the initial settings If this language is not recorded on the disc only the available language on the disc wil...

Page 56: ...DVD menu and play DVD with Dolby audio you can get audio output with two channels via the speakers and the DIGITAL AUDIO socket If you select RAW from Spdif Output in DVD menu and play DVD with Dolby audio speakers will be muted and you can get 5 1 Dolby audio via the DIGITAL AUDIO socket Troubleshooting The picture quality is poor DVD Make sure the DVD disc surface is not damaged Scratch fingerpr...

Page 57: ... enables aesthetically pleasing full motion video to be recorded over long periods of time for instance a whole movie can be recorded DVD has a structure consisting of two 0 6 mm thin discs which are adhered to each other Since the thinner the disc the higher the density at which the information can be recorded a DVD disc has a greater capacity than a single 1 2 mm thick disc Since the two thin di...

Page 58: ...ons can be easily selected through the on screen menu An LP is recorded as an analog signal with more distortion CD is recorded as a Digital Signal with better audio quality less distortion and less deterioration of audio quality overtime Mp3 is recorded as a Digital Signal with better audio quality less distortion and less deterioration of audio quality over time JPEG is recorded as a Digital Sig...

Page 59: ...cture File Format This unit can only display a maximum of 14 Subtitles smi sub ssa ass Note It is not guaranteed that all DivX formats are supported Specifications Types of Discs Supported DVD SS SL 12cm DVD 5 SS DL 12cm DVD 9 DS SL 12cm DVD 10 DS DL 12cm DVD 18 CD DA CD R CD RW MP3 JPEG Video Type MPEG2 Video Standard Decoding MPEG1 supported Full Screen Video Display of 720 x 576 PAL 720 x 480 N...

Page 60: ...republika 323 204191 Danmark 80 88 93 38 Eesti Vabariik 69 97 800 Suomen tasavalta 0800 77 35 03 France 09 69 32 64 84 Deutschland 0431 24 89 45 50 Ortstarif abweichender Mobilfunktarif moglich Gibralter 200 76334 Ελληνική 210 9554298 Magyar Köztársaság 23 428 870 Ísland 00 45 80 88 93 38 Yisrā el 03 953 5900 Italia 039 609 9301 Latvijas 00 372 69 97 800 Lietuvos 00 372 69 97 800 Luxembourg 00 32 ...

Reviews: