Toshiba 23PB200 Series Owner'S Manual Download Page 9

– 9 –

appropriate 

Colour System

 (For the system of each 

country or region, refer to pages 10, 22).

Switching off  the TV

1


Press 

 on the remote control or 

!

 on the 

TV left side panel to switch to the standby 
mode.

Notes:

• 

 When the TV will not be used for a long period of 
time, such as during vacation or travel, remove the 
power plug from the wall outlet.

• 

 The TV will automatically turn itself off  after 
approximately 15 minutes if it is tuned to a vacant 
channel or a station that completes its broadcast 
for the day. This function does not work in external 
input or Blue screen Off  mode. 
The TV will automatically turn itself off  after 
approximately 2 hours if you do not operate the TV 
after turned on by on timer function.

• 

 If power is cut off  while you are viewing the TV, 
the Last Mode Memory function turns on the TV 
automatically when power is applied again. If power 
is going to be off  for a long time and you are going 
to be away from your TV, unplug the power cord to 
prevent the TV from turning on in your absence.

Tuning the TV for the fi rst time

Before switching on the TV, put your decoder and 
media recorder to standby, if they are connected, 
and ensure that the aerial is connected. To setup 
the TV, use the buttons on the remote control as 
detailed on page 7.

Press the 

 button. The 

Quick Setup

 screen 

will appear. This screen will appear the fi rst time 
that the TV is switched on.

Quick Setup

Language

English

Press 

 or 

 to select the menu language 

(English, Chinese (CS), Malay, Thai, Vietnamese, 
Russian, Arabic, Persian, French or Indonesia).

Press 

Q

, to display the 

Location

 menu.

Press 

 or 

 to select 

Store

 or 

Home

. For 

normal home use, select 

Home

.

You can select either 

Home

 or 

Store

 mode. 

Home

 is recommended for normal home use. 

Select 

Store

 when using a TV for displaying in 

a shop, etc.

Location

Home

To use the TV for displaying in 
a store showroom, please select [Store].
[Home] mode is recommended 
for normal use.

Notes:

• 

 Some PC models cannot be connected to this TV.

• 

 If connecting a certain PC model that signal is 
particular, the PC signal may not be detected 
correctly.

• 

 There is no need to use an adapter for computers 
with DOS/V compatible mini D-sub 15 pin terminal.

• 

 A bar may appear in the upper, lower, right or left 
side of the screen, or parts of the picture may be 
obscured depending on some signals. This is not the 
malfunction.

• 

 If the edges of the picture are stretched, readjust the 
picture position adjustments in the 

PC Settings


menu.

• 

 Depending on the specifi cation of the PC you are 
playing the DVD-Video on, and the DVD’s title, some 
scenes may be skipped, or you may not be able to 
pause during multi-angle scenes.

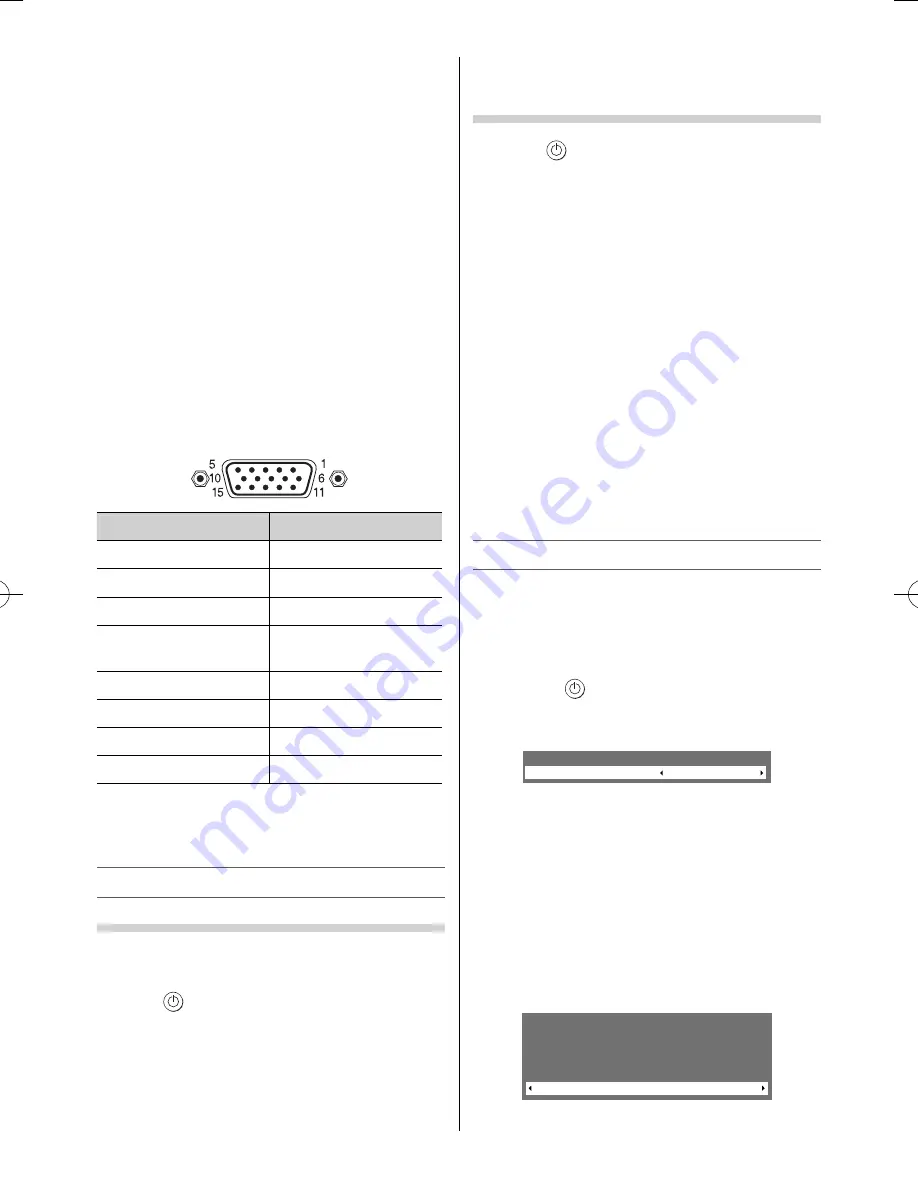
Signal names for mini D-sub 15 pin connector

Pin assignment for RGB/PC terminal

Pin No.

Signal name

Pin No.

Signal name

1

R

9

NC

2

G

10

Ground

3

B

11

NC

4

NC (not 
connected)

12

DDC Data

5

NC

13

H-sync

6

Ground

14

V-sync

7

Ground

15

DDC Clock

8

Ground

• 

 Most of the picture/sound controls and functions 
are available. However features not available will 
be greyed out.

Turning the TV on

Switching on the TV

Connect the power cord to a wall outlet, the 

!

 power indicator lights in red (standby mode).

Press 

 on the remote control or 

!

 on the TV 

left side panel, the 

power indicator lights in 

green.

Note:

If you watch black and white programmes when the 

Colour System

 mode is set to 

Auto

, colour noise 

may appear on the screen. In this case select the 

23293240PB200Series̲En.indd   9

23293240PB200Series̲En.indd   9

2012/10/04   14:55:48

2012/10/04   14:55:48

Summary of Contents for 23PB200 Series

Page 1: ...Series 2012 TOSHIBA CORPORATION All Rights Reserved VX1A00260900 TD J Welcome toToshiba Thank you for purchasing this Toshiba LED TV This manual will help you use the exciting features of your new TV Instructions in this manual are based on using the remote control You also can use the controls on the TV if they have the same name as those referred to on the remote control Please read all safety a...

Page 2: ...ted Note Extreme care should always be used when attaching the pedestal stand to avoid damage to the LCD panel 1 1 3 2 2 4 M5 x 14 M4 x 8 M5 x 14 Warning Ensure the power cable is not pinched when attaching the pedestal stand as this could cause an electric shock Warning Ensure the power cable is not pinched when attaching the pedestal stand as this could cause an electric shock 29PB200 Series 32P...

Page 3: ...ever use other cord except for supplied AC power cord and never use the supplied power cord for any other purpose 5 Never insert or remove the power plug with wet hands This may cause an electric shock 6 Never block or cover the slots and openings in the cabinet Never place the TV so that it is facing upward or on its side Never place the TV in a closet bookcase or other similar area where the ven...

Page 4: ...V this may cause a fire or an electric shock If small objects drop inside the TV turn off the TV and remove the power plug from the outlet immediately and contact a service technician 3 Never insert objects metal or paper or pour water inside the TV through ventilation holes and other openings These items may cause a fire or an electric shock If these objects are inserted inside the TV turn off th...

Page 5: ...hing on it These actions will damage the LCD screen 2 About cabinet and LCD screen Never spray volatile compounds such as insecticide on the cabinet and LCD screen This may cause a discolouration or damage the cabinet and LCD screen 3 Some pixels of the screen do not light up The LCD display panel is manufactured using an extremely high level of precision technology however sometimes some pixels o...

Page 6: ...sal area Batteries must not be exposed to excessive heat such as sunshine fire or the like Attention should be drawn to the environmental aspects of battery disposal Never mix battery types or combine used batteries with new ones Notes If the remote control does not operate correctly or if the operating range becomes reduced replace both batteries with new ones If the batteries are dead or if you ...

Page 7: ...vailable 12 Picture still 13 Stereo Bilingual selection 14 Number buttons 0 9 15 To display the Channel List 16 To return to the previous programme 17 To display on screen information Initial Index function for Teletext 18 This button turns the sound off on 19 To exit menu 20 To access the Quick Menu 21 Teletext on Superimpose Teletext off 22 Teletext control buttons Four coloured buttons Red Gree...

Page 8: ...device and select Analogue in HDMI 2 Audio of the AV Connection menu page 13 This TV is able to connect with HDMI devices But it is possible that some HDMI devices may not operate properly with this TV Connecting HDMI or DVI devices The HDMI input on your TV receives digital audio and uncompressed digital video from an HDMI and uncompressed digital video from a DVI device This input is designed to...

Page 9: ...Press or to select Store or Home For normal home use select Home You can select either Home or Store mode Home is recommended for normal home use Select Store when using a TV for displaying in a shop etc Location Home To use the TV for displaying in a store showroom please select Store Home mode is recommended for normal use Notes Some PC models cannot be connected to this TV If connecting a certa...

Page 10: ...ound system page 22 D Position skip selection Press or to turn the position skip option on 8 or off The position will then be skipped when you select channels with PU or Pu The 8 mark will appear beside a position number when you use the Number button on the remote control E Channel search operation Press to search up the band or to search down the band Press or repeatedly until your desired chann...

Page 11: ... headings Press or to select an item Press or to select or adjust setting Press Q to display the next menu Press EXIT to close the menu Press RETURN to return the previous menu Displaying the menu chart PICTURE Picture Settings 3D Colour Management Base Colour Adjustment Active Backlight Control Noise Reduction Noise Reduction Off On TIMER Sleep Timer On Timer On Timer Position 00 00 00 00 01 SOUN...

Page 12: ...ss again Sorting positions Ex To swap channel ABCD Prog 1 for channel MNOP Prog 4 1 From the SETUP menu press or to select Manual Tuning menu and then press Q 2 Press or to select the channel ABCD then press 1 A B C D E F G H I J K L M N O P Manual Tuning Pos Label 2 3 4 5 3 Press to select the new position 4 then press 4 Press to select the channel MNOP then press 5 Press to select the new positi...

Page 13: ... when receiving PC signal format This setting will display the image correctly without distortion or picture clipping PC Wide Use this setting for PC connected via HDMI or RGB PC terminal when receiving PC signal format This setting will display the image without picture clipping Notes Using the special functions to change the size of the displayed image e g changing the height width ratio for the...

Page 14: ...select the On mode Effective signal and setup conditions When the Video input mode is selected When the input signal format is 480i 576i or 1080i signals Use menus PICTURE and Picture Settings Use the item Cinema Mode Note When a DVD movie with subtitle is playing back this mode may not work correctly Adjusting the ColourTemperature Colour Temperature increases the warmth or coolness of the pictur...

Page 15: ...ogrammes If sound distortion interruptions or silence arises in the low sound volume level setting the e Mono 2 mode will mitigate the problem When a monaural programme is received e Mono appears and press g Use modes Mono 1 and Mono 2 Note On some cases the reception of stereo bilingual broadcasts may not be possible after switching on the e Mono 2 mode Adjusting the sound quality You can adjust ...

Page 16: ...Teletext Auto and List which are explained below Setting up theTeletext mode To select a language forTeletext The language 1 4 option enables the display of different language when using Teletext Use the menu FUNCTION Use the item Teletext Language Language 1 English German Dutch Flemish Russian Bulgarian Ukranian Lettish Lithuanian Czech Slovak Estonian Language 2 Polish German Dutch Flemish Esto...

Page 17: ...ou want to change e g Press the Green button and enter the 3 digit number This number will change and blinking 4 Press Q to store your choice The bars at the bottom of the screen will flash white 5 You may view other pages by simply entering the 3 digit page number but NEVER press Q or you will lose the favorite already stored Teletext buttons on the remote control Below is an introduction to the ...

Page 18: ...e the item Sampling Clock Resetting the PC Settings The Reset function adjusts the PC Settings to the factory settings Use menus SETUP and PC Settings Use the item Reset select Yes and press Q Note When a PC is connected using HDMI none of these function will be available Using the Media Player This TV allows you to enjoy music and photo files stored on a USB device connected to the USB port Notes...

Page 19: ...ss to view the next file or press to view the previous file Note If the previous or next file is not compatible it will be skipped automatically 3 Press Q to return to Single View mode To set the Slide Show mode settings 1 From FUNCTION menu highlight Media Player and press Q 2 Press or to select Setup and press Q 3 Press or to select Slide Show Effect or Interval Time Item Description Slide Show ...

Page 20: ... next file Press Z to skip to the beginning of the current file Press Z again within 2 seconds to skip to the beginning of the previous file Note If the previous or next file is not compatible it will be skipped automatically During playback Press W to pause To resume normal playback press c play To play in fast reverse or fast forward directions press CC or cc during playback Each time you press ...

Page 21: ...htness of the screen comes down or flickers of the screen are caused or some parts of the screen do not light up When you just buy and start to use this TV a flickering may be caused in the screen In this case switch off the TV then switch on it again to cure the condition Some pixels of the screen do not light up The LCD display panel is manufactured using an extremely high level of precision tec...

Page 22: ...deo tapes through PAL TV equipment Specifications LEDTV Model 23PB200 Series 29PB200 Series 32PB200 Series 40PB200 Series 29PB202 Series Power source 110 240 V AC 50 60 Hz Power consumption 23 40 W 0 3 W 29 56 W 0 3 W 32 56 W 0 3 W 40 84 W 0 4 W Dimensions 23 548 W 423 H 135 D mm 29 665 W 507 H 145 D mm 32 734 W 546 H 145 D mm 40 922 W 652 H 191 D mm Mass Weight 23 4 4 kg 29 4 5 kg 32 5 0 kg 40 8 ...

Page 23: ...e Support file system FAT16 and FAT32 Operating condition Temperature 0 C 35 C Humidity 20 80 No moisture condensation Following information is only for India The use of this symbol indicates that this product may not be treated as household waste By ensuring this product is disposed of correctly you will help prevent potential negative consequences for the environment and human health which could...

Page 24: ...whatsoever for any loss arising from the use of or inability to use such software components The same applies even when the copyright holders or relevant third parties have been informed of the possibility of such loss Loss here includes normal special incidental and indirect loss including but not limited to the loss of data or its accuracy loss incurred by the user or any third party and interfa...

Page 25: ...ogram independent of having been made by running the Program Whether that is true depends on what the Program does 1 You may copy and distribute verbatim copies of the Program s source code as you receive it in any medium provided that you conspicuously and appropriately publish on each copy an appropriate copyright notice and disclaimer of warranty keep intact all the notices that refer to this L...

Page 26: ...e 4 You may not copy modify sublicense or distribute the Program except as expressly provided under this License Any attempt otherwise to copy modify sublicense or distribute the Program is void and will automatically terminate your rights under this License However parties who have received copies or rights from you under this License will not have their licenses terminated so long as such partie...

Page 27: ...BLE LAW EXCEPT WHEN OTHERWISE STATED IN WRITING THE COPYRIGHT HOLDERS AND OR OTHER PARTIES PROVIDE THE PROGRAM AS IS WITHOUT WARRANTY OF ANY KIND EITHER EXPRESSED OR IMPLIED INCLUDING BUT NOT LIMITED TO THE IMPLIED WARRANTIES OF MERCHANTABILITY AND FITNESS FOR A PARTICULAR PURPOSE THE ENTIRE RISK AS TO THE QUALITY AND PERFORMANCE OF THE PROGRAM IS WITH YOU SHOULD THE PROGRAM PROVE DEFECTIVE YOU AS...

Page 28: ...be mouse clicks or menu items whatever suits your program You should also get your employer if you work as a programmer or your school if any to sign a copyright disclaimer for the program if necessary Here is a sample alter the names Yoyodyne Inc hereby disclaims all copyright interest in the program Gnomovision which makes passes at compilers written by James Hacker signature of Ty Coon 1 April ...

Page 29: ......

Reviews: