background image

6

(E) 23HLV85

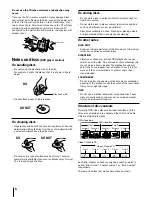
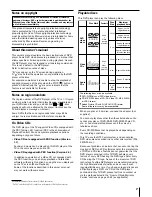
Do not use the TV when moisture condensation may
occur.

If you use the TV in such a situation, it may damage discs
and internal parts. Remove the disc, connect the power cord
of the TV to the wall outlet, turn on the TV, and leave it for
two or three hours. After two or three hours, the TV will have
warmed up and evaporated any moisture. Keep the TV
connected to the wall outlet and moisture  ondensation will
seldom occur.

Notes on discs 

(DVD player section)

On handling discs

• Do not touch the playback side of the disc.

For example, handle the disc so that it is shown in figure
below.

• Do not attach paper or tape to discs.

On cleaning discs

• Fingerprints and dust on the disc cause picture and sound

deterioration. Wipe the disc from the center outwards with
a soft cloth. Always keep the disc clean.

• Do not use any type of solvent such as thinner, benzine,

commercially available cleaners or antistatic spray for vinyl
LPs. It may damage the disc.

On storing discs

• Do not store discs in a place subject to direct sunlight or

near heat sources.

• Do not store discs in places subject to moisture and dust

such as a bathroom or near a humidifier.

• Store discs vertically in a case. Stacking or placing objects

on discs outside of their case may cause warping.

On other notes

DISC SLOT

• Keep your fingers well clear of the disc slot as it is closing.

It may cause serious personal injury.

VIBRATION

• Vibration or shock may disrupt DVD playback or cause

scratches on the disc. Do not move or tilt or otherwise jolt
the set when a disc is loaded. The playback sound may
skip if the TV is dropped from a height of 4 cm (1.5 in) or
more or if the set is installed at a greater angle than
recommended.

LASER BEAM

• Do not look into the opening of the disc slot or ventilation

opening of the product to see the source of the laser beam.
It may cause sight damage.

DISC

• Do not use a cracked, deformed, or repaired disc. These

discs are easily broken and may cause serious personal
injury and product malfunction.

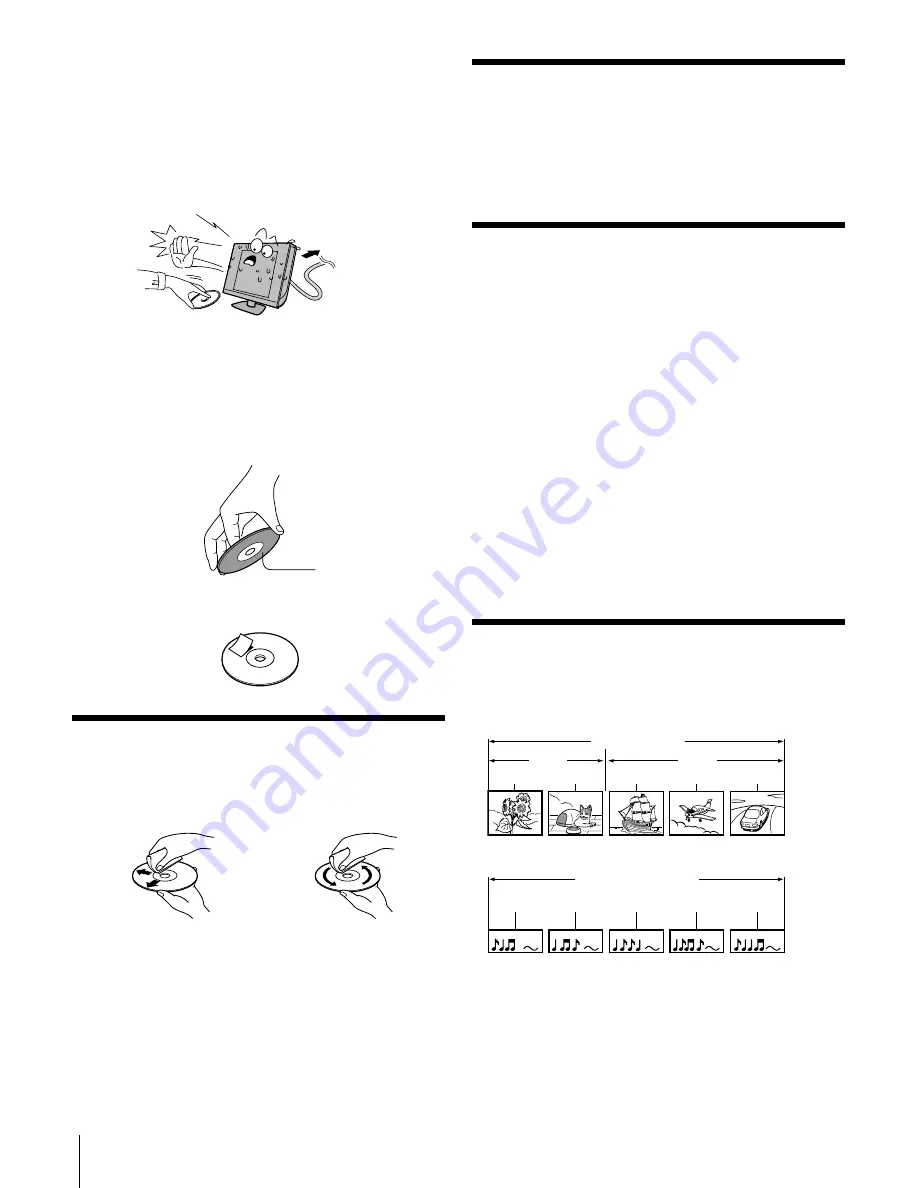
Structure of disc contents

Normally, DVD video discs are divided into titles, and the
titles are sub-divided into chapters. Video CDs and Audio
CDs are divided into tracks.

DVD video disc

Video CD/Audio CD

Title 1

Title 2

Chapter 1

Chapter 2

Chapter 1

Chapter 2

Chapter 3

Track 1

Track 2

Track 3

Track 4

Track 5

DVD video disc

Video CD/Audio CD

Each title, chapter or track is assigned a number, which is
called “title number”, “chapter number” or “track number”
respectively.

There may be discs that do not have these numbers.

Playback side

Wait!

Wall outlet

DO

DO NOT

DO

DO NOT

#01E02-07_23HLV85

05.6.24, 8:14 PM

6

Black

Summary of Contents for 23HLV85 - 23" LCD TV

Page 1: ...hese numbers in the spaces below Refer to these numbers whenever you communicate with your Toshiba dealer about this TV DVD Model number 23HLV85 Serial number DIGITAL VIDEO E ENGLISH F FRANÇAIS S ESPAÑOL E S F Connecting your TV Using the Remote Control Setting up your TV Using the TV s Features Appendix Index Introduction DVD Playback ...

Page 2: ...designed to provide reasonable protection against harmful interference in a residential installation This equipment generates uses and can radiate radio frequency energy and if not installed and used in accordance with the instructions may cause harmful interference to radio communications However there is no guarantee that interference will not occur in a particular installation If this equipment...

Page 3: ...vision The LCD panel inside the TV contains glass and a toxic liquid If the liquid comes in contact with your mouth or eyes or your skin is cut by broken glass rinse the affected area thoroughly with water and consult your doctor ALWAYS contact a service technician to inspect the TV any time it has been damaged or dropped ChildSafety It Makes A Difference Where Your TV Stands Congratulations on yo...

Page 4: ...anything to rest on or roll over the power cord and never place the TV where the power cord is subject to wear or abuse 5 inches for the DVD slot side 24 Never overload wall outlets and extension cords 25 Always operate the TV with a 100 240 V AC 60Hz power source only 26 Always make sure the antenna system is properly grounded to provide adequate protection against voltage surges and built up sta...

Page 5: ...ontains mercury the disposal of which may be regulated due to environmental considerations For disposal or recycling information contact your local authorities or the Electronics Industries Alliance www eiae org Important notes about your LCD TV The following symptoms are technical limitations of LCD Display technology and are not an indication of malfunction Therefore TACP TCL is not responsible ...

Page 6: ...ing or placing objects on discs outside of their case may cause warping On other notes DISC SLOT Keep your fingers well clear of the disc slot as it is closing It may cause serious personal injury VIBRATION Vibration or shock may disrupt DVD playback or cause scratches on the disc Do not move or tilt or otherwise jolt the set when a disc is loaded The playback sound may skip if the TV is dropped f...

Page 7: ... of the functions described in this owner s manual may not work with some discs The unauthorized recording use distribution or revision of television programs videotapes DVDs and other materials is prohibited under the Copyright Laws of the United States and other countries and may subject you to civil and criminal liability Playable discs This DVD player can play the following discs When you play...

Page 8: ... between two channels using Channel Return 24 Using the Blue screen feature 24 Selecting the video input source 24 Viewing the wide screen picture formats 25 Selecting the picture size 25 Natural picture size 25 TheaterWide 1 picture size 26 TheaterWide 2 picture size 26 TheaterWide 3 picture size 26 Full picture size 26 Using the V Chip menu 27 V Chip rating and categories 27 V Chip blocking Pare...

Page 9: ...ol You also can use the controls on the TV if they have the same name as those referred to on the remote control Please read all the safety and operating instructions carefully and keep this manual for future reference Supplied accessories Check that you have the accessories and items shown Owner s Manual Remote control Power cord Clip This book Batteries R03 AAA 2 Connecting the power cord Back o...

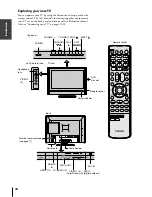
Page 10: ...d see page 11 Exploring your new TV You can operate your TV by using the buttons on the top panel or the remote control The A V terminals for connecting other equipment to your TV are on the back panel and side panel see illustrations below Also see Connecting your TV on pages 12 18 VIDEO 1 IN ColorStream HD RGB PC IN PC AUDIO IN Cable clamper DVD disc slot HDMI IN PLAY STOP SKIP EJECT SPDIF digit...

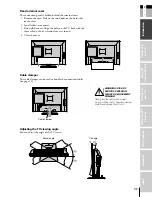
Page 11: ...es as necessary 3 Reinstall the cover Align the holes on the TV back with the three tabs on the rear terminal cover as shown 4 Close the cover Cable clamper The cable clamper can be used to bundle the connection cables see page 12 Cable clamper Adjusting the TV viewing angle You can adjust the angle of the TV screen Swivel angle Tilt angle WARNING RISK OF SERIOUS PERSONAL INJURY OR EQUIPMENT DAMAG...

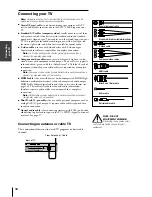
Page 12: ...uired for a complete connection Note Component video cables provide better picture performance than a standard composite video or S video cable HDMI cable is for use with devices with uncompressed HDMI high definition multimedia interface video and compressed audio output HDMI cable delivers digital audio and video in its native format see page 16 This cable carries both video and audio informatio...

Page 13: ...hange channels Cable box IN OUT Connecting a cable converter box and a VCR This connection allows you to watch and record basic and premium cable channels as well as watch videotapes Set the TV signal source to Video1 page 24 Tune the VCR to channel 3 or 4 the same channel as the converter box output switch and use the cable converter box to change channels IN from ANT VIDEO AUDIO OUT to TV CH 3 L...

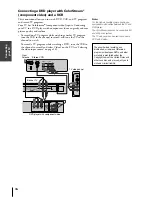
Page 14: ...d select Video1 on the TV see Selecting the video input source on page 24 VIDEO OUT S VIDEO AUDIO COMPONENT VIDEO OUT L R L R PR PB Y IN from ANT VIDEO AUDIO OUT to TV CH 3 L R CH 4 IN OUT DVD player with component video The unauthorized recording use distribution or revision of television programs videotapes DVDs and other materials is prohibited under the Copyright Laws of the United States and ...

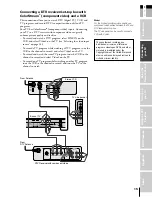
Page 15: ...and select Video1 on the TV To record and watch the same TV program tune the VCR to the channel to record and select Video2 on the TV To record one TV program while watching another TV program tune the VCR to the channel to record and tune the TV to the channel to watch IN from ANT OUT to TV VIDEO AUDIO L R IN OUT CH 3 CH 4 Satelite IN VIDEO OUT S VIDEO AUDIO COMPONENT VIDEO OUT L R L R PR PB Y No...

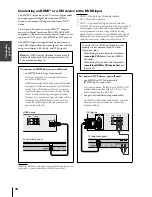
Page 16: ...V first and then the HDMI or DVI device When turning off your electronic components turn off the HDMI or DVI device first and then the TV The HDMI 1 input on your TV receives digital audio and uncompressed digital video from an HDMI device or uncompressed digital video from a DVI 2 device This input is designed to accept HDCP 3 program material in digital form from EIA CEA 861 861B compliant 4 con...

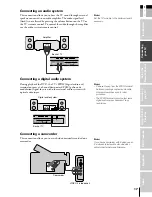
Page 17: ...tem s remote control LINE IN L R Connecting a digital audio system During playback the DVD the TV s SPDIF digital audio out terminal outputs a 2 channel down mixed PCM pulse code modulation signal for use with other external audio system with optical audio input LINE IN Optical Audio IN L R Connecting a camcorder This connection allows you to watch video materials recorded on a camcorder VIDEO AUD...

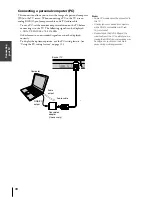
Page 18: ...ther formats or non standard signals may not be displayed correctly To display the optimum picture use the PC setting feature see Using the PC setting feature on page 35 Note Some PC models cannot be connected to this TV An adapter is not needed for computers with a DOS V compatible mini D sub 15 pin terminal Depending on the DVD s title and the specifications of the PC on which you are playing th...

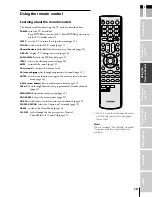
Page 19: ...MUTE turns off the sound page 32 VOL volume adjusts the volume level CH channel cycles through programmed channels page 23 ENTER activates the function settings in the menu or selects the next menu page 21 yzx arrow buttons select or adjust menu items page 21 FAV yz cycle through channels you programmed as favorite channels page 23 MENU SETUP opens the menu system page 21 EXIT CANCEL closes the me...

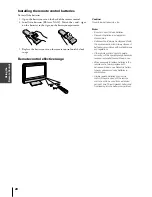
Page 20: ...d always be disposed of with the environment in mind Always dispose of batteries in accordance with applicable laws and regulations If the remote control does not operate correctly or if the operating range becomes reduced replace batteries with new ones When necessary to replace batteries in the remote control always replace both batteries with new ones Never mix battery types or use new and used...

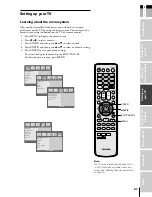
Page 21: ...TER and then press y or z to select or adjust a setting 5 Press ENTER to save your menu settings To return to the previous menu press EXIT CANCEL To close the menu system press MENU Picture mode Contrast Brightness Color Sharpness Tint Picture ENTER MENU Sound mode Bass Treble Balance StableSound ENTER MENU Sound Auto program Manual program Favorite channel Blue screen Channel ENTER MENU Language ...

Page 22: ...s in your area and store them in the channel memory After the channels are programmed automatically you can manually add or erase individual channels see page 23 To program channels automatically 1 Press MENU and then press x or until the Channel menu appears 2 Press ENTER and then press y or z to highlight Auto program To start ENTER EXIT MENU Auto program Manual program Favorite channel Blue scr...

Page 23: ...er press the 100 button and then the next two numbers For example to select channel 125 press 100 2 5 To change to the next programmed channel Press CH or CH on the TV or remote control Programming your favorite channels You can preset up to 8 of your favorite channels using the Favorite Channel Programming feature Because this feature scans through only your favorite channels it allows you to ski...

Page 24: ...hen no signal is received To turn on the Blue screen feature 1 Press MENU and then press x or until the Channel menu appears 2 Press ENTER and then press y or z to highlight Blue screen 3 Press ENTER and then press y or z to select On Note If the Blue screen appears repeatedly because of poor signal strength select Off in step 3 On Off Auto program Manual program Favorite channel Blue screen Chann...

Page 25: ...are viewing Select the picture size that displays the current program the way that looks best to you Full picture size Selecting the picture size Repeatedly press PIC SIZE on the remote control to select the desired picture size as described below and on the next page Full TheaterWide 3 TheaterWide 2 TheaterWide 1 Natural Natural picture size The image is displayed close to its originally formatte...

Page 26: ... The picture is stretched wider to fill the width of the screen but only slightly stretched taller A small part of the picture at the top and bottom is hidden Full picture size For 16 9 format programs If you are receiving a 4 3 format program the picture is stretched wider to fill the width of the screen but not stretched taller None of the picture is hidden Note Using these functions to change t...

Page 27: ...cked G above general audience PG above parental guidance suggested PG 13 above 13 years and older R above restricted NC 17 above 18 years and older X adult If you select PG 13 above all G and PG rated movies will be available and all PG 13 R NC 17 and X rated movies will be blocked For Television programs including made for TV movies General TV Ratings Unblocked TV G above general audience individ...

Page 28: ...y or z to highlight the type of blocking to be set 6 Press ENTER and then press y or z to select the type of ratings to block The age block and Content block menus also have sub menus therefore you will need to repeat steps 5 and 6 to set the types of blocking and ratings in the sub menus General Children Unblocked TV G above TV PG above TV 14 above TV MA Parental Lock Set password MPAA Age block ...

Page 29: ...em you want to adjust is highlighted 3 Press ENTER 4 Press x or to adjust the level The Picture qualities you adjusted can be saved in the TV s Memory Mode Picture Quality Dynamic Bright and dynamic picture factory setting Standard Standard picture setting factory setting Movie Movie like picture setting factory setting Memory Your personal preference Note If you select one of the factory set pict...

Page 30: ...and then press y or z to select the Caption or Text mode you prefer Language Caption Text Captions Panel lock V Chip Auto off CC1 Text1 CC2 Text2 CC3 Text3 CC4 Text4 Special EXIT MENU To view captions select CC1 CC2 CC3 or CC4 CC1 displays captions in the primary language in your area Note If the program or video you selected is not closed captioned the captions will not display on the screen Gian...

Page 31: ...en for example When the Panel lock is On no control buttons on the TV top panel will operate except POWER To lock the top panel 1 Press MENU and then press x or to display the Special menu 2 Press ENTER and then press y or z to highlight Panel lock 3 Press ENTER and then press y or z to select On Language Caption Text Captions Panel lock V Chip Auto off On Off Special EXIT MENU To unlock the top p...

Page 32: ...gram SAP containing a second language music or other audio information when provided by individual stations When the TV receives a stereo or SAP broadcast the word ST SAP Stereo or SAP appears on screen every time the TV is turned on the channel is changed or DISPLAY is pressed The MTS feature is not available when the TV is in Video mode To listen to stereo sound Repeatedly press AUDIO SELECT to ...

Page 33: ... You can select your desired sound type from six sound modes WOW Flat Hall Theater News or Memory To select the sound mode 1 Press MENU and then press x or until the Sound menu appears 2 Press ENTER and then press z or y to highlight Sound mode 3 Press ENTER and then press z or y to select the mode you prefer Sound mode Bass Treble Balance StableSound Sound WOW Flat Hall Theater News Memory EXIT M...

Page 34: ...tronger or increases the balance in the right channel depending on the item selected Note To continue adjusting the other items press y or z in step 4 Using the StableSound feature When the signal source is changed the StableSound feature limits the highest volume level to prevent extreme changes in volume for example to prevent the sudden increase in volume that often happens when a TV program sw...

Page 35: ...n V Position Clock Phase Auto Configure Reset PC ENTER EXIT MENU 5 Press Enter 6 Press x or to make the appropriate adjustments H position V position Adjusts picture left right and up down The adjustment range is 0 100 The adjustable range may vary depending on the input mode Clock Minimizes any vertical bars or stripes appearing on the screen background The adjustment range is 0 100 The adjustabl...

Page 36: ...s if it is tuned to a vacant channel or a station that completes its broadcast for the day This feature does not work when the Blue screen mode is set to Off To activate the Auto off feature 1 Press MENU and then press x or until the Special menu appears 2 Press ENTER and then press y or z to highlight Auto off 3 Press ENTER and then press y or z to Select On Language Caption Text Captions Panel l...

Page 37: ... function settings in the menu page 39 yzx arrow buttons select or adjust menu items MENU SETUP opens the menu system page 40 EXIT CANCEL closes the menu system PAUSE pauses the picture To restart press again page 38 PLAY begins playback of a DVD page 38 STOP stops playback of a DVD page 38 REV rewinds the DVD Press during play mode to view the picture moving rapidly backward page 38 FF fast forwa...

Page 38: ... 1 2 1 4 1 8 1 16 1 DVD only 2 Press PLAY to resume normal playback Note There is no sound during fast or slow playback for DVDs or Video CDs Skip a Chapter or a Track 1 Press SKIP or SKIP to locate a desired chapter during playback Each time you press the button a chapter or track is skipped Press SKIP to locate succeeding chapters or tracks Press SKIP twice in quick succession playback will star...

Page 39: ...ress ANGLE to select the desired angle Note You can only change the angle for DVDs that provide multiple angles of scenes The angle function will not work on DVD video discs that do not contain scenes recorded at different angles The number of angles varies from disc to disc Picture Size Zoom When enlarging or reducing the picture it may become distorted 1 Press ZOOM during playback 2 Each press o...

Page 40: ...Original Korean English French German Spanish Italian Chinese Polish Japanese Off Subtitle Language Move Next 3 Press ENTER 4 Press SETUP to resume normal playback Disc menu language selection Select your preferred language for the disc menus and DVD messages The disc must contain the selected language 1 Press SETUP in the stop mode and then press y or z to select Menu Language 2 Press and then pr...

Page 41: ...splay can be shown on the screen in your specified language 1 Press SETUP in the stop mode and then press y or z to select OSD Language 2 Press and then press y or z to select your desired language All the on screen displays will appear in the selected language 3 Press SETUP to resume normal playback Digital audio output You can select the output for SPDIF Sony Philips Digital Interface 1 Press SE...

Page 42: ...tart point during playback A is displayed on TV screen and the starting point of your selected segment is set up 2 Press REPEAT A B again to select the end point AB is displayed on TV screen and the ending point is set up Playback starts at the point that you selected Playback stops at the end point returns to Point A automatically then starts again 3 Repeatedly press REPEAT A B until Off appears ...

Page 43: ...ile playing a JEPG disc the picture slide show starts Picture transition modes 1 Press y or z to select the desired picture and then press PLAY to start the slide show 2 Press EXIT CANCEL to stop the slide show Image Rotation Press y or z to rotate a picture There are 2 modes to rotate picture y invert z mirror Track Number Playing Time Audio CD Playback options On Screen Display You can display t...

Page 44: ... Repeat Off JPEG files compatibility Discs and pixels whose compatibility with this player has been confirmed by TOSHIBA are as follows Kodak Picture CD JPEG disc compatibility with this player is limited as follows Playable discs CD ROM CD R CD RW File system ISO9660 UDF without interleave File name File names are limited to eight characters or less and must incorporate JPG extension e g JPG File...

Page 45: ...fications This model complies with the specifications listed below Designs and specifications are subject to change without notice HEADPHONE jack 3 5 mm stereo mini jack PC INPUT 15 pin D sub Analog RGB PC AUDIO INPUT 3 5 mm stereo mini jack HDMI INPUT HDMI compliant type A connector HDCP compliant E EDID compliant Suggested scan rates 1080i 480p 480i 720p HDMI Audio 2 channel PCM 32 44 1 48 kHz s...

Page 46: ...difficulties Try another channel Make sure the MTS feature is set properly Check the antenna connections The station may have broadcast difficulties Try another channel Adjust the Picture menu The station may have broadcast difficulties Try another channel Check the antenna connections The closed caption feature may be set to one of the Text modes Text1 Text2 Text3 or Text4 Turn closed captioning ...

Page 47: ...e changed appears on the screen No disc is loaded The disc may be dirty Clean the disc The TV cannot play CD ROMs etc TV selector is not set correctly Make sure the input selector of the amplifier is set properly The TV is in the special playback mode Select the correct Audio Output Input position on AV Amplifier The picture will be distorted occasionally Some discs may not perform certain functio...

Page 48: ...ORE THE ABOVE PROVISIONS MAY NOT APPLY TO YOU UNDER SUCH CIRCUMSTANCES Limited United States Warranty for 23 LCD TVs and 23 LCD TV DVD Combinations LCD Product s Toshiba America Consumer Products L L C TACP makes the following limited warranties to original consumers in the United States THESE LIMITED WARRANTIES EXTEND TO THE ORIGINAL CONSUMER PURCHASER OR ANY PERSON RECEIVING THIS LCD PRODUCT AS ...

Page 49: ...t of customer controls and installation or repair of antenna systems are not covered by this warranty Reception problems caused by inadequate antenna systems misaligned satellite dishes cable television distribution VCRs DVD players recorders personal computer level IEEE 1394 devices and any other connected signal source device are your responsibility 5 Warranties extend only to defects in materia...

Page 50: ...tton 39 L M N Language selection 22 Last mode memory 36 MARKER button 39 Menu system 21 MP3 42 MTS 32 MUTE button 32 Natural picture size 25 P Panel lock 31 PAUSE button 38 PC connection 18 PC setting 35 PIC SIZE button 25 Picture adjustments Picture mode 29 Picture quality 29 Picture size 25 PLAY button 38 PLAY MODE button 39 POWER button 19 R Remote control Battery installation 20 Learning about...

Page 51: ...Appendix DVD playback ...

Page 52: ...18050 TRANS CANADA KIRKLAND QUEBEC H9J 4A1 CANADA TEL 514 390 7766 VANCOUVER 22171 FRASERWOOD WAY RICHMOND B C V6W 1J5 CANADA TEL 604 303 2500 HEAD OFFICE 82 TOTOWA ROAD WAYNE NEW JERSEY 07470 U S A NATIONAL SERVICE DIVISION 1420B TOSHIBA DRIVE LEBANON TN 37087 U S A ColorStream and StableSound are registered trademarks of Toshiba America Consumer Products L L C YC L1 72742113 ...

Reviews: