background image

40

POWER

1

2

3

4

5

6

7

8

9

0

TV(DVD)

VCR

CABLE

TV/DVD

100

CH +

CH –

EXIT/

CANCEL

INPUT

PIC SIZE

MUTE

SUBTITLE

AUDIO

ENTER

VOL

CODE

VOL

+

SLEEP

MENU/
SETUP

RECALL/

DISPLAY

TOP MENU

DVD MENU

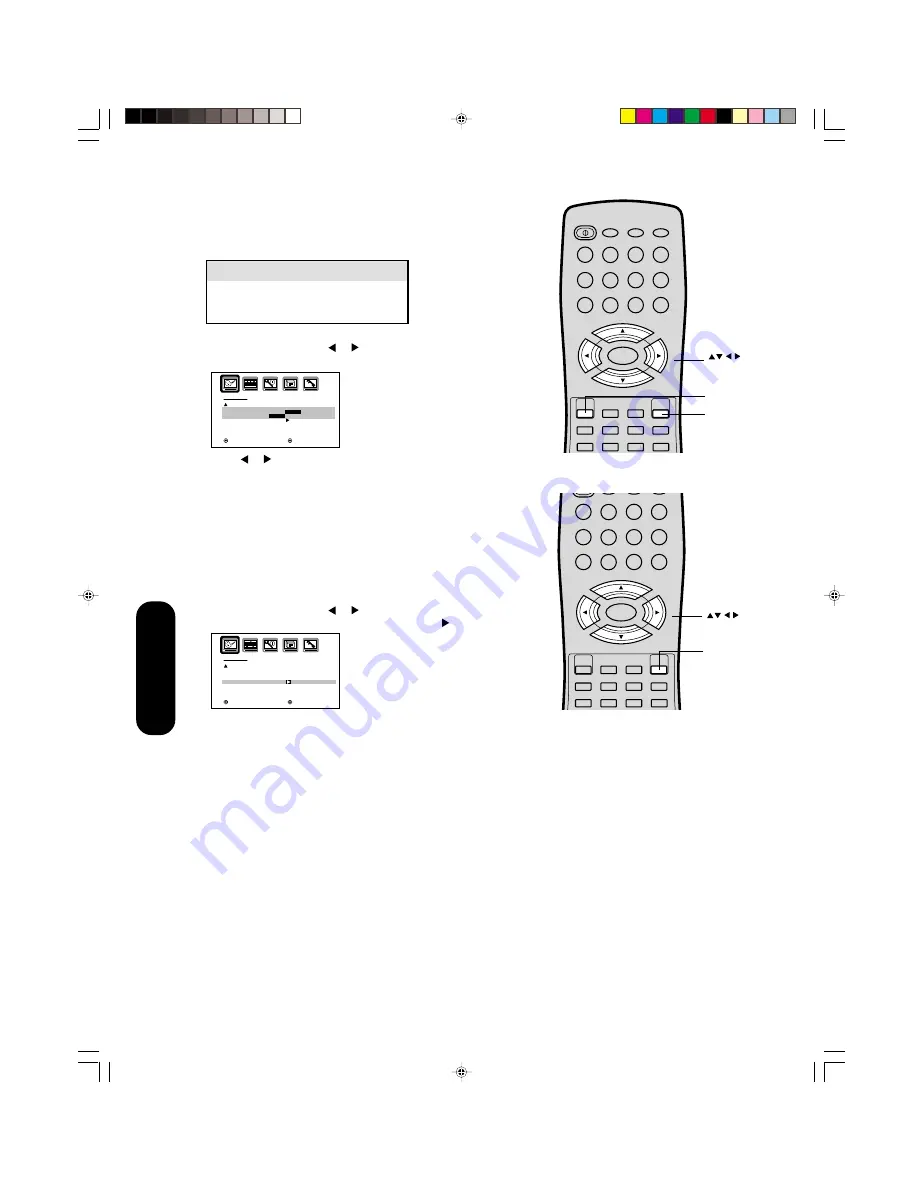
Selecting the color temperature

Change the picture quality by selecting from three preset color tem-
peratures—cool, medium, and warm—as described in the following
table:

To select the color temperature:

1. Press MENU, then press   or   to display the PICTURE menu.
2. Press 

 or 

 to highlight COLOR TEMPERATURE.

3. Press   or   to highlight the mode you prefer.
4. Press EXIT to return to normal viewing.

Resetting your picture adjustments

The RESET function returns your picture quality adjustments to the
following factory settings:

Mode ............................ sports

Tint .......................... center (0)

Brightness ............ center (25)

Sharpness ............. center (25)

Contrast .................. max (50)

Color temperature ............ cool

Color .................... center (25)

To reset your picture adjustments:

1. Press MENU, then press   or   to display the PICTURE menu.
2. Press 

 or 

 to highlight RESET, and then press  .

Menu

1

2

3

4

5

6

7

8

9

0

TV/DVD

100

CH +

CH –

EXIT/

CANCEL

INPUT

PIC SIZE

MUTE

SUBTITLE

AUDIO

ENTER

VOL

CODE

VOL

+

SLEEP

MENU/
SETUP

RECALL/

DISPLAY

TOP MENU

DVD MENU

Menu

Mode


Picture Quality

COOL

Blueish

MEDIUM

Neutral

WARM

Reddish

P I C T U R E

C O L O R
T E M P E R A T U R E

R E S E T

: S E L E C T

: A D J U S T

                  C O O L
C O O L

  /


M E D I U M


/   W A R M

Exit

P I C T U R E

C O L O R
T E M P E R A T U R E

R E S E T

: S E L E C T

: A D J U S T

C O O L

Using the

TV/DVD

’s Features

J5P00101A(E)P35-41

8/12/04, 11:40 AM

40

Summary of Contents for 23HLV84

Page 1: ...23HLV84 ENER Y STAR PARTNER DVD Playback Using the TV DVD s Features Setting up your TV DVD Connecting your TV DVD Introduction Appendix J5P00101A E Cover 8 12 04 2 21 PM 1 ...

Page 2: ...jury or property damage or could damage your Television We hope that you are completely satisfied with your Toshiba television and that it will give you long and enjoyable service We look forward to providing you with additional Toshiba products to serve all of your entertainment needs in the future The lightning flash with arrowhead symbol within an equilateral triangle is intended to alert the u...

Page 3: ...BE FULLY INSERTED TO PREVENT BLADE EXPOSURE Federal Communications Commission FCC This equipment complies with Part 15 of the FCC rules FCC Declaration of Conformity Compliance Statement Part 15 The Toshiba 23HLV84 LCD TV DVD Combination complies with Part 15 of the FCC rules Operation is subject to the following two conditions 1 this device may not cause harmful interference and 2 this device mus...

Page 4: ...outlet 12 POWER CORD PROTECTION Power supply cords should be routed so that they are not likely to be walked on or pinched by items placed upon or against them paying particular attention to cords at plugs convenience receptacles and the point where they exit from the appliance 13 LIGHTNING To protect your unit from a lightning storm or when it is left unattended and unused for long periods of tim...

Page 5: ...s closing Failure to do so may cause serious personal injury 23 CONNECTING When you connect the product to other equipment turn off the power and unplug all of the equipment from the wall outlet Failure to do so may cause a product damage Read the owner s manual of the other equipment carefully and follow the instructions when making any connections 24 HEADPHONES When you use headphones keep the v...

Page 6: ...tand that they cannot be completely eliminated even with the most advanced manufacturing technologies available today The fluorescent tube which illuminates the panel from the inside will deteriorate with use When the LCD becomes dim flickers or does not illuminate contact your dealer for replacement The brightness of the LCD monitor differs slightly depending on the viewing angles Adjust the angl...

Page 7: ...rack 3 Track 4 Track 5 DVD video disc Video CD Audio CD Structure of disc contents Normally DVD video discs are divided into titles and the titles are sub divided into chapters Video CDs and Audio CDs are divided into tracks DVD video disc Video CD Audio CD Each title chapter or track is assigned a number which is called title number chapter number or track number respectively Some discs may not h...

Page 8: ...u Playback Some of the functions described in this owner s manual may not work with some discs Playable discs This unit can play the following discs DIGITAL VIDEO Disc Mark Contents Disc Size Maximum playback time Audio Video moving pictures DVD video discs Video CDs Audio CDs Audio Video moving pictures Audio 12 cm 8 cm 12 cm 8 cm 12 cm 8 cm CD single Approx 4 hours single sided disc Approx 8 hou...

Page 9: ... password 28 Using the V Chip parental control feature 29 Locking channels 30 Locking the video inputs 31 Setting the GameTimerTM 31 Using the panel lock feature 32 Labeling channels 32 Selecting the video input source 33 Labeling the video input sources 33 Setting the clock 34 Setting the ON timer 34 Viewing the wide screen picture formats 480i and 480p signals only 35 Scrolling the TheaterWide p...

Page 10: ...E O M E N U V O L U M E 2 3 C H A N N E L P L A Y S T O P S K I P 4 E J E C T 0 AUDIO 2 IN HEADPHONE ColorStream HD IN Right side Disc slot Top Front Remote sensor POWER indicator Back Left side Side panel Back panel left The STARTING SETUP feature appears the first time you turn on the TV See page 26 for details Top panel Back panel right PC IN COAXIAL DIGITAL AUDIO OUT HDMI IN VIDEO 1 IN VARIABL...

Page 11: ...onic equipment before or you have been frustrated in the past you may wish to read this section Cables are not supplied A coaxial cable is the standard cable that comes in from your antenna or cable converter box Coaxial cables use F connectors Standard A V audio video cables are usually color coded accord ing to use yellow for video and red and white for audio The red audio cable is for the stere...

Page 12: ...the Converter Descrambler box usually channel 3 or 4 and use the Converter Descrambler box to select channels Option 3 For Subscribers to Unscrambled Basic Cable with Scrambled Premium Channels If you subscribe to a cable service in which basic cable channels are unscrambled and premium channels require the use of a Converter Descrambler box you may wish to use a two set signal splitter some times...

Page 13: ...ote You can use a standard video cable instead of the S video cable but the picture quality will decrease If you use an S video cable between the TV DVD and DVD player satellite receiver make the audio connections but remove the standard video cable Do not connect both an S video and a standard video cable to VIDEO1 at the same time or the picture performance will be unacceptable Satellite Receive...

Page 14: ... greatly enhance picture quality and performance DVD player with Component video Rear lower right of TV DVD Stereo VCR From antenna Note The ColorStream HD jacks can be used with Progressive 480p 720p and Interlaced 480i 1080i scan systems A 1080i signal will provide the best picture performance The unauthorized recording use distribu tion or revision of television programs videotapes DVDs and oth...

Page 15: ...e For HDMI connection see page 17 The ColorStream HD jacks and HDMI jacks can be used with Progressive 480p 720p and Interlaced 480i 1080i scan systems If your DTV or HDMI receiver does not have component video use the S video and standard audio connections instead Do not connect both an S video and a standard video cable to VIDEO1 at the same time or the picture performance will be unacceptable T...

Page 16: ...rder Rear lower left of TV DVD Connecting an audio system This connection allows you to use an audio amplifier and external speakers and adjust the audio level using the TV DVD s remote control To control the audio turn on the TV DVD and the stereo amplifier and turn off the TV DVD s built in speakers see Turning off the built in speakers on page 44 You will need one pair of standard audio cables ...

Page 17: ... with the TV DVD To connect a DVI device you will need one HDMI to DVI adapter cable HDMI type A connector For proper operation the length of an HDMI to DVI adapter cable should not exceed 9 8 ft 3m The recommended length is 6 6 ft 2m one pair of standard analog audio cables An HDMI to DVI adapter cable transfers only video Separate analog audio cables are required see illustration below You must ...

Page 18: ...AUDIO OUT Manufactured under license from Dolby Laboratories Dolby Pro Logic and the double D symbol are trademarks of Dolby Laboratories Rear lower right of TV DVD Rear lower left of TV DVD To VARIABLE AUDIO OUT Amplifier equipped with Dolby Surround Pro Logic Connect one or two rear speakers The out put sound from the rear speakers will be mon aural even if you connect two rear speakers To audio...

Page 19: ... audio input Rear lower right of TV DVD To COAXIAL DIGITAL AUDIO OUT You will need one coaxial cable Notes Connect the COAXIAL DIGITAL AUDIO OUT jack of the TV DVD to the COAXIAL input of a Receiver or Processor Refer to the owner s manual of the connected equipment as well The output sound of the TV DVD has a wide dynamic range Be sure to adjust the receiver s volume to a moderate listening level...

Page 20: ...Monitor Display modes MODE Resolution Refresh rate VGA 640x480 60Hz SVGA 800x600 56 3Hz SVGA 800x600 60 3Hz XGA 1024x768 60Hz Rear lower right of TV DVD Amplifier equipped with a Digital audio input To COAXIAL type digital audio input To COAXIAL DIGITAL AUDIO OUT Rear lower right of TV DVD You will need one VGA cable To PC You will need one coaxial cable Notes PCM audio is limited to DVD or CD pla...

Page 21: ...video standard will require a different value for this setting VER POSITION To adjust the vertical position of the image on the PC Monitor screen Each video standard will require a different value for this setting PHASE This must be adjusted after the frequency has been set to optimize picture quality CLOCK To minimize any vertical bars or stripes visible on the screen background AUTO ADJUST When ...

Page 22: ...brand of your VCR see Programming the remote control for use with a VCR or cable TV converter on page 23 The buttons shown at right will then control the VCR Press the VCR button first Using the remote control with a VCR or cable TV converter Note The TV DVD remote control may or may not operate your VCR or cable TV converter Refer to your owner s manuals supplied with the equipment to see which f...

Page 23: ...conds 3 Point the remote control at the VCR or converter and press POWER to test the code If the VCR converter turns on you have entered the right code If the VCR or converter does not respond to the remote control you may have entered the wrong code Repeat steps 1 2 with another code For future reference write down the codes you used VCR code Cable TV converter code Notes When shipped from the fa...

Page 24: ...14 15 18 27 Sylvania 07 14 27 JVC 02 25 58 Symphonic 31 Kenwood 02 Tashiko 09 Logik 39 Tatung 02 LXI 09 31 Teac 02 31 Magnavox 07 14 31 Teknika 34 Marantz 07 18 Toshiba 05 15 Marta 09 XR1000 39 Memorex 06 12 14 31 33 Vector Research 04 18 Mitsubishi 04 22 52 64 Yamaha 02 18 Montgomery Ward 08 14 16 19 31 49 Zenith 01 24 25 29 37 CABLE TV CONVERTER Allegro 58 62 RCA DSS 73 Allegro A B Switch 61 Reg...

Page 25: ... page 52 JUMP locates the desired point to play back page 49 CH RTN ZOOM returns to the last viewed channel page 28 allows you to zoom in page 49 SKIP 4 skips DVD chapter page 48 FF SEARCH fast forwards a videotape DVD CD sound forwards playback PLAY plays a videotape DVD CD sound REW SEARCH rewinds a videotape DVD CD sound reviews playback TV VCR toggles between TV and VCR modes when viewing whil...

Page 26: ...SETUP stops and changes to the TV screen After you have installed the batteries and programmed the remote control you need to set some preferences on the TV DVD using the menu system You can access the menu system with the buttons on the remote control When you make a menu selection your changes occur immedi ately You do not have to press MENU or EXIT to see your changes After one minute the menu ...

Page 27: ...the message PROGRAMMING NOW PLEASE WAIT appears 6 When channel programming is complete the message COMPLETED appears 7 Press CH or to view the programmed channels Adding and erasing channels manually After you have programmed the channels automatically you can add or erase specific channels manually To add or erase channels manually 1 Select the channel you want to add or erase If adding channels ...

Page 28: ...rograms and channels you must select a password The password you select prevents others from changing the rating limits you set To select your password and access the LOCKS menu 1 Press MENU then press or to highlight the LOCKS menu 2 Press or to display the password entering mode 3 Use the Channel Number buttons 0 9 to enter your password If you are accessing the LOCKS menu for the first time sel...

Page 29: ... B ENTER VOL CODE VOL SLEEP PLAY MODE MENU SETUP RECALL DISPLAY TOP MENU DVD MENU Recall Enter Channel Numbers To use the V Chip to block programs by rating 1 Press MENU then press or to display the LOCKS menu 2 Press or to display the password entering mode 3 Use the Channel Number buttons 0 9 to enter your password Press ENTER The LOCKS menu appears 4 Press or to highlight V CHIP Press or to hig...

Page 30: ...fore turning off the television POWER 1 2 3 4 5 6 7 8 9 0 TV DVD VCR CABLE TV DVD 100 CH CH EXIT CANCEL INPUT PIC SIZE MUTE JUMP CH RTN ZOOM SKIP S C SUBTITLE AUDIO RETURN ANGLE REPEAT A B ENTER VOL CODE VOL SLEEP PLAY MODE MENU SETUP RECALL DISPLAY TOP MENU DVD MENU Enter Exit Channel Numbers LOCKS LOCK CH LOCK VIDEO LOCK GAME TIMER PANEL LOCK NEW PASSWORD SELECT ADJUST OFF OFF OFF CH LOCK CH 002...

Page 31: ...CKS menu appears 4 Press or to highlight VIDEO LOCK and press or to highlight OFF 5 Press EXIT to return to normal viewing Setting the GameTimerTM With the GameTimerTM feature you can automatically activate the VIDEO LOCK feature VIDEO setting to set a time limit for playing a video game 30 60 90 or 120 minutes To set up the GameTimer 1 Press MENU then press or to display the LOCKS menu 2 Press or...

Page 32: ...ress or to highlight CH LABEL 4 Press to display the CH LABEL menu SET CLEAR will be high lighted 5 Press or to highlight SET 6 Press or to highlight LABEL 7 Press or to enter a character in the first space Press the button repeatedly until the character you want appears on the screen Press ENTER 8 Repeat step 7 to enter the rest of the characters If you would like a blank space in the label name ...

Page 33: ... to highlight the video source you want to label 5 Press or to select the desired label for that input source 6 Press EXIT to return to normal viewing Pressing INPUT on the remote control displays the current signal source press INPUT again or 0 5 to change OPTION ON TIMER CH LABEL VIDEO LABEL OFF OFF SET SELECT ADJUST OPTION 1 VIDEO1 2 VIDEO2 3 ColorStream HD 4 HDMI VCR DVD DTV SAT CBL SELECT ADJ...

Page 34: ... TV DVD to channel 012 at 6 30 AM DAILY 1 Set the clock if you have not already done so see above 2 Press MENU and then press or to display the OPTION menu 3 Press or to highlight ON TIMER 4 Press or to highlight SET then press ENTER The ON TIMER menu appears 5 Press or to set the desired hour then press 6 Set the desired minutes and channel as in step 5 7 Press to select ONCE or DAILY 8 Press EXI...

Page 35: ... example The way the image displays will vary depending on the format of the program you are currently watching SETUP CLOSED CAPTION PICTURE SIZE PICTURE SCROLL CINEMA MODE ASPECT BACK LIGHTING SELECT ADJUST OFF FILM ON 16 Pic Size TheaterWide 1 picture size example Notes The PICTURE SIZE feature is not available for some program formats such as 1080i or 720p Such formats will display in Natural p...

Page 36: ...37 TheaterWide 3 picture size for letter box programs with subtitles The picture is non uniformly enlarged it is stretched wider to fill the width of the screen but only slightly stretched taller The top and bottom edges of the picture may be hidden To view the hidden areas such as subtitles or captions see Scrolling the TheaterWide picture on page 37 Full picture size for 16 9 source programs The...

Page 37: ...enu appears 3 Press or to highlight PICTURE SCROLL 4 Press or to display the Scroll Adjustment mode 5 Press or to adjust the vertical position of the picture Normal center position To raise the picture press To lower the picture press Note You can scroll the picture in TheaterWide 2 and TheaterWide 3 only The scroll amounts are as follows 480i 480p signal source Wide 1 Not adjustable Wide 2 10 to ...

Page 38: ...light CINEMA MODE and then press or to select FILM To set the CINEMA MODE to VIDEO off Press or to select VIDEO in step 2 above SETUP CLOSED CAPTION PICTURE SIZE PICTURE SCROLL CINEMA MODE ASPECT BACK LIGHTING SELECT ADJUST OFF FILM VIDEO ON 16 POWER 1 2 3 4 5 6 7 8 9 0 TV DVD VCR CABLE TV DVD 100 CH CH EXIT CANCEL INPUT PIC SIZE MUTE JUMP CH RTN ZOOM SKIP REW SEARCH FF SEARCH PLAY SUBTITLE AUDIO ...

Page 39: ...s highlighted 3 Press or to adjust the level Selection Pressing BRIGHTNESS darker lighter CONTRAST lower higher COLOR paler deeper TINT reddish greenish SHARPNESS softer sharper Menu Exit Adjusting the picture Selecting the picture mode You can select four picture modes Sports Standard Movie and Memory as described in the following table To select the picture mode 1 Press MENU then press or to dis...

Page 40: ...ure adjustments The RESET function returns your picture quality adjustments to the following factory settings Mode sports Tint center 0 Brightness center 25 Sharpness center 25 Contrast max 50 Color temperature cool Color center 25 To reset your picture adjustments 1 Press MENU then press or to display the PICTURE menu 2 Press or to highlight RESET and then press Menu 1 2 3 4 5 6 7 8 9 0 TV DVD 10...

Page 41: ... effects of programs and videos that are closed captioned usually identified in your local TV listing as CC Text An on screen display of information not related to the program such as weather or stock data if available in your viewing area To view captions or text 1 Tune the TV DVD to the desired program 2 Press MENU and then press or to display the SETUP menu 3 Press or to highlight CLOSED CAPTIO...

Page 42: ...igh fidelity stereo sound MTS also can transmit a second audio program SAP contain ing a second language or other audio information Note The MTS feature is not available in VIDEO mode When the TV DVD receives a stereo or SAP broadcast the word STEREO or SAP displays on screen every time you turn the TV on change the channel or press RECALL To listen to stereo sound 1 Press MENU then press or to di...

Page 43: ...ered trademarks of Dolby Laboratories A U D I O M T S B A S S T R E B L E B A L A N C E S TA B L E S O U N D S P E A K E R S S T E R E O S E L E C T A D J U S T 2 5 2 5 0 O N O F F O N POWER 1 2 3 4 5 6 7 8 9 0 TV DVD VCR CABLE TV DVD 100 CH CH EXIT CANCEL INPUT PIC SIZE MUTE JUMP CH RTN ZOOM SKIP SUBTITLE AUDIO RETURN ANGLE REPEAT A B ENTER VOL CODE VOL SLEEP PLAY MODE MENU SETUP RECALL DISPLAY T...

Page 44: ...tem Turning off the built in speakers Use this feature to turn the TV DVD speakers off when you connect an audio system see pages 16 18 and 19 To turn off the built in speakers 1 Press MENU then press or to display the AUDIO menu 2 Press or to highlight SPEAKERS and then press or to select OFF To turn on the built in speakers Select ON in step 2 above Selecting the HDMI audio input source See page...

Page 45: ...ack lighting feature If your TV DVD is in a bright room the screen image may be difficult to see You can use the BACK LIGHTING feature to adjust the screen brightness for improved picture clarity To adjust the back lighting 1 Press MENU and then press or until the SETUP menu appears 2 Press or to highlight BACK LIGHTING 3 Press a or to adjust the screen brightness Displaying on screen information ...

Page 46: ...the 8cm disc you need an adapter not supplied 4 On the TV screen No Disc changes to Reading and then playback commences A menu screen will appear on the TV screen if the disc has a menu feature Press or to select title then press ENTER Title is selected and play commences 5 Press VOL or to adjust the volume 6 Press STOP to end playback Resume feature Depending on the disc you are playing when you ...

Page 47: ...rrect Disc will continue to be displayed Some discs may not resume playing the same scene after stopping Resuming cannot function when you play a PBC featured Video CD while the PBC is on To turn off the PBC see page 54 Some playback operations of DVDs may be intentionally fixed by software producers Since this unit plays DVDs according to the disc contents the software producers designed some pla...

Page 48: ...g of the current chapter or track When you press twice in quick successions playback starts from the beginning of the preceding chapter or track Note A Prohibition symbol may appear at the upper left of the screen This symbol means either the feature you tried is not available on the disc or the TV DVD cannot access the feature at this time This does not indicate a problem with the TV DVD JUMP CH ...

Page 49: ... supplied with the disc to check the numbers 4 Press ENTER Playback starts When you change the title playback starts from Chapter 1 of the selected title Some discs may not work in the above operation 1 Jump Time Title Chapter Enter 0 9 Cancel Jump Time Title Chapter Jump Enter 0 9 Cancel Jump Time Title Chapter 12 Jump Enter 0 9 Cancel Jump Notes You can select the Pause Slow or Search playback i...

Page 50: ... again Off appears on the screen Repeat Off Enter Play Mode Play Mode Off Repeat Off Enter Play Mode A A B POWER 1 2 3 4 5 6 7 8 9 0 TV DVD VCR CABLE TV DVD 100 CH CH EXIT CANCEL INPUT PIC SIZE MUTE JUMP CH RTN ZOOM SKIP REW SEARCH FF SEARCH PLAY SUBTITLE AUDIO RETURN ANGLE REPEAT A B ENTER VOL CODE VOL SLEEP PLAY MODE MENU SETUP RECALL DISPLAY TOP MENU DVD MENU Enter Play Mode Play Notes Some dis...

Page 51: ... then press or ENTER to select Random 3 Press PLAY The Random Playback will start If you set Random during playback mode Random playback will begin after the track that is currently being played has ended To resume normal playback select Play Mode Off in step 2 Repeat 1 2 3 4 5 6 7 8 9 10 11 12 Clear Program Playback Play Mode Program Off Enter 0 9 Cancel Play Mode Play Mode Repeat Off Enter Play ...

Page 52: ...r screen Repeat steps 2 and 3 to set the item completely 1 9 EXIT CANCEL INPUT PIC SIZE MUTE JUMP CH RTN ZOOM SKIP REW SEARCH FF SEARCH PLAY SUBTITLE AUDIO RETURN ANGLE REPEAT A B CODE SLEEP PLAY MODE MENU SETUP RECALL DISPLAY TOP MENU DVD MENU Angle Note Depending on the DVD you may not be able to change the angles even if multi angles are recorded on the DVD Note Depending on the DVD you may not...

Page 53: ...R MUTE JUMP CH RTN ZOOM SKIP REW SEARCH FF SEARCH PLAY TV VCR PAUSE STEP REC SLOW STOP SUBTITLE AUDIO RETURN ANGLE REPEAT A B CODE SLEEP PLAY MODE RECALL DISPLAY TOP MENU CT 866 DVD MENU Audio Notes If the desired language is not heard after pressing the button several times the language is not recorded on the disc Changing soundtrack language is cancelled when you eject the disc The initial defau...

Page 54: ...e then press ENTER 00 12 04 32 Track PBC 34 56 71 33 Track 11 99 00 12 04 32 1 8 Eng Dolby Digital Off 1 8 Eng Dolby Digital On 00 34 56 01 12 33 00 34 56 01 12 33 1 9 Title 1 99 1 8 1 32 Chapter 1 999 EngDolby Digital Eng POWER 1 2 3 4 5 6 7 8 9 0 TV DVD VCR CABLE TV DVD 100 CH CH EXIT CANCEL INPUT PIC SIZE MUTE JUMP CH RTN ZOOM SKIP SUBTITLE AUDIO RETURN ANGLE REPEAT A B ENTER VOL CODE VOL SLEEP...

Page 55: ...in 16 letters on the screen Long file names will be condensed Music files recorded on an Apple HFS hierarchical file system volume cannot be played Limitations on display The maximum number for display is 16 letters Available letters for display are the following capital or small alphabets of A through Z numbers of 0 through 9 and _ under score Other letters than those above are replaced in hyphen...

Page 56: ... see pages 50 and 51 In the case of a CD containing a mixture of MP3 WMA and JPEG files the files are played back by selecting them from the file menu During MP3 WMA playback you can not adjust the volume level using the VOL buttons on the remote In this case please use the VOLUME buttons on the unit 1 72 0 9 Enter Play Mode 2 3 4 5 Japan CD R Bay Bridge CLOSE MY EYES DIVE TO BLUE Honey 8 9 10 11 ...

Page 57: ...how enables you to view pictures files one after another automatically Preparation Set JPEG Interval setting to 5 Seconds 10 Seconds or 15 Seconds See page 59 1 Select your desired starting file for the slide show in the step 3 on the above 2 Press ENTER to start slide show from the selected file If you press PAUSE during the slide show the slide show stops temporarily 8 appears briefly on the pic...

Page 58: ...LE AUDIO RETURN ANGLE REPEAT A B ENTER VOL CODE VOL SLEEP PLAY MODE MENU SETUP RECALL DISPLAY TOP MENU DVD MENU Return Menu Setup Enter Section Language Picture Sound Parental Other Details To select the language of Menu Subtitle and Audio if their languages are recorded on the disc in more than one language To select a picture size To turn on or deactivate the operational status display on the sc...

Page 59: ...d right edges automatically cut off 16 9 Wide A wide screen picture is displayed full size Note If the DVD disc is not formatted in the pan scan style it displays 4 3 style Display On screen display can be switched on or off when you press the buttons On On screen displays appear when you press the buttons factory setting Off On screen displays do not appear when you press any buttons JPEG Interva...

Page 60: ...ng on the discs the unit cannot limit playback Some discs may not be encoded with specific rating level information though its disc jacket says adult For those discs the age restriction will not work To change the parental level 1 Press or to select Password 2 Press Number buttons 0 9 to enter the password you have stored 3 Press ENTER The rating is now unlocked 4 Press or to select Parental then ...

Page 61: ...e password has not been set playback will commence If you don t know or have forgotten the password select Cancel Picture The setting screen will disappear Press EJECT on the unit to remove the disc 4 Enter the password with Number buttons 0 9 Then press ENTER If you interrupt the entering press RETURN 5 Playback will commence if the entered password was correct Note This temporary cancellation of...

Page 62: ...2425 Thai 3018 Bihari 1218 Hungarian 1831 Oriya 2528 Tibetan 1225 Breton 1228 Icelandic 1929 Panjabi 2611 Tigrinya 3019 Bulgarian 1217 Indonesian 1924 Pashto Pushto 2629 Tonga 3025 Burmese 2335 Interlingua 1911 Persian 1611 Turkish 3028 Byelorussian 1215 Irish 1711 Polish 2622 Turkmen 3021 Cambodian 2123 Italian 1930 Portuguese 2630 Twi 3033 Catalan 1311 Japanese 2011 Quechua 2731 Ukrainian 3121 C...

Page 63: ...hannel 13 Make sure TV CABLE is set to CABLE mode Unable to select a certain channel The channel may be blocked by the V Chip feature or CH LOCK feature or erased with the add erase feature Cannot access signal input sources Video1 Check the VIDEO LOCK feature Video2 ColorStream HD HDMI and PC and or Channels 3 and 4 Multiple images The station may have broadcast difficulties Try another channel U...

Page 64: ...ay etc cannot be performed No on screen display Select Display On No surround sound The setup does not match your stereo system The unit or remote operation key is not Turn off the unit and unplug the AC power cord for several minutes functioning then replug it Playback does not start when the title is Check the RATING LEVEL setup selected Audio soundtrack and or subtitle language Multilingual lan...

Page 65: ...DIO INPUT VIDEO 1V p p 75 ohm negative sync pin jack x 2 AUDIO 150 mV rms 30 modulation equivalent 47k ohm pin jack L R x 5 ColorStream component video INPUT Y 1V p p 75 ohm PR 0 7V p p 75 ohm PB 0 7V p p 75 ohm AUDIO OUTPUT AUDIO 150 mV rms 30 modulation equivalent 47k ohm pin jack L R x 1 DIGITAL AUDIO OUTPUT Coaxial DVD mode only 0 5V p p 75 ohm pin jack L R x 1 HEADPHONE Ø3 5mm stereo mini jac...

Page 66: ...omer controls and installation or repair of antenna systems are not covered by these warranties Reception problems caused by inadequate antenna systems are your responsibility Limited United States Warranty for LCD TV DVD 5 Warranties extend only to defects in materials or workmanship as limited above and do not extend to any LCD TV DVD or parts that have been lost or discarded by you or to damage...

Page 67: ...e not covered by these warranties Reception problems caused by inadequate antenna systems are your responsibility 5 Warranties extend only to defects in materials or workmanship as limited above and do not extend to any television or parts that have been lost or discarded by you or to damage to the television or parts caused by fires misuse accident Acts of God such as lightning or fluctuations in...

Page 68: ...IRKLAND QUEBEC H9J 4A1 CANADA TEL 514 390 7766 VANCOUVER 22171 FRASERWOOD WAY RICHMOND B C V62 1J5 CANADA TEL 604 303 2500 ColorStream FST Pure TheaterWide and StableSound are registered trademarks of Toshiba America Consumer Products L L C GameTimer is trademarks of Toshiba America Consumer Products L L C Printed in Thailand J5P00101A E P63 68 8 12 04 12 04 PM 68 ...

Reviews: