background image

English

   - 24 -

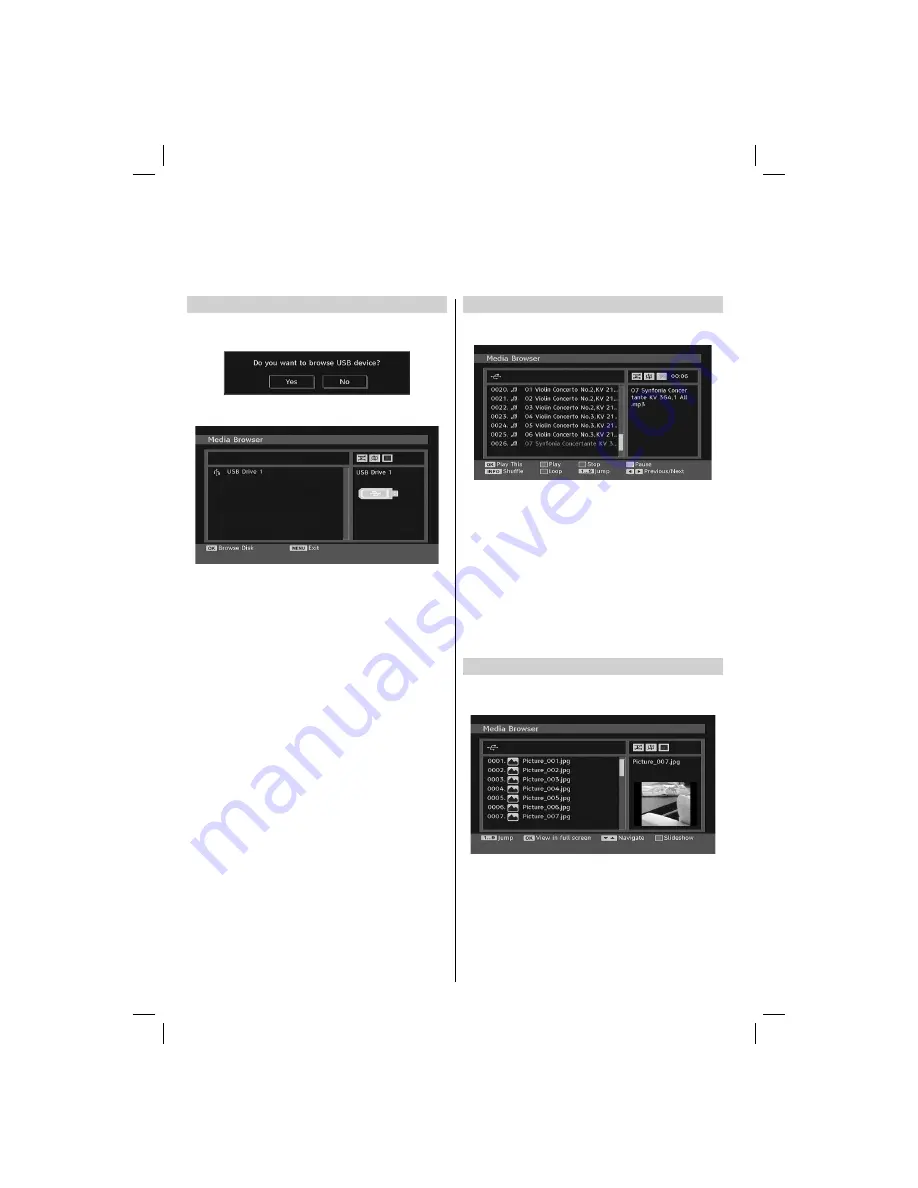
Auto Start

When you plug a USB device, the following screen will 

• 

be displayed:

Select 

• 

YES

 by pressing 

Left

 or 

Right

 button and press 

OK


button. Media browser will be displayed.


You can play music, picture and video 

fi

 les from a USB 

• 

memory stick.

Note

If you plug USB stick while in analogue mode, the TV will 
automatically switch to digital TV mode.
Some USB compliant devices may not be supported.
If the USB stick is not recognized after power off/on or First 
Time Installation, 

fi

 rst, plug the USB device out and power 

off/on the TV set. Plug the USB  device in again.

Playing MP3 Files

To play mp3 

fi

 les from a USB disk, you can use this menu 

screen.

Use 

• 

Up

 or 

Down

 button to highlight a 

fi

 le.

Press 

• 

OK

 to play the selected 

fi

 le.

Press 

• 

GREEN

 button to play all media 

fi

 les in the folder 

starting with the selected one.
Press 

• 

YELLOW

 button to pause a playing 

fi

 le.

Use 

• 

RED

 button to stop playback. 

Use 

• 

Left

 or 

Right

 button to jump to th previous or next 

fi

 le to play.

Press 

• 

INFO

 button to play 

fi

 les randomly. If shuf

fl

 e mode 

is enabled, previous/next function will also jump to the 
tracks randomly.
Use 

• 

BLUE

 button to play the selected 

fi

 le repeatedly.

Viewing JPG Files

To view photo 

fi

 les from a USB disk, you can use this menu 

screen.

Use 

• 

Up

 or 

Down

 button to highlight a 

fi

 le.

Use numeric (

• 

1...9)

 buttons) to jump to theselected 

fi

 le.

Press

• 

 OK

 button to view the selected picture in full 

screen.
Press 

• 

GREEN

 button to start the slideshow with all pictures 

in the folder.

USB Media Browser

This TV allows you to enjoy photo or music 

fi

 les stored on a USB device.

00_MB45_[GB]_3910UK_IDTV_NICKEL9_22740W_(IB_INTERNET)_10068436.indd   24

00_MB45_[GB]_3910UK_IDTV_NICKEL9_22740W_(IB_INTERNET)_10068436.indd   24

17.05.2010   16:53:43

17.05.2010   16:53:43

Summary of Contents for 22BV500B

Page 1: ...22BV500B OWNER S MANUAL 彍䈴㕟孇䉝彃佖䕒弨䥂彉乔䕒久吩弱 㘸㐳 ㄴ 慹 ﵳ 〱 䍵浡 㠺㔳㨱 ...

Page 2: ...8 Selecting Programme Positions 18 Input Selection 18 Controlling Volume and Muting Sound 19 Equalizer Settings 19 Balance 19 Headphone Volume 19 Sound Mode 19 AVL 19 Picture Mode 20 Picture Adjustments 20 Colour Temperature 20 Noise Reduction 20 Film Mode 20 Game Mode 20 Picture Zoom 20 Resetting Picture Settings 20 Child Lock 22 Default Zoom 22 Blue Background 22 Menu Background 22 Menu Timeout ...

Page 3: ...changing connections DO consult your dealer if you are ever in doubt about the installation operation or safety of your equipment DO be careful with glass panels or doors on equipment Do not DON T remove any fixed cover as this may expose dangerous voltages DON T obstruct the ventilation openings of the equipment with items such as newspapers tablecloths curtains etc Overheating will cause damage ...

Page 4: ... may be missing picture elements or have luminous spots This is not a sign of a malfunction Make sure the television is located in a position where it cannot be pushed or hit by objects as pressure will break or damage the screen Also please be certain that small items cannot be inserted into slots or openings in the case Cleaning the screen and cabinet Turn off the power and clean the screen and ...

Page 5: ...re tune your TV in order to continue receiving your existing TV channels and also to pick up new ones Digital UK the body leading the digital TV switchover will advise you when you need to re tune during the switchover If you choose to connect your TV to satellite or cable with a digital box then it will not be affected by switchover and you won t need to re tune Keep this important information ab...

Page 6: ...e television If the operating range becomes reduced the batteries may need replacing SCREEN SCREEN LANG LANG SUBTTL SUBTTL PIP PIP 1 2 3 4 6 5 9 7 8 0 BACK BACK MENU MENU EPG EPG FAV SOURCE SOURCE PRESETS PRESETS SLEEP SLEEP INFO INFO V V P OK OK Standby mode Subtitle on off No function No function Current language selection To select TV programme number To return to the previous programme Menu on...

Page 7: ...rmance with 1080i and 1080p high definition video signals but will also accept and display VGA 480i 480p 576i 576p and 720p signals PC format signals will also be displayed NOTE Although this television is able to connect to HDMI equipment it is possible that some equipment may not operate correctly A wide variety of external equipment can be connected to the television therefore the relevant owne...

Page 8: ...rk properly with this mode HDMI cable transfers both video and audio Separate analogue audio cables are not required see illustration To view the HDMI device video press the SOURCE button to select HDMI HDMI Input Socket HDMI device HDMI To Connect a DVI Device Connect an HDMI to DVI adaptor cable HDMI type A connector to the HDMI terminal and audio cables to the PC Side AV YPbPr sockets see illus...

Page 9: ...a USB Disk You can connect a USB disk to your TV by using the USB input of the TV This feature allows you to display play music or photo files stored in a USB stick It is possible that certain types of USB devices e g MP3 Players may not be compatible with this TV You may back up your files before making any connections to the TV set in order to avoid any possible data loss Note that manufacturer ...

Page 10: ...wner s manual of the equipment to be connected for full details NOTE The USB socket has limited functionality and Toshiba can take no responsibility for damage to other connected equipment Using the Remote Control Press the MENU button on the remote control to see the menus In analogue TV mode the menu appears as a group of icons each for a menu option Press the Left or Right button to select a to...

Page 11: ...d set country as UK in analogue AUTO Programme for UK broadcasts only Do not turn off the TV while initializing first time installation Auto Tuning As new services are broadcast it will be necessary to re tune the television in order to view them Auto Tuning will completely re tune the television and can be used to update the channel list It is recommended that Auto Tuning is run periodically to e...

Page 12: ...T lead or to tune in a station on another System To allocate a programme position on the television for a decoder and media recorder turn the decoder on insert a pre recorded film into the media recorder and press PLAY then manually tune Press MENU and using the Left or Right button select Install menu Using the Down button select Program and key in the programme position to be tuned with the numb...

Page 13: ...ar on the screen Press BACK to finish Sorting Programme Positions Analogue Channels may be moved and saved to the position of your choice Select Programme Table tab from the main analogue TV menu With the list of channels showing use navigation buttons to highlight the channel you want to move and press GREEN button The selected channel will be highlighted with a frame Use navigation buttons move ...

Page 14: ... RED or GREEN button to move page up or page down To watch a specific channel highlight it by using Up or Down buttons Afterwards highlight Select tab by using Left or Right buttons Press OK button Moving a Channel Highlight the desired channel by using Up or Down buttons Select Move option in the channel list and press OK button Edit Number screen will be displayed Enter the desired channel numbe...

Page 15: ...viewed Whenever you change channel theTV displays the broadcast picture along with an information banner at the bottom of the screen available only in DTV mode This will remain on the screen for a few seconds If the selected channel is locked you must enter the correct four numeric code to view the channel Enter PIN will be displayed on the screen in such a case Enter the PIN number to continue El...

Page 16: ...e control to exit Preferred These settings will be used if available Otherwise the current settings will be used Audio by pressing Left or Right keys change the audio language Subtitle alter the subtitle language with Left or Right keys The chosen language will be seen in subtitles Movie Subtitle In order to display subtitles properly use this setting to select a movie subtitle language By pressin...

Page 17: ... Up or Down buttons to go to Menu Lock option Use Left or Right buttons to choose Menu Lock Mode DISABLED All menus are unlocked ALL MENUS All Menus are accessible only with the correct lock key So the user cannot add delete rename channels cannot set timers INSTALLATION MENU Installation menu is locked So the user can t add channels Changes will be updated after exiting Configuration Menu Set PIN...

Page 18: ...ncrypted Press Left or Right button to set this function as On or Off Receiver Upgrade This feature helps to keep your TV updated It works automatically and searches for new information when available Note that this setting is inactive to be modified Please ensure that the TV is set to standby mode The TV automatically goes to active standby mode at 3 00 A M each day and searches for any new infor...

Page 19: ...eft or Right button to set this setting as On or Off If you change Standby Search to Off this function will be unavailable To use Standby search please make sure that you select Standby Search as On Viewing Main Menu Press buttons on the TV at the same time to view main menu Press MENU button on the remote control to view main menu Selecting Programme Positions To select a programme position use t...

Page 20: ...Balance level can be adjusted between 32 and 32 Headphone Volume This setting is used to set the sound output when headphones are connected Press Up or Down button to select Headphone Press Right button to view the headphone menu Press Up or Down button to select Volume Press Right button to increase headphone volume level Press Left button to decrease headphone volume level Headphone volume level...

Page 21: ...ise Reduction Press Left or Right to set Noise Reduction as Low Medium High or Off Film Mode Films are recorded at a different number of frames per second to normal television programmes Turn this feature on when you are watching films to see the fast motion scenes clearly In the PICTURE menu press Up or Down to select Film Mode Press Left or Right button to set this feature as On or Off Game Mode...

Page 22: ...tting to view a true 4 3 broadcast 14 9 ZOOM This option zooms to the 14 9 picture SUBTITLE When subtitles are included on a letterbox format broadcast this setting will raise the picture to ensure that all the text is displayed 14 9 This zooms up the wide picture 14 9 aspect ratio to the upper and lower limits of the screen PANORAMIC This stretches the left and right sides of a normal picture 4 3...

Page 23: ...c display timeout for menu screens set a value for this option In the FEATURE menu select Menu Timeout and choose 5 sec 30 sec or 60 sec using Left or Right button HDMI PC Full Mode optional If you want to view PC screen in HDMI mode by using external connection HDMI PC FULL MODE option should be On to adjust the screen ratio correctly This item might be inactive in some resolutions Note If you co...

Page 24: ...ertion of a CAM Conditional Access Module and card These are purchased from a service provider and allow additional subscription broadcasts to be viewed For more information see a service provider Insert the CAM and card into the Common Interface Slot following the instructions provided with the CAM Press the MENU button to display the main menu and use the or button to highlight the Conditional A...

Page 25: ...ia files in the folder starting with the selected one Press YELLOW button to pause a playing file Use RED button to stop playback Use Left or Right button to jump to th previous or next file to play Press INFO button to play files randomly If shuffle mode is enabled previous next function will also jump to the tracks randomly Use BLUE button to play the selected file repeatedly Viewing JPG Files T...

Page 26: ... is enabled next photo will be choosen randomly If the loop function is not enabled the slideshow will stop at the end If the loop function is enabled after the slideshow ends it will start again and again Press BLUE button to activate Loop function In Loop mode Slideshow goes on continuously and icon turns the highlighted icon Press INFO button to activate the operations bar To Close the Media Pl...

Page 27: ...his item to get a clear picture by trial and error method In the PC POSITION menu press the Down button until Phase is highlighted Press the Left or Right button to adjust the value Dot Clock Dot Clock adjustments correct the interference that appear as vertical banding in dot intensive presentations like spreadsheets or paragraphs or text in smaller fonts In the PC POSITION menu press the Down bu...

Page 28: ...in to return to normal viewing Programmes cannot be changed until text is cancelled The first text page shown will be the initial page Any text page can be accessed by entering the 3 digit page number using the numbered buttons pressing the coloured buttons or pressing to advance to the next page and to go back to the previous page Four coloured titles will appear at the base of the screen To acce...

Page 29: ... 9 4 3 11 1024 768 70 56 5 VESA 16 9 4 3 12 1024 768 72 57 7 16 9 4 3 13 1024 768 75 60 0 16 9 4 3 14 1152 864 70 64 2 VESA 16 9 4 3 15 1152 864 75 67 5 VESA 16 9 4 3 16 1152 870 75 68 9 MAC 16 9 4 3 17 1280 768 60 47 7 VESA 16 9 4 3 18 1360 768 60 47 7 16 9 4 3 19 1280 960 60 60 0 VESA 16 9 4 3 20 1280 1024 60 64 0 VESA 16 9 21 1280 1024 75 80 0 VESA 16 9 22 1600 1200 60 75 0 VESA 16 9 PIN Inform...

Page 30: ...60Hz O 1080I 50Hz O 1080I 60Hz O 1080P 24Hz O 1080P 25Hz O 1080P 30HZ O 1080P 50HZ O 1080P 60HZ O X Not Available O Available Note In some cases a signal on the LCD TV may not be displayed properly The problem may be an inconsistency with standards from the source equipment DVD Set top box etc If you do experience such a problem please contact your dealer and also the manufacturer of the source eq...

Page 31: ...8K 48KHz Bit Rate 64K 320Kbps Photo jpg Baseline JPEG WxH 8902x8902 up to 77Mega pixel Support format 444 440 422 420 Grayscale Progressive JPEG Up to 4 Mega pixel Support format 444 440 422 420 Grayscale 00_MB45_ GB _3910UK_IDTV_NICKEL9_22740W_ IB_INTERNET _10068436 indd 30 00_MB45_ GB _3910UK_IDTV_NICKEL9_22740W_ IB_INTERNET _10068436 indd 30 17 05 2010 16 53 44 17 05 2010 16 53 44 ...

Page 32: ...ks Audio L R HDMI 1 Input HDMI Enable Content Type INSTAPORT RGB Range supported PC Input Mini D Sub 16 PinAnalogue RGB Signal USB Port Media Browser Interface Version USB 2 0 USB Class Mass Storage File System FAT32 Headphone Socket 3 5 mm stereo Dimensions approx 37 cm H 53 cm W 60 cm D Height dimension includes foot stand Weight approx 5 5 kg without stand 5 0 kg Operating Conditions Temperatur...

Page 33: ...n of uncompressed digital video with high bandwidth digital content protection which is being standardized for reception of high definition video signals Because this is an evolving technology it is possible that some devices may not operate properly with the television 00_MB45_ GB _3910UK_IDTV_NICKEL9_22740W_ IB_INTERNET _10068436 indd 32 00_MB45_ GB _3910UK_IDTV_NICKEL9_22740W_ IB_INTERNET _1006...

Page 34: ...T A Make sure the media recorder or DVD player is connected to the television as illustrated in the beginning chapters and then select the correct input by pressing SOURCE A Digital Video Broadcast via an aerial antenna Q Why is the VCR DVD picture in black and white Q How are radio channels selected A Check that the correct EXT 1 input setting has been chosenor AV A You can select them via the Ch...

Page 35: ...gital channels be viewed Q Why is the soundtrack in English when a different audio language has been selected A Favourite mode is set to On A The programme is currently being broadcast with an English soundtrack only Q Why are some encrypted digital channels unavailable Q Why is there no digital text service A Your subscription needs upgrading Contact your service provider A The digital programme ...

Page 36: ... Reproduction in whole or part without written permission is strictly prohibited TOSHIBA Television Central Europe Sp z o o ul Pokoju 1 Biskupice Podgórne 55 040 Kobierzyce Poland Specification is subject to change without notice 彍䈴㕟孇䉝彃佖䕒弨䥂彉乔䕒久吩弱 㘸㐳 ㄴ 慹 ﵳ 〱 䍵浡 㠺㔳㨱 ...

Reviews: