background image

English   

- 24 -

Analogue  sound  controls  —  volume,  sound  mute,

equalizer, 

balance

Sound Controls

Volume

Press 

 or 

   to adjust  the  volume.

Sound Mute

Press 

 on the remote control once to turn the sound off

and again to cancel.

Equalizer

The


Equalizer 

feature has a number of sound settings to

select  from; 

Flat,  Classic,  Pop,  Rock,


Jazz  and  User.

These


settings are all preset and cannot be


altered. The

User 

setting can be altered and stored


to suit personal

preference.

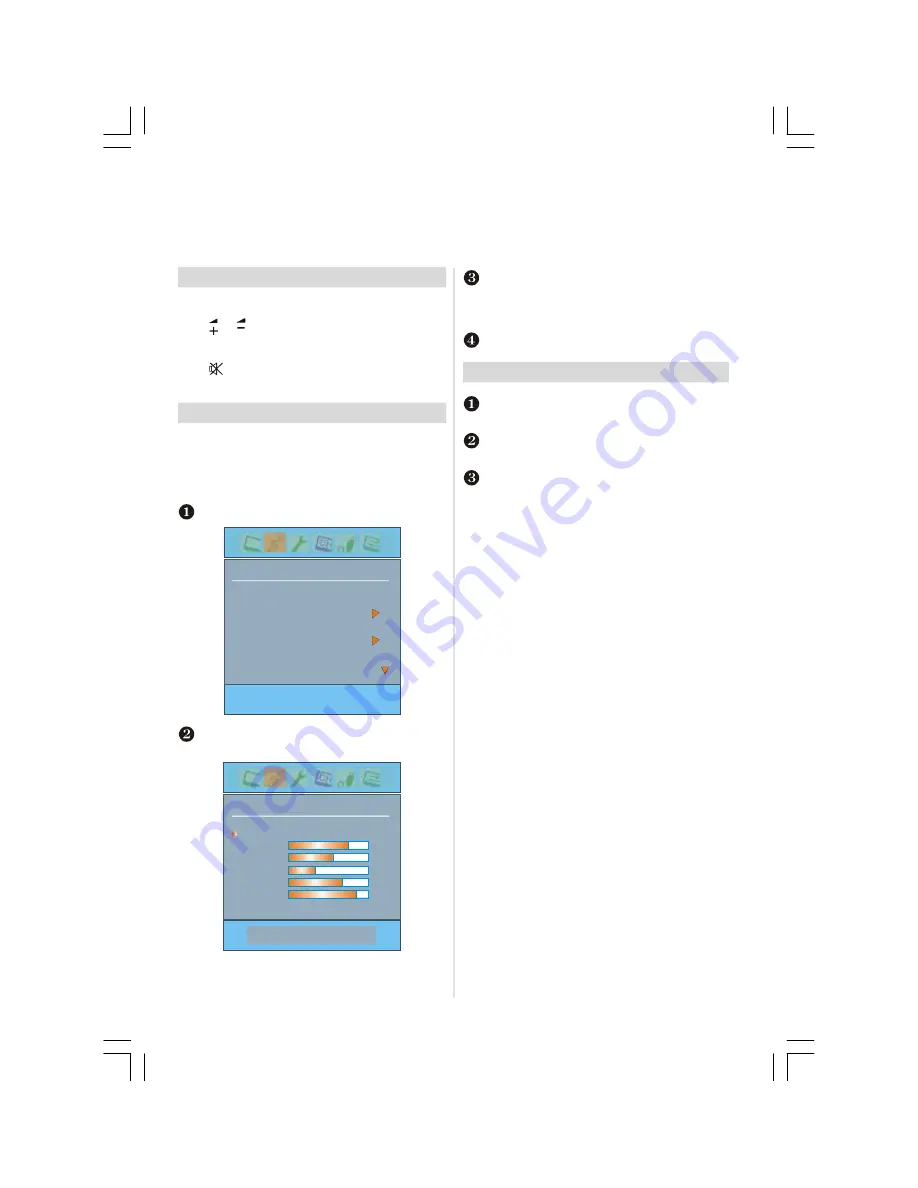
 Select the 

SOUND 

option from the main menu.

SOUND

Volume

Equalizer

Balance

Headphone

Sound Mode

 Use the Down button to highlight 

Equalizer 

then press

the Left  or  Right  button


to select 

preset

  mode.

User

Equalizer

Preset

120 Hz
500 Hz
1.5 kHz

5 kHz

10 kHz

8
4

-4

6

10

  Using  the  Up  and  Down  buttons  select  a  frequency

and then Left  and Right buttons


to  adjust to  suit per-

sonal  taste.  Note  that  user  mode  settings  are  stored
automatically.

 Press EXIT to return to TV..

Sound Balance

  Press  the  Right  button  to  select  the 

SOUND 

option

from  the  main  menu.

 Press the Down button to highlight 

Balance 

and Left or

Right  button


to  adjust the  settings.

 Press 

EXIT

 to  finish.

20_23790W_TOSHIBA_MB22_CT8003_(PAN_EU-DVB-T) (20W330DG-23W330DG).p65

02.04.2007, 09:45

24

Summary of Contents for 20W330DB

Page 1: ...20W330DB 23W330DB OWNER S MANUAL 䍏噅刭 〦ㅄ䈦䕎䜭塘㜳しⴱ㝍䈲 啔中十䴩 啋䑖䈭吩ⴱ 㐸㘱 ㄳⴵ〱じ塘 ㄶ 慲琠 畭愠ㄷ㨵㔺ㄱ ...

Page 2: ... 15 colour temperature noise reduction film mode Analogue picture controls 3D comb blue background PIP PAP 16 Timers 17 Digital programme guide and on screen information 18 Digital parental controls setting the pin mode 19 Digital settings favourite programmes locked programmes encrypted programmes 20 Digital settings country and language audio languages 21 Digital settings continued subtitles aud...

Page 3: ...n or safety of your equipment DO be careful with glass panels or doors on equipment Do not DON T remove any fixed cover as this may expose dan gerous voltages DON T obstruct the ventilation openings of the equipment with items such as newspapers tablecloths curtains etc Overheating will cause damage and shorten the life of the equipment DON T allow electrical equipment to be exposed to dripping or...

Page 4: ... a result of the owner s failure and or neglect to follow the instructions set out in the owner s manual viii any loss or damage caused directly as a result of misuse or malfunction of the product when used simultaneously with associated equipment Furthermore under no circumstances shall Toshiba be liable for any consequential loss and or damage including but not limited to the following loss of p...

Page 5: ...FAST FORWARD press to EJECT press to STOP press to SKIP REWIND press to SKIP FORWARD MENU GUIDE EXIT TEXT Standby mode To mute the sound To return to the previous programme in TV mode On screen menus To select TV programme number To select between analogue and digital TV or an external source Picture format To exit Menus To alter the volume To call up text services in mode and interactive services...

Page 6: ...English 5 Connecting external equipment Before connecting any external equipment disconnect from the main power 20_23790W_TOSHIBA_MB22_CT8003_ PAN_EU DVB T 20W330DG 23W330DG p65 02 04 2007 09 45 5 ...

Page 7: ... select between ATV DTV AV 1 AV 2 AV 2S AV 4 AV 4S YPbPr HDMI or PC RGB Connecting external equipment continued Connecting the PC via PC input Power off both computer and TV before making any con nections Connect the PC cable to the PC input of your TV and to the 15 pin connector on the rear of your computer Tighten the screws on the plugs until the connectors are fastened securely If you are usin...

Page 8: ... a topic To use the options press the Up and Down buttons on the remote control to move up and down through them and OK Left or Right buttons to select the required choice Follow the on screen instructions The functions of each menu are described in detail throughout the manual Using the controls and connections Using the control buttons on the top of the TV To alter the volume press To alter the ...

Page 9: ...anguage and Audio Language out of the options available You can also set Subtitles OFF as well as specifying the subtitle language When completed press OK to start tuning After auto tuning has completed you may find the time is not correct In this case you can adjust the time by using and buttons to highlight Local Time Setting and and buttons to set the correct time The Auto tuningscreen will app...

Page 10: ...e lost Select the SETUP MENU and use to highlight the Auto tuning Press OK A screen will appear warning that previous digital programmes and settings will be deleted Press OK to continue with the Auto tuning WARNING All previous settings will be deleted Continue YES Select Cancel The television will start to search for all available stations You must allow the television to complete the search Whe...

Page 11: ...will automati cally select programme position 1 This may not be a clear picture or the signal may be weak so the station order can be changed using program table which will appear on the screen P02 C 04 P03 C 05 P04 BBC 1 P05 CH 4 P06 BBC 2 P07 C 04 P08 C 07 P09 C 12 P10 C 15 P11 S 18 P12 S 29 P13 S 31 P14 S 33 P15 S 34 P16 S 35 P17 S 36 P18 S 37 P19 S 40 P20 C 21 Name Delete Insert APS P01 BBC 1 ...

Page 12: ...e tuned with the number but tons we suggest Programme 0 for a media recorder INSTALL Program Table Program Band Channel Colour System 1 Use the Down button to select Search then press the Left or Right button to search The television will begin searching for channels Each signal will show on the television if it is not your media recorder press the Left or Right button to restart the search When y...

Page 13: ... 03 C 04 63 75 MHz 6 63 75 MHz Cancel APS is running You must allow the television to complete the search When the search is complete the television will automati cally select programme position 1 This may not be a clear picture or the signal may be weak so the station order can be changed using program table which will appear on the screen Press EXIT to finish Choosing a language The Language fea...

Page 14: ...word Dual appears press to select Dual 1 or Dual 2 In digital mode a list of languages and audio formats may be shown briefly mono stereo multi channel Use the button to select between them Child lock CHILD LOCK disables the buttons on the top of the televi sion All buttons on the remote control can still be used SETUP MENU TV Setup OK Local Options OK Auto tuning OK Manual tuning OK Programmes OK...

Page 15: ...ming in and selecting the image without distortion Subtitle SUBTITLE When subtitles are included on a letterbox format broadcast this setting will raise the picture to ensure that all the text is displayed SUPER LIVE Use this setting when watching a widescreen DVD widescreen video tape or a 16 9 broadcast when available Due to the range of widescreen formats 16 9 14 9 20 9 etc black bars may be vi...

Page 16: ...Hue Colour Temp Noise Reduction Sharpness Colour 0 Colour Temperature Colour Temperature increases the warmth or coolness of a picture by increasing the red or blue tint In the PICTURE menu press the Down button until Colour Temp is highlighted Press the Left and Right buttons to select between NORMAL WARM and COOL to suit your preference Noise Reduction Noise Reduction softens the screen represen...

Page 17: ...ress EXIT to finish Picture in Picture PIP Picture and Picture PAP NOTE This feature only allows PC mode plus an other signal input Press the button to switch to PIP mode At PIP Mode a small picture PIP picture is displayed on the main picture There are 3 sizes and 6 positions available for the PIP window You can use button to change the PIP position Aspect Ratio of the PIP window is fixed and 4 3...

Page 18: ...t adding the details of the programme to be recorded by using the number buttons and or to make selections SET TIMER Programme BBC FOUR 10 Date Sat 21 Aug 21 08 Start T ime 13 45 End Time 14 45 Repeat ONCE Subtitles NONE Auto start VCR YES When all the details have been entered press OK to save the timer Please Note When a timed programme is about the start recording an information screen will app...

Page 19: ... list adding details of the programme to be recorded by using the number buttons and or to make selections Press OK to save Guide Select the on screen guide by pressing GUIDE the guide screen will appearhighlighting details of thechannel and programme currently being viewed This may take a few moments to appear BBC ONE BBC TWO ITV 1 CHANNEL 4 Five ITV 2 BBC THREE Teletext BBC FOUR Sky travel UKTV ...

Page 20: ...ntered the screen will ask you to confirm them by entering them again DEFINE PIN NUMBER New PIN Confirm PIN Exit Press MENU to go back to the Parental Control screen The PIN number is now set Mode This feature locks various menus to prevent the television being retuned or the settings being overridden In the PARENTAL CONTROL menu press to select Mode PARENTAL CONTROL Mode OFF Change Pin OK Back Wa...

Page 21: ...S Common Interface Slot Software Upgrade OK Back Watch TV Press EXIT Using the P buttons will only access those channels in Favourite List 1 when FAV 1 is selected Locking Programmes Locked programmes stops the viewing of selected digi tal channels which can only be accessed by entering the PIN From the FEATURE MENU press to select Favourite and Locked Programmes Press repeatedly to select the Loc...

Page 22: ...enu language selection From the LOCAL OPTIONS menu press to select Language item LOCAL OPTIONS UK ENGLISH OFF 13 39 Country Language Audio Language Subtitles Local Time Setting Back Watch TV ENGLISH Use or to set your language Audio Languages This feature allows a programme or film to be viewed with a choice of soundtrack language provided they are currently being broadcast From the SETUP MENU pre...

Page 23: ...a logue channels and settings The television will return to factory settings and then auto tune Press MENU and then press until Reset TV is highlighted Press OK to select A screen will appear warning that all previous settings will be deleting press OK to con tinue The digital welcome screen will appear press OK to continue the television will then auto tune Retune also analogue channels as descri...

Page 24: ...owing the software download taking place From the SOFTWARE UPGRADE menu press to select Auto Upgrade Use or to select ON or OFF Note During the Auto Upgrade the two green LEDs will light on the front of the TV Searching for new software If prefered software upgrades can be searched for manu ally using Search For New Software In the SOFTWARE UPGRADE menu press or to select Search For New Software S...

Page 25: ...ND Volume Equalizer Balance Headphone Sound Mode Use the Down button to highlight Equalizer then press the Left or Right button to select preset mode User Equalizer Preset 120 Hz 500 Hz 1 5 kHz 5 kHz 10 kHz 8 4 4 6 10 Using the Up and Down buttons select a frequency and then Left and Right buttons to adjust to suit per sonal taste Note that user mode settings are stored automatically Press EXIT to...

Page 26: ...limits high volume levels and prevents the extreme changes in volume that can occur whenchannels are changed or a programme switches to a commercial In the SOUND menu press the Down button to highlight AVL Use the Left or Right button to turn AVL on or off Effect Effect creates a synthetic sound effect for movies and television shows recorded in mono In the SOUND menu press the Down button to high...

Page 27: ... 2 Scart 2 This enables selection of the source to output from AV 2 For example to record transmissions in stereo from a ste reo decoder connect a stereo decoder to AV 1 and stereo media recorder to AV 2 then select AV 1 as the AV 2 Out The signal received through SCART 1 will output directly through SCART 2 NOTE If the currently watched source is analogue TV a connected device displays analogue T...

Page 28: ...r Temp is Manual you can also adjust the R G B items R G and B adjust the TV image colour in PC RGB mode You can change the TV colour to your desired colour R Red G Green B Blue Select Reset and press OK button to reset the adjustments to factory default settings This television has a multi page text memory which takes a few moments to load Autoposition If you shift the picture horizontally or ver...

Page 29: ... 35 2 56 5 800 600 37 9 60 6 800 600 48 1 72 7 800 600 46 9 75 8 1024 768 48 4 60 9 1024 768 56 5 70 10 1024 768 60 75 11 1280 1024 64 60 12 1280 768 47 8 60 13 1360 768 47 7 60 Resolution Frequency PC input typical display modes 20_23790W_TOSHIBA_MB22_CT8003_ PAN_EU DVB T 20W330DG 23W330DG p65 02 04 2007 09 45 28 ...

Page 30: ... system s see the broadcast text index page or consult your local Toshiba dealer Below is a guide to the functions of the remote control text buttons To displayan initial page Press to access an initial page The one displayed is dependant on the broadcaster To access sub pages If a text page has sub pages press and enter the subpage numbers 01 02 03 etc which can be selected using buttons at the b...

Page 31: ...how n on page 5 then s elect the correct input by pres s ing A Pleas e check you have s elected the correct country Go to the LOCAL OPTIONS m enu and check the COUNTRY s etting on page 21 Otherw is e you can correct the tim e us ing the LOCAL TIME SETTING see page 22 Q W hy is the V CR DVD picture in black and white A C heck the correct input has been chos en S VIDEO or AV See AV connections Q W h...

Page 32: ...y bars in a 4 3picture A Favourite Mode has been set to On See page 21 Q Why are some encrypted digital channels unavailable A Your subscription needs upgrading Contact your service provider Q Why is the soundtrack in English when a different audio language has been selected A The programme is currently being broadcast with an English soundtrack only Q What can be done if the PIN number has been f...

Page 33: ...English 32 Notes For your own records 20_23790W_TOSHIBA_MB22_CT8003_ PAN_EU DVB T 20W330DG 23W330DG p65 02 04 2007 09 45 32 ...

Page 34: ...English 33 Notes For your own records 20_23790W_TOSHIBA_MB22_CT8003_ PAN_EU DVB T 20W330DG 23W330DG p65 02 04 2007 09 45 33 ...

Page 35: ...th stand Sweden 05 12 21 69 Finland 05 12 21 69 Weight approx 7 6 Kg with stand Greece 05 12 21 69 6 0 Kg without stand Austria 05 12 21 69 Headphone Socket 3 5mm stereo Video Input PAL SECAM NTSC 3 58 4 43 Accessories Remote control External Connections 2 batteries AV 1 Input 21 pin Scart RGB A V AAA IEC R03 1 5V P Clip AV 2 Input Output 21 pin Scart RGB A V HDMI Input High Definition 1080i AV 4 ...

Page 36: ... 05 12 21 69 7 4 Kg without stand Austria 05 12 21 69 Headphone Socket 3 5mm stereo Video Input PAL SECAM NTSC 3 58 4 43 Accessories Remote control External Connections 2 batteries AV 1 Input 21 pin Scart RGB A V AAA IEC R03 1 5V P Clip AV 2 Input Output 21 pin Scart RGB A V HDMI Input High Definition 1080i AV 4 Input side 4 pin S video RCA jack Video composite RCA jacks Audio L R YPbPr Input RCA ...

Page 37: ...0 Chlorine free European Service centre Toshiba Information Systems U K Ltd Consumer Products Division European Service Centre Admiralty Way Camberley Surrey GU15 3DT England 50100000 䍏噅刭 〦ㅄ䈦䕎䜭塘㜳しⴱ㝍䈲 啔中十䴩 啋䑖䈭吩ⴱ 㐸㘱 ㄳⴵ〱じ塘 ㄶ 慲琠 畭愠ㄷ㨵㔺ㄱ ...

Reviews: