background image

62

DVD Playback

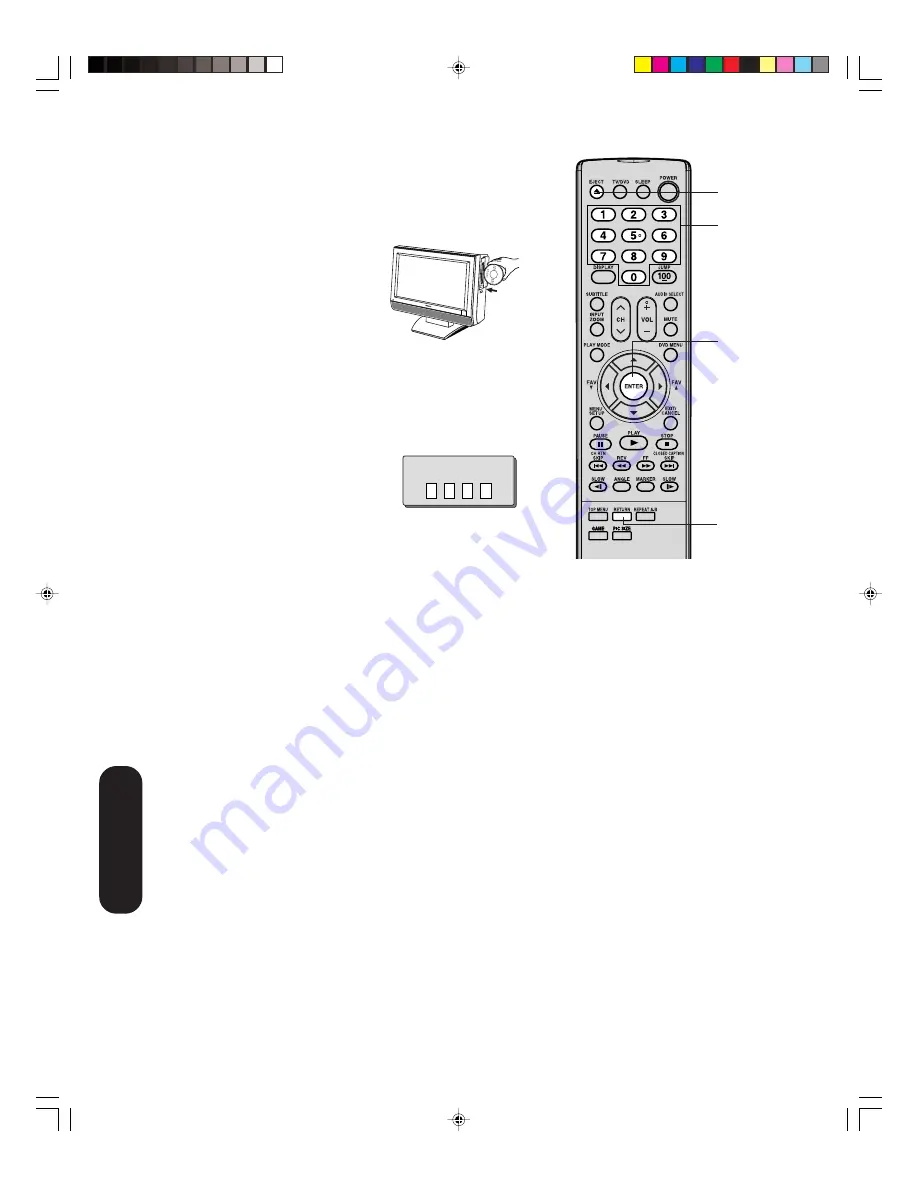
ENTER

Number
buttons

RETURN

Temporary cancel the rating level by DVD disc

Depending on the DVD disc, the disc may try to temporarily cancel the
parental level that you have set.
It is up to you to decide whether to cancel the rating level or not.

1. Load a DVD disc.

2. If the DVD disc has been designed to temporarily cancel the

Rating level, the screen which follows the “Reading” screen will
change, depending on which disc is played. If you select “YES”
with the ENTER key, password input screen will then appear.
• If “NO” is selected, press EJECT to remove the disc.

3. Enter the password with Number buttons (0–9). Then press

ENTER.
To exit from the entry, press RETURN.

4. Playback will commence if the entered password is correct.

Note:

This temporary cancellation of rating level will
be kept until the disc is ejected.
When the disc is ejected, the original parental
rating level will be set again automatically.

EJECT

Enter Password

 5X20301A(E)P56-63

13/3/06, 5:24 PM

62

Summary of Contents for 20HLV86 - 20" LCD TV

Page 1: ...20HLV86 Combination DIGITAL VIDEO DVD Playback Using the TV DVD s Features Setting up your TV DVD Connecting your TV DVD Introduction Appendix 5X20301A E Cover 13 3 06 5 18 PM 1 ...

Page 2: ...will give you long and enjoyable service We look forward to providing you with additional Toshiba products to serve all of your entertainment needs in the future The lightning flash with arrowhead symbol within an equilateral triangle is intended to alert the user to the presence of uninsulated dangerous voltage within the product s enclosure that may be of sufficient magnitude to constitute a ris...

Page 3: ...tion The party responsible for compliance to these rules is Toshiba America Consumer Products L L C 82 Totowa Rd Wayne NJ 07470 Ph 800 631 3811 or visit TACP s website at www tacp Toshiba com NOTE This equipment has been tested and found to comply with the limits for a Class B digital device pursuant to Part 15 of the FCC rules These limits are designed to provide reasonable protection against har...

Page 4: ...cloth 7 Do not block any ventilation openings Install in accordance with the manufacturer s instructions 8 Do not install near any heat sources such as radiators heat registers stoves or other apparatus including amplifiers that produce heat 9 Do not defeat the safety purpose of the polarized or grounding type plug A polarized plug has two blades with one wider than the other A grounding type plug...

Page 5: ...k the service technician to use only replacement parts specified by the manufacturer Upon completion of service ask the service technician to perform routine safety checks to determine that the TV is in safe operating condition 41 When the TV reaches the end of its useful life ask a qualified service technician to properly dispose of the TV Installation cont from previous page 26 Always make sure ...

Page 6: ...o not use the unit for a long period the unit may not function properly in the future Turn on and use the unit occasionally Notes on locating the unit When you place this unit near a TV radio or VCR the playback picture may become poor and the sound may be distorted In this case place the unit away from the TV radio or VCR To avoid damage to this product never place or store the TV DVD in direct s...

Page 7: ...2 Track 3 Track 4 Track 5 DVD video disc Video CD Audio CD Structure of disc contents Normally DVD video discs are divided into titles and the titles are sub divided into chapters Video CDs and Audio CDs are divided into tracks DVD video disc Video CD Audio CD Each title chapter or track is assigned a number which is called title number chapter number or track number respectively Some discs may no...

Page 8: ...This unit can play the following discs DIGITAL VIDEO Disc Mark Contents Disc Size Maximum playback time Audio Video moving pictures DVD video discs Video CDs Audio CDs Audio Video moving pictures Audio 12 cm 8 cm 12 cm 12 cm 8 cm Approx 4 hours single sided disc Approx 8 hours double sided disc Approx 80 minutes single sided disc Approx 160 minutes double sided disc Approx 74 minutes single sided ...

Page 9: ...wing the wide screen picture formats 480i and 480p signals only 33 Scrolling the TheaterWide picture TheaterWide 2 and 3 only 35 Selecting the cinema mode 36 Using the ASPECT feature 36 Setting the sleep timer 37 Using the closed caption feature 37 Adjusting the picture 38 Selecting the picture mode 38 Adjusting the picture quality 38 Using the CableClear feature 39 Selecting the color temperature...

Page 10: ...r POWER indicator Back The STARTING SETUP feature appears the first time you turn on the TV DVD See page 23 for details Top panel You can adjust the angle of the TV screen 5 forward or 10 backward from vertical Hold the base of the TV DVD while adjusting the angle The volume and channel buttons on the top panel can be used as and buttons while the TV menu is displayed on screen Approx 10 Approx 5 ...

Page 11: ...ed accord ing to use yellow for video and red and white for audio The red audio cable is for the stereo right channel and the white audio cable is for the stereo left or mono channel If you look at the rear panel of the TV DVD you will see that the terminals are color coded in the same manner as the cables S video cables provide better picture performance than standard video cables S video cables ...

Page 12: ...elevision to the output of the Converter Descrambler box usually channel 3 or 4 and use the Converter Descrambler box to select channels Option 3 For Subscribers to Unscrambled Basic Cable with Scrambled Premium Channels If you subscribe to a cable service in which basic cable channels are unscrambled and premium channels require the use of a Converter Descrambler box you may wish to use a two set...

Page 13: ... S video cable between the TV DVD and DVD player satellite receiver make the audio connections but remove the standard video cable Do not connect both an S video and a standard video cable to VIDEO1 at the same time or the picture performance will be unacceptable Connecting your TV DVD The unauthorized recording use distribu tion or revision of television programs videotapes DVDs and other materia...

Page 14: ...compatible DVD player such as a Toshiba DVD player with ColorStream can greatly enhance picture quality and performance Note The ColorStream HD jacks can be used with Progressive 480p 720p and Interlaced 480i 1080i scan systems A 1080i signal will provide the best picture performance The unauthorized recording use distribu tion or revision of television programs videotapes DVDs and other materials...

Page 15: ...e The ColorStream HD jacks and HDMI jacks can be used with Progressive 480p 720p and Interlaced 480i 1080i scan systems If your DTV receiver does not have compo nent video use the S video and standard audio connections instead Do not connect both an S video and a standard video cable to VIDEO1 at the same time or the picture performance will be unacceptable For an HDMI connection see page 17 The u...

Page 16: ...se an S video cable plus the standard audio cables instead of a standard video cable Do not connect both a standard video cable and an S video cable at the same time or the picture performance will be unacceptable You will need one set of standard AV cables Connecting your TV DVD VIDEO AUDIO L R OUT VIDEO AUDIO L R OUT S VIDEO VHS Camcorder TV DVD back panel S VHS Camcorder TV DVD back panel 5X203...

Page 17: ...input setting to DVI in the AUDIO menu see page 42 HDMI the HDMI logo and High Definition Multimedia Interface are trademarks or registered trademarks of HDMI Licensing LLC To ensure that the HDMI or DVI device is reset prop erly it is recommended that you follow these proce dures When turning on your electronic components turn on the TV DVD first and then the HDMI or DVI device When turning off y...

Page 18: ...manual of the connected equipment as well The output sound of the TV DVD has a wide dynamic range Be sure to adjust the receiver s volume to a moderate listening level Otherwise the speakers may be damaged by a sudden high volume sound Turn off the amplifier before you connect or disconnect the TV DVD s power cord If you leave the amplifier power on the speakers may be damaged You will need one co...

Page 19: ...ng your TV DVD Connecting an amplifier equipped with a digital audio input 2 channel digital stereo You can enjoy the dynamic sound of 2 channel digital stereo by connecting an amplifier equipped with a digital audio input and speaker system right and left front speakers You will need one coaxial cable Notes PCM audio is limited to DVD or CD playback Connect the COAXIAL DIGITAL AUDIO OUT jack of t...

Page 20: ...ting your TV DVD Monitor display modes Mode Resolution Refresh rate VGA 640x480 60Hz VGA 720x400 70Hz WVGA 848x480 60Hz SVGA 800x600 60Hz XGA 1024x768 60Hz WXGA 1280x720 60Hz WXGA 1280x768 60Hz WXGA 1360x768 60Hz You will need one VGA 15 pin computer cable one PC audio cable Notes Some PC models cannot be connected to this TV An adapter is not needed for computers with a DOS V compatible mini D su...

Page 21: ...ols for your other devices in which case it is suggested that you use the original remote control for the applicable device Caution Never throw batteries into a fire Notes Be sure to use AAA size batteries Dispose of batteries in a designated disposal area Batteries should always be disposed of with the environment in mind Always dispose of batteries in accordance with applicable laws and regulati...

Page 22: ...ws access to DVD Top menu or display a file browser screen for JPEG pags 51 56 PLAY MODE sets repeat playback page 49 RETURN clears DVD setup menu page 59 MARKER index of DVD VCD page 48 REPEAT A B repeats playback between A and B page 49 ANGLE changes playback angle page 51 JUMP locates the desired point to play back page 47 CH RTN returns to the last viewed channel page 25 ZOOM allows you to zoo...

Page 23: ...e remote control you need to set some preferences on the TV DVD using the menu system You can access the menu system with the buttons on the remote control When you make a menu selection your changes are immediate You do not have to press MENU or EXIT to see your changes After one minute the menu screen will automatically close if you do not make a selection Your changes will still be saved When y...

Page 24: ...you have programmed the channels automatically you can add or erase specific channels manually To add or erase channels manually 1 Select the channel you want to add or erase If adding channels you must select the channel to add using the Channel Number buttons 2 Press MENU then press or to display the SETUP menu 3 Press or to highlight ADD ERASE 4 Press or to select ADD or ERASE whichever functio...

Page 25: ...nt to program 2 Press MENU then press or to display the OPTION menu 3 Press or to highlight FAVORITE CH 4 Press or to display the FAVORITE CH menu SET CLEAR will be highlighted 5 Press or to highlight SET and press ENTER 6 Press EXIT to return to normal viewing 7 Repeat steps 1 6 for up to 12 channel To select your favorite channels Press the FAV buttons on the remote control to select your favori...

Page 26: ...rd again to confirm it and then press ENTER The LOCKS menu appears If the wrong password is entered ERROR blinks about 4 seconds 5 You may now set up the LOCKS menu See Using the V Chip parental control feature page 27 Locking channels page 28 Locking the video inputs page 28 Setting the GameTimerTM page 29 or Using the panel lock feature page 29 To change your password 1 Press MENU then press or ...

Page 27: ...dience TV PG Parental guidance TV 14 14 years old and above TV MA 17 years old and above When you select TV Y7 TV PG TV 14 or TV MA press DISPLAY to explain the rating Press or to select the desired rating you want Press or to select the setting ON or OFF then press ENTER 6 Press or to highlight MOVIE RATING Then press or to display the desired rating OFF MOVIE RATING is not set no movies will be ...

Page 28: ...ed channels unless you clear the setting You can choose to lock up to nine TV channels and nine cable channels To lock channels 1 Use the Channel Number buttons 0 9 and 100 to display the television channel you wish to lock 2 Press MENU then press or to display the LOCKS menu 3 Press or to display the password entering mode 4 Use the Channel Number buttons 0 9 to enter your password then press ENT...

Page 29: ...UST OFF OFF OFF 30 60 90 120 ENTER EXIT Channel Numbers To unlock the video inputs 1 Press MENU then press or to display the LOCKS menu 2 Press or to display the password entering mode 3 Use the Channel Number buttons 0 9 to enter your password then press ENTER The LOCKS menu appears 4 Press or to highlight VIDEO LOCK and press or to highlight OFF 5 Press EXIT to return to normal viewing Setting t...

Page 30: ... Labeling channels Channel labels appear above the channel number display each time you turn on the TV DVD select a channel or press the DISPLAY button You can choose any four characters to identify a channel To create channel labels 1 Select a channel you want to label 2 Press MENU then press or until the OPTION menu appears 3 Press or to highlight CH LABEL 4 Press or to display the CH LABEL menu...

Page 31: ... video input sources in the order illustrated below Labeling the video input sources The video label feature allows you to label each input source for your TV DVD from the following preset list of labels Uses the default label name VCR Video cassette recorder DVD DVD video DTV Digital TV set top box SAT Satellite box CBL Cable box HD HDMI equipment To label the video input sources 1 Press MENU the...

Page 32: ...he on timer Example Turning on the TV DVD to channel 012 at 6 30 AM DAILY 1 Set the clock if you have not already done so see page 31 2 Press MENU then press or to display the OPTION menu 3 Press or to highlight ON TIMER 4 Press or to highlight SET then press ENTER The ON TIMER menu appears Press or to set the time 5 Press or to set the desired hour then press 6 Set the desired minutes and channel...

Page 33: ...iginally formatted proportion Some program formats will display with side bars and or bars at the top and bottom Natural picture size example The way the image displays will vary depending on the format of the program you are currently watching SETUP CLOSED CAPTION PICTURE SIZE PICTURE SCROLL CINEMA MODE ASPECT BACK LIGHTING SELECT ADJUST OFF FILM ON 16 Conventional 4 3 picture in Natural size on ...

Page 34: ... picture is stretched wider to fill the width of the screen but not stretched taller None of the picture is hidden Using these functions to change the picture size i e changing the height width ratio for any purpose other than your private viewing may be prohibited under the Copyright Laws of the United States and other countries and may subject you to civil and criminal liability The picture is s...

Page 35: ...P menu appears 3 Press or to highlight PICTURE SCROLL 4 Press or to display the Scroll Adjustment mode Note You can scroll the picture in TheaterWide 2 and TheaterWide 3 only The scroll amounts are as follows 480i 480p signal source Wide 1 Not adjustable Wide 2 10 to 20 Wide 3 10 to 20 5 Press or to adjust the vertical position of the picture Normal center position To raise the picture press To lo...

Page 36: ...n be obtained by setting the CINEMA MODE to FILM To set the CINEMA MODE to FILM 1 Press MENU then press or until the SETUP menu appears 2 Press or to highlight CINEMA MODE then press or to select FILM To set the CINEMA MODE to VIDEO Press or to select VIDEO in step 2 above SETUP CLOSED CAPTION PICTURE SIZE PICTURE SCROLL CINEMA MODE ASPECT BACK LIGHTING SELECT ADJUST OFF FILM VIDEO ON 16 Using the...

Page 37: ... the program such as weather or stock data if available in your viewing area To view captions or text 1 Tune the TV DVD to the desired program 2 Press MENU then press or to display the SETUP menu 3 Press or to highlight CLOSED CAPTION 4 Press or to select the desired Closed Caption mode as follows To view captions select C1 or C2 C1 displays translation of the primary language in your area Note If...

Page 38: ...the following table To select the picture mode 1 Press MENU then press or to display the PICTURE menu 2 Press or to highlight MODE 3 Press or to highlight the mode you prefer 4 Press EXIT to return to normal viewing Mode Picture Quality SPORTS Bright and dynamic picture factory set STANDARD Standard picture quality factory set MOVIE Movie like picture setting factory set MEMORY Your personal prefe...

Page 39: ...ur picture adjustments 1 Press MENU then press or to display the PICTURE menu 2 Press or to highlight RESET and then press or Mode Picture Quality COOL Blueish MEDIUM Neutral WARM Reddish PICTURE CableClear COLOR TEMPERATURE RESET SELECT ADJUST COOL MEDIUM WARM ON COOL PICTURE CableClear COLOR TEMPERATURE RESET SELECT ADJUST ON COOL MENU EXIT Using the CableClear feature CableClear reduces visible...

Page 40: ... second language or other audio information Note The MTS feature is only available in ANT input source When the TV DVD receives a stereo or SAP broadcast the STEREO or SAP displays on screen every time you turn the TV DVD on change the channel or press DISPLAY To listen to stereo sound 1 Press MENU then press or to display the AUDIO menu 2 Press or to highlight MTS 3 Press or to highlight STR ster...

Page 41: ...et your audio adjustments 1 Press MENU then press or to display the AUDIO menu 2 Press or to highlight RESET and then press or MENU Using the surround sound feature The surround sound feature expands the audio listening field wider and deeper to create exceptional sound quality from the TV s speakers The feature uses stereo signals from a TV broadcast or video input To turn on the surround sound f...

Page 42: ...atus Content rating On timer Sleep timer if preset Picture size STEREO SAP TV PG L V ON TIMER 12 00AM SLEEP TIMER 2h00m ANT FULL ABCD CLOCK 12 00AM CABLE 002 OFF FILM ON 16 SETUP CLOSED CAPTION PICTURE SIZE PICTURE SCROLL CINEMA MODE ASPECT BACK LIGHTING SELECT ADJUST Note The cold cathode fluorescent lamp used for the back light on this TV DVD has a limited life When areas on the screen darken fl...

Page 43: ...ress MENU in PC mode 2 Press 2 or 3 to select the desired menu 3 Press or to highlight RESET and then press or PICTURE menu settings BRIGHTNESS To adjust the brightness of PC Monitor screen CONTRAST To adjust the contrast of PC Monitor screen HOR POSITION To adjust the horizontal position of the image on the PC Monitor screen Each video standard will require a different value for this setting VER ...

Page 44: ... and place it in position 4 On the TV screen changes to Reading and then playback commences A menu screen will appear on the TV screen if the disc has a menu feature Press or to select title then press ENTER Title is selected and play commences 5 Press VOL or to adjust the volume 6 Press STOP to end playback Resume feature Depending on the disc you are playing when you press STOP one time the TV D...

Page 45: ...s may take a minute or so to start playback When you set a single faced disc label downwards ie the wrong way up Reading will appear on the display for a few minutes and then Incorrect Disc will continue to be displayed Some discs may not resume playing the same scene after stopping Resuming cannot function when you play a PBC featured Video CD while the PBC is on To turn off the PBC see page 53 S...

Page 46: ...ted chapter or track SKIP To locate succeeding chapters or tracks SKIP 4 Playback starts from the beginning of the current chapter or track When you press twice in quick successions playback starts from the beginning of the preceding chapter or track Note A Prohibition symbol may appear at the upper right of the screen This symbol means either the feature you tried is not available on the disc or ...

Page 47: ... the case of VCD CD discs track and time are used to locate the desired point to playback To check the title chapter track and time press DISPLAY 1 Press JUMP during playback or resume stop mode 2 Press or to select the Time Title Track or Chapter 3 Press Number buttons 0 9 to input the number If you input a wrong number press CANCEL Refer to the package supplied with the disc to check the numbers...

Page 48: ...r stop mode 2 Press or to select the Marker 1 3 3 Press ENTER Playback starts from the marked scene To cancel the Marker Follow the above steps 1 2 then press CANCEL Notes Some discs may not work with the marking operation The marking is canceled when you eject the disc or turn the power off Some subtitles recorded around the marker may fail to appear In case of Video CD with PBC the MARKER is pro...

Page 49: ...points 1 Press REPEAT A B during playback The start point is selected 2 Press REPEAT A B again The end point is selected Playback starts at the point that you selected Playback stops at the end point and returns to Point A automatically then starts again To resume normal playback Press REPEAT A B again Off appears on the screen Notes Some discs may not work with the repeat operation In case of Vid...

Page 50: ...clear the program one by one Select Mode to Program press to select the track file number Then press CANCEL To clear all the programs In the left column press to select Clear Program Then press ENTER Random playback VCD The unit selects tracks or files at random and playback For Audio CD and MP3 WMA CD please see Random playback on page 58 1 Press PLAY MODE during playback or stop mode 2 Press to ...

Page 51: ...start DVD menu Some DVDs allow you to select the disc contents using the menu When you playback these DVDs you can select the subtitle language and sound track language etc using the menu 1 Press DVD MENU during playback The DVD menu appears on the screen Press DVD MENU again to resume playback at the scene when you pressed DVD MENU 2 Press to select the desired item 3 Press ENTER The menu continu...

Page 52: ...urn off the subtitle press SUBTITLE until Off appears The on screen display will disappear after a few seconds Notes If the desired language is not heard after pressing the button several times the language is not recorded on the disc The selected soundtrack language is canceled when you eject the disc The initial default language or available language will be heard if the disc is played back agai...

Page 53: ...er 2 24 1 1 Eng Dolby Digital 1 2 Eng 1 1 CHAPTER NO ELAPSED TIME ANGLE NO DISC OPERATION TITLE NO TOTAL TIME AUDIO LANGUAGE A KIND OF AUDIO SUBTITLE LANGUAGE 1 Press PLAY MODE in the stop mode 2 Press to select Mode then press ENTER repeatedly until Off appear 3 Press PLAY MODE again to clear the screen To turn on the PBC Follow the above steps 1 2 then press ENTER repeatedly until PBC appear 1 2...

Page 54: ...le name is displayed within 15 letters on the screen Long file names will be condensed The music files recorded by Hierarchical File System HFS cannot be played Limitations on display The maximum number for display is 15 letters Available letters for display are the following capital or small alphabets of A through Z numbers of 0 through 9 and _ under score Other letters than those above are repla...

Page 55: ... During MP3 WMA JPEG playback you cannot use JUMP A B Repeat functions You can use Repeat Track or All Random functions and Program playback for MP3 WMA JPEG DivX CD playback see page 58 The picture menu is displayed when the FUJICOLOR CD or the Kodak Picture CD are played To display the file menu press TOP MENU In the case of a CD containing a mixture of MP3 WMA JPEG and DivX files the files are ...

Page 56: ...u can rotate an image by 90 degrees Pressing ANGLE during playback of the image or appears briefly on the screen Zooming an image Zoom function also can be used in viewing JPEG files Press ZOOM See Zooming page 47 5 Press STOP to end playback The file browser appears on the screen If you want to watch the other file repeat steps 3 4 Slide show playback CD The slide show enables you to view picture...

Page 57: ...een If you want to watch the other file repeat steps 3 4 Movie 01 Movie 02 Movie 03 Movie 04 Movie 05 Movie 06 Movie 07 Movie 08 Select Files Repeat Off Mode Off Movie 01 DIVX JPEG Preview View DivX VOD Rental This rental has 5 views left Do you want to use one of your 5 views now No Yes Note In order to play DivX VOD content on this unit you first need to register the unit with registration code ...

Page 58: ...de 4 Press or to select Program View then press ENTER Program View shows only the programed files that you have added in step 2 5 In the Program View press PLAY The files start to playback in programmed order that were added by you To remove file from program list In the Edit Mode switch to Program View Select file you want to remove then press ENTER Select Clear Program and press ENTER Marked fil...

Page 59: ...ar SETUP screen press SETUP or RETURN Parental Off Set Password Output Interlace DivX R VOD DRC Off QSound On E B L Off TV Screen 4 3 Display On Picture Mode Auto JPEG Interval 5 Seconds Screen Saver On Menu English Subtitle English Audio English Section Option Menu Subtitle Audio TV Screen Display Picture Mode JPEG Interval DRC Parental Password DivX R VOD Details To select the language of Menu S...

Page 60: ...ames per second and video content video signals recorded at 30 frames per second Make this selection according to the type of content being viewed Auto Select this position normally The DVD player automatically detects source content film or video of playback source and converts that signal in the progressive output format in an appropriate method Film The DVD player converts film content pictures...

Page 61: ...CEL Set the new password 1 Press or to select Password then press ENTER Enter Current Password screen will appear 2 Press Number buttons 0 9 to input the current password If the password has not been set yet after you purchase this unit it is 0000 3 Then press ENTER Enter New Password screen will appear Press Number buttons 0 9 to input the new password 4 Press ENTER Now your new password has been...

Page 62: ... Reading screen will change depending on which disc is played If you select YES with the ENTER key password input screen will then appear If NO is selected press EJECT to remove the disc 3 Enter the password with Number buttons 0 9 Then press ENTER To exit from the entry press RETURN 4 Playback will commence if the entered password is correct Note This temporary cancellation of rating level will b...

Page 63: ...3 Nepali 2415 Telugu 3015 Bhutani 1436 Hindi 1819 Norwegian 2425 Thai 3018 Bihari 1218 Hungarian 1831 Oriya 2528 Tibetan 1225 Breton 1228 Icelandic 1929 Panjabi 2611 Tigrinya 3019 Bulgarian 1217 Indonesian 1924 Pashto Pushto 2629 Tonga 3025 Burmese 2335 Interlingua 1911 Persian 1611 Turkish 3028 Byelorussian 1215 Irish 1711 Polish 2622 Turkmen 3021 Cambodian 2123 Italian 1930 Portuguese 2630 Twi 3...

Page 64: ...responding audio jacks or the HDMI input if available on your TV for connection to such external A V device If the TV is connected to an A V receiver that has a programmable audio delay feature use this feature to help synchronize the sound to the picture If connected to a video game system and your TV has the Game Mode feature see owner s manual for more information enable this feature If you not...

Page 65: ...ow motion Some discs may not perform certain functions play repeat play or program play etc cannot be performed No on screen display Set Display to On No surround sound The setup does not match your stereo system The unit or remote operation key is not Turn off the unit and unplug the AC power cord for several minutes functioning then replug it Playback does not start when the title is Check the P...

Page 66: ...n jack L R x 4 ColorStream component video INPUT Y 1V p p 75 ohm PR 0 7V p p 75 ohm PB 0 7V p p 75 ohm DIGITAL AUDIO OUTPUT Coaxial DVD mode only 0 5V p p 75 ohm pin jack x 1 HEADPHONE Ø3 5mm stereo mini jack x 1 HDMI INPUT HDMI compliant type A connector HDCP compliant E EDID compliant Suggested scan rates 1080i 480p 480i 720p HDMI Audio 2 channel PCM 32 44 1 48 kHz sampling frequency 16 20 24 bi...

Page 67: ... Repair Warranty personal computer level IEEE 1394 devices and any other connected signal source device are your responsibility 5 Warranties extend only to defects in materials or workmanship as limited above and do not extend to any LCD TV DVD Combination or parts that have been lost or discarded by you or to damage to the LCD TV DVD Combination or parts caused by fires misuse accident Acts of Go...

Page 68: ...oblems caused by inadequate antenna systems are your responsibility 5 Warranties extend only to defects in materials or workmanship as limited above and do not extend to any television or parts that have been lost or discarded by you or to damage to the television or parts caused by fires misuse accident Acts of God such as lightning or fluctuations in electric power improper installation improper...

Page 69: ...69 DVD Playback Using the TV DVD s Features Setting up your TV DVD Connecting your TV DVD Introduction Appendix MEMO 5X20301A E P64 Back 13 3 06 5 24 PM 69 ...

Page 70: ...70 Appendix MEMO 5X20301A E P64 Back 13 3 06 5 24 PM 70 ...

Page 71: ...71 DVD Playback Using the TV DVD s Features Setting up your TV DVD Connecting your TV DVD Introduction Appendix MEMO 5X20301A E P64 Back 13 3 06 5 24 PM 71 ...

Page 72: ...ColorStream TheaterWide and StableSound are registered trademarks of Toshiba America Consumer Products L L C and GameTimer are trademarks of Toshiba America Consumer Products L L C Printed in Thailand 5X20301A E P64 Back 13 3 06 5 24 PM 72 ...

Reviews: