background image

Connections

19

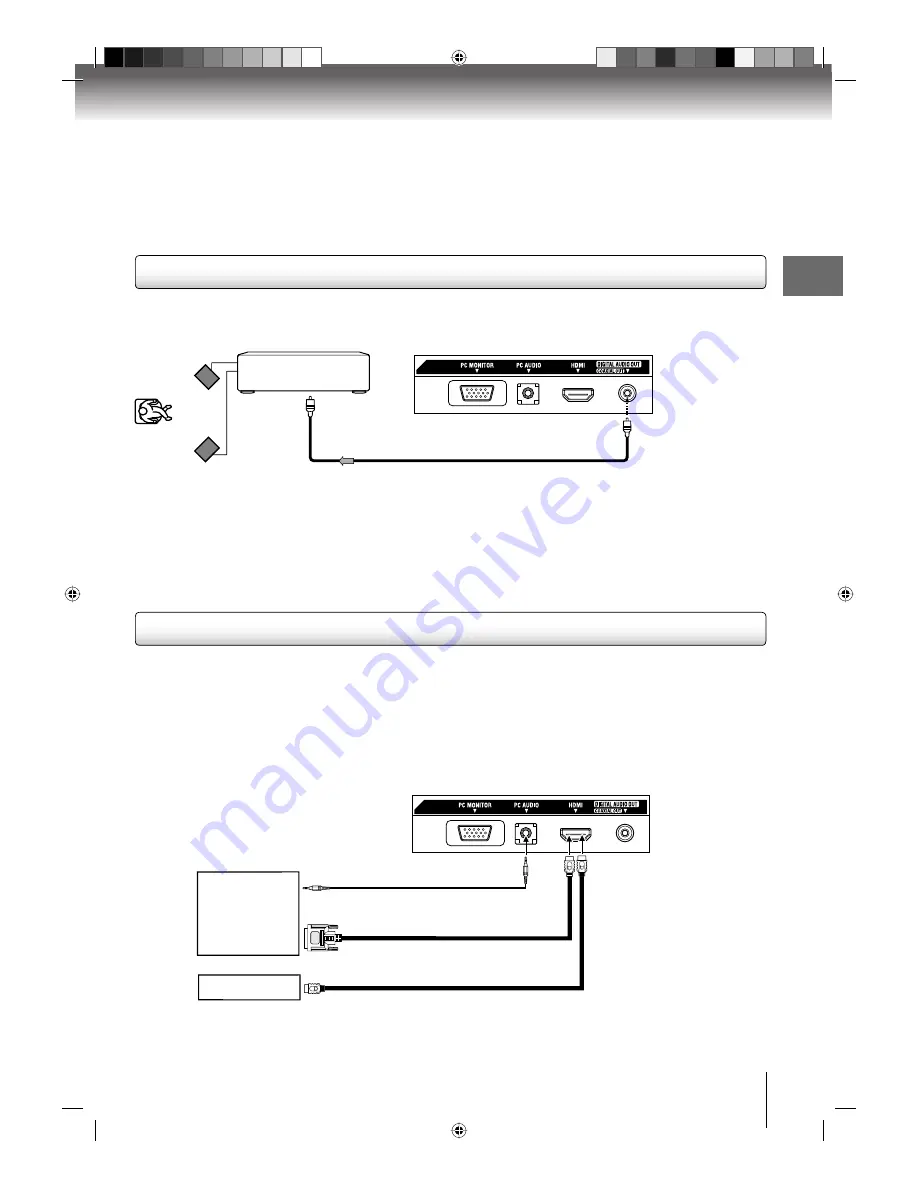
Amplifi er equipped with a 

Digital audio input

To COAXIAL 
type digital 
audio input

75 

Ω

 coaxial cable (not supplied)

Connecting to an amplifi er equipped with a digital audio input

2 channel digital stereo
You can enjoy the dynamic sound of 2 channel digital stereo by connecting an amplifi er equipped with a digital audio input and speaker 
system (right and left front speakers).
Note:  PCM audio is limited to DVD or CD playback.

Note:
•  DO NOT connect the COAXIAL DIGITAL AUDIO OUT jack of the TV/DVD to the AC-3 RF input of a Dolby Digital Receiver.   


  This input on your A/V Receiver is reserved for Laserdisc use only and is incompatible with the COAXIAL DIGITAL AUDIO OUT jack  
 of 

the 

TV/DVD.

•  Connect the COAXIAL DIGITAL AUDIO OUT jack of the TV/DVD to the “COAXIAL” input of a Receiver or Processor.
•  Refer to the owner

ʼ

s manual of the connected equipment as well.

•  When you connect the TV/DVD to other equipment, be sure to turn off the power and unplug all of the equipment from the wall outlet  
  before making any connections.
•  The output sound of the TV/DVD has a wide dynamic range. Be sure to adjust the receiver

ʼ

s volume to a moderate listening level.

  Otherwise, the speakers and your hearing may be damaged by a sudden high volume sound.
•  Turn off the amplifi er before you connect or disconnect the TV/DVD

ʼ

s power cord. If you leave the amplifi er

ʼ

s power on, the speakers  

  may be damaged.

Back side

To COAXIAL DIGITAL 
AUDIO OUT

HDMI - to - DVI adapter cable 

(HDMI type A connector)

(not supplied)

Audio cord (not supplied)

HDMI cable (type A connector)

(not supplied)

To DVI output

To HDMI out

or

HDMI device

DVI device

To HDMI IN

To PC AUDIO IN

Connecting to an HDMI or a DVI device

Back side

Note:

You must select the corresponding audio input source (HDMI or DVI) on the menu screen (see ”Selecting the HDMI audio 

input source” on page 37). Otherwise you will only see the image with no sound.

About HDMI
HDMI (High Defi nition Multimedia Interface) supports both video 
and audio on a single digital connection for use with DVD players, 
DTV, set-top boxes, and other AV devices. HDMI was developed 
to provide the technologies of High Bandwidth Digital Content 
Protection (HDCP) as well as Digital Visual Interface (DVI) in one 
specifi cation. HDCP is used to protect digital content transmitted 
and received by DVI-compliant or HDMI-compliant displays.

HDMI has the capability to support standard, enhanced, or high-
defi nition video plus standard to multi-channel surround-sound 
audio. HDMI features include uncompressed digital video, a 
bandwidth of up to 2.2 gigabytes per second (with HDTV signals), 
one connector (instead of several cables and connectors), and 
communication between the AV source and AV devices such as 
DTVs.

HDMI, the HDMI logo and High-Definition Multimedia Interface are 

trademarks or registered trademarks of HDMI licensing LLC.

50S0301A.indb   19

50S0301A.indb   19

2/5/08   5:58:37 PM

2/5/08   5:58:37 PM

Summary of Contents for 19LV505C

Page 1: ...ual thoroughly Screen size is approximate Ownerʼs Record The model number and serial number are on the back of your TV DVD Record these numbers in the spaces below Refer to these numbers whenever you communicate with your Toshiba dealer about this TV DVD Model number Serial number 19LV505C 22LV505C OWNER S MANUAL 19 22 inch Diagonal LCD TV DVD COMBINATION 50S0301A indb 1 50S0301A indb 1 2 5 08 5 5...

Page 2: ...n for wall mounting this television could result in serious bodily injury and or property damage See Choosing a location for your LCD TV Pg 6 Congratulations on your purchase As you enjoy your new product please keep these safety tips in mind The Issue The home theater entertainment experience is a growing trend and larger flat panel displays are popular purchases However flat panel displays are n...

Page 3: ...CATION USE OF CONTROLS ADJUSTMENTS OR THE PERFORMANCE OF PROCEDURES OTHER THAN THOSE SPECIFIED HEREIN MAY RESULT IN HAZARDOUS RADIATION EXPOSURE TO PREVENT DIRECT EXPOSURE TO LASER BEAM NEVER OPEN THE ENCLOSURE VISIBLE LASER RADIATION MAY BE PRESENT WHEN THE ENCLOSURE IS OPENED NEVER STARE INTO BEAM ON DISPOSAL The lamp s inside this product contain mercury Disposal may be regulated due to environ...

Page 4: ...feat the safety purpose of the polarized or grounding type plug A polarized plug has two blades with one wider than the other A grounding type plug has two blades and a third grounding prong The wide blade or the third prong are provided for your safety If the provided plug does not fit into your outlet consult an electrician for replacement of the obsolete outlet 10 Protect the power cord from be...

Page 5: ...na from the TV if you leave the TV unattended or unused for long periods of time SAFETY INSTRUCTIONS Continued Care cont from previous column 32 During normal use the TV may make occasional snap ping or popping sounds This is normal especially when the unit is being turned on or off If these sounds become frequent or continuous unplug the power cord and contact a Toshiba Authorized Service Center ...

Page 6: ...stal stand 3 Once you have removed all two screws holding the pedestal stand in place remove the pedestal stand from the TV by sliding the pedestal stand away from the TV Important notes about your LCD TV The following symptoms are technical limitations of LCD Display technology and are not an indication of malfunction therefore Toshiba is not responsible for perceived defects resulting from these...

Page 7: ...d a number which is called title number chapter number or track number respectively There may be discs that do not have these numbers Example of moisture condensation Optical pick up lens Notes on moisture condensation Moisture condensation damages the unit Please read the following carefully Moisture condensation occurs for example when you pour a cold drink into a glass on a warm day and drops o...

Page 8: ...egion number of this unit is 1 If region numbers which stand for their playable area are printed on your DVD video disc and you do not find 1 or ALL disc playback will not be allowed by the player In this case the unit will display a message on screen Some DVDs that have no region code label may still be subject to area restrictions and therefore not playable On Video CDs This unit supports Video ...

Page 9: ...ting the HDMI audio input source 37 Using the aspect feature 38 Adjusting the back lighting 38 Setting the Auto Shut Off 39 Resetting your settings 39 Basic playback Playing a disc 40 Advanced playback Zooming 43 Locating desired scene 43 Marking desired scenes 44 Repeat playback 45 A B Repeat playback 45 Program playback 46 Random playback 46 Changing angles 47 Title selection 47 DVD menu 47 Chan...

Page 10: ... 26 STOP button 40 MENU button 22 56 INPUT ENTER button 16 POWER button 21 Illustration of 19LV505C Illustration of 19LV505C Adjusting the angle of the base You can adjust the angle of the TV screen for 3 forward or for 10 backward from vertical angle Hold the base of the TV while adjusting the angle Approx 10 Approx 3 50S0301A indb 10 50S0301A indb 10 2 5 08 5 58 25 PM 2 5 08 5 58 25 PM ...

Page 11: ...ORSTREAM HD IN jacks 17 VIDEO GAME IN jack 16 17 PC MONITOR IN jack 20 PC AUDIO IN jack 20 HDMI IN jack 19 COAXIAL DIGITAL AUDIO OUT jack 18 19 Antenna jack 14 15 Illustration of 19LV505C 50S0301A indb 11 50S0301A indb 11 2 5 08 5 58 27 PM 2 5 08 5 58 27 PM ...

Page 12: ...6 Direct channel selection button AUDIO SELECT button 48 MUTE button 27 47 EXIT CANCEL button 21 30 SKIP button 42 STOP button 40 42 REPEAT A B button 45 PIC SIZE button SE R0305 33 ENTER button 21 SLEEP button 27 DVD MENU button 26 VOL button 21 SLOW button MARKER button 47 44 ANGLE button CH button Remote control The instructions in this manual describe the function on the remote control See the...

Page 13: ...eries should always be disposed of with the environment in mind Always dispose of batteries in accordance with applicable laws and regulations If the remote control does not operate correctly or if the operating range becomes reduced replace batteries with new ones When necessary to replace batteries in the remote control always replace both batteries with new ones Never mix battery types or use n...

Page 14: ... supplied Connect the VHF 300 ohm twin lead wire to the 300 75 ohm matching transformer notsupplied Attachthetransformertothecombiner then attach the combiner to the antenna jack on the back of the TV DVD Connect the VHF 75 ohm cable and UHF 300 ohm twin lead wire to the combiner not supplied Attach the combiner to the antenna jack on the back of the TV DVD Combination VHF UHF antenna Separate VHF...

Page 15: ...quires the use of a converter descrambler box connect the incoming 75 ohm coaxial cable to the converter descrambler box Using another 75 ohm coaxial cable connect the output jack of the converter descrambler box to the antenna jack on the TV DVD Follow the connections shown below Set the TV DVD to the output channel of the converter descrambler box usually channel 3 or 4 and use the converter des...

Page 16: ...ed they have not all been included in the suggested connection diagrams Youʼll need to consult each componentʼs Ownerʼs Manual for additional information Interactive video games that involve shooting a gun type of joystick at on screen target may not work on this TV DVD Signal flow Signal flow Signal flow Using the audio video inputs Press INPUT to view a signal from another device connected to yo...

Page 17: ...quality and performance Select the ColorStream HD by pressing INPUT repeatedly Ex DVD player with Component video Audio cable not supplied Component video cable not supplied To Audio L R OUT To Component Video OUT To COLORSTREAM HD AUDIO L R IN To COLORSTREAM HD Y PB PR IN When using the Component video cable an Audio cable must be connected to COLORSTREAM HD AUDIO L R IN jacks Note The ColorStrea...

Page 18: ... DTS decoder or processor you can obtain the full benefit of 5 1 channel DTS encoded sound tracks on DVD video discs or audio CDs Manufactured under license under U S Patent 5 451 942 other U S and worldwide patents issued pending DTS and DTS Digital Out are registered trademarks and the DTS logos and Symbol are trademarks of DTS Inc 1996 2007 DTS Inc All Rights Reserved Amplifier equipped with a ...

Page 19: ...mplifierʼs power on the speakers may be damaged Back side To COAXIAL DIGITAL AUDIO OUT HDMI to DVI adapter cable HDMI type A connector not supplied Audio cord not supplied HDMI cable type A connector not supplied To DVI output To HDMI out or HDMI device DVI device To HDMI IN To PC AUDIO IN Connecting to an HDMI or a DVI device Back side Note You must select the corresponding audio input source HDM...

Page 20: ... PC MONITOR on the rear of the TV DVD Attach the connectors firmly with the screws on the plug In case of a Multimedia computer connect the audio cord to the audio output of your Multimedia computer and to the AUDIO connector of the PC AUDIO IN jack of the TV DVD Select PC by pressing INPUT repeatedly Switch on the computer The TV DVD can operate as the computer monitor Monitor Display modes MODE ...

Page 21: ...en press or to select Air or Cable Automatic Search Auto Setup Language Signal Type Cable Start English Adjust Select Air VHF UHF channels Cable Cable TV channels 4 Press or to select Automatic Search then press ENTER Auto Setup Language Signal Type Cable Start English Select Automatic Search ENTER Set 5 Now the Automatic Search starts Auto Setup Language Signal Type Cable Start Digtal Channel Fou...

Page 22: ...e Video Label Backlight Auto Shut Off Off On Aspect Reset 16 Setup Closed Caption Language English Adjust Select 4 Press or to select the desired language English French Français or Spanish Español 5 Press EXIT CANCEL to return to the normal screen Note If the unit does not operate properly or No key operation by the unit and or the remote control Static electricity etc may affect the TV DVD s ope...

Page 23: ...elete Auto Ch Memory 3 Press or to select Signal Type Automatic Search Start Auto Ch Memory Signal Type Cable 4 Press or to select Air or Cable Automatic Search Start Auto Ch Memory Signal Type Air Air VHF UHF channels Cable Cable TV channels 5 Press EXIT CANCEL to return to the normal screen 1 Press MENU in the TV mode The TV menu screen will appear Press or to select Channel then press or ENTER ...

Page 24: ...NTER Set Add Delete MENU EXIT CANCEL ENTER 4 Press or to select the channel that you want to skip CH Signal 2 Analog 3 Analog Add 3 001 Digital Delete 3 002 Digital Add 4 Analog Delete Add Delete Adjust Add Select 5 Press or to select Add or Delete whichever function you want to perform CH Signal 2 Analog 3 Analog Add 3 001 Digital Delete 3 002 Digital Add 4 Analog Delete Add Delete Adjust Delete ...

Page 25: ...emory Add Delete Clear All Add Delete Adding Channel Select ENTER Set 5 Press EXIT CANCEL to return to the normal screen MENU EXIT CANCEL ENTER All channels are deleted from the channel memory 1 Press MENU in the TV mode Press or to select Channel then press or ENTER Picture Audio Channel Setup Main Menu Select ENTER Set 2 Press or to select Add Delete then press or ENTER Select ENTER Set Ch Label...

Page 26: ... 2 100 125 Press the 3 digits in order Example to select channel 120 press 1 2 0 TO SELECT DIGITAL CHANNELS Press the first 3 digits then press the button followed by the remaining number Example to select channel 015 001 press 0 1 5 1 If a channel is selected with only audio content Audio only will be displayed on the screen If a channel is selected with a weak digital signal Digital channel sign...

Page 27: ... selected by pressing CH RTN Press CH RTN again to return to the last channel you were watching MUTE Press MUTE to switch off the sound The TV DVD s sound will be silenced and Mute will appear on the screen The sound can be switched back on by pressing this button again or the VOL or SLEEP To set the TV DVD to turn off after a preset amount of time press SLEEP on the remote control The clock will ...

Page 28: ...racter which you desire appears press ENTER Repeat this step to enter the rest of the characters If you would like a blank space in the label name you must choose the empty space from the list of characters 5 When you finish inputting the label name press EXIT CANCEL to return to the normal screen 6 Repeat steps 3 5 for other channel You can assign a label to each channel To clear a Ch Label After...

Page 29: ... Off On Aspect Reset 16 Setup Closed Caption Language English Select ENTER Set 3 Press or to select an input which you want to label ColorStream HD HDMI Video Label Adjust Select Video 4 Press or to select the desired label for that input source HDMI Video Label Adjust ColorStream HD SAT Select Video Uses the default label name VCR Video cassette recorder DVD DVD video DTV Digital TV set top box S...

Page 30: ...pear Video Label Backlight Auto Shut Off Off On Aspect Reset 16 Setup Closed Caption Language English Select ENTER Set 3 Press or to select CC Setting then press or to select On On Captions will be displayed on the screen Off Captions will not be displayed on the screen CC Priority Closed Caption CC Setting Off Digital CC C1 CS1 Default Select Analog Caption Digital Caption Digital CC Preset CC Ad...

Page 31: ... Type Auto Text Edge Auto Text Color Auto Text Opacity Auto Background Color Auto Background Opacity Auto Adjust Select You can select from among the following items and parameters Text Size Auto Small Standard Large Text Type Auto Style1 Style2 Style3 Style4 Style5 Style6 Style7 Text Edge Auto None Raised Depressed Uniform Left Shadow Right Shadow Text Color Auto Black White Red Green Blue Yellow...

Page 32: ...icture Setting menu will appear On PC Setting DNR On Picture Picture Setting Picture Preference Sports Picture Size Film Mode Adjust Select 3 Press or to select the item you want to adjust Press or to adjust the setting Brightness Contrast Sharpness Color Tint Color Temperature Cool Picture Setting 25 50 25 25 0 Adjust Select ENTER Set Brightness decrease brightness increase brightness Contrast de...

Page 33: ...both wider and taller retains its original proportion The top and bottom edges of the picture may be hidden A B C D E F G Note This picture size is not available on 22LV505C Theater Wide3 picture size for letter box programs with subtitles To fill the width of the screen it is extended horizontally However it is only slightly extended at the top and the bottom The top and bottom edges of the pictu...

Page 34: ...icture This function is available only for analog broadcast DNR MENU EXIT CANCEL ENTER Film Mode 1 Press MENU in the TV mode Press or to select Picture then press or ENTER Picture Audio Channel Setup Main Menu Select ENTER Set 2 Press or to select Film Mode PC Setting DNR On Picture Picture Setting Picture Preference Sports Picture Size Film Mode On Adjust Select 3 Press or to select On or Off PC ...

Page 35: ...ress or to adjust the setting Hor Position To adjust the horizontal position of the image on the PC mode Ver Position To adjust the vertical position of the image on the PC mode Clock To minimize any vertical bars or stripes visible on the screen background Phase This must be adjusted after the frequency of the PC mode has been set to 60Hz to optimize picture quality page 20 6 After adjusting pres...

Page 36: ...in the TV mode Press or to select Audio then press or ENTER Picture Audio Channel Setup Main Menu Select ENTER Set 2 Press or to select the item you want to adjust Then press or to adjust each setting Treble Balance MTS Stereo Audio Language English HDMI Audio HDMI Audio 15 0 Adjust Bass Select 15 Bass Press or to adjust the bass sound Treble Press or to adjust the treble sound Balance Press or to...

Page 37: ...re audio languages are included in a digital signal you can select one of the audio language This function is available only for digital broadcast When you use PC AUDIO IN jacks with HDMI or DVI device you must select HDMI audio input source from HDMI or DVI Selecting the HDMI audio input source 1 Press MENU in the TV mode Press or to select Audio then press or ENTER Picture Audio Channel Setup Ma...

Page 38: ... Off Off Reset 8 Setup Closed Caption Language English Select ENTER Set On Aspect 4 After you desired setting press EXIT CANCEL to return to the normal screen Adjusting the back lighting Using the aspect feature MENU EXIT CANCEL ENTER 1 Press MENU in the TV mode Press or to select Setup then press or ENTER Picture Audio Channel Setup Main Menu Select ENTER Set 2 Press or to select Aspect Press or ...

Page 39: ...will appear on the screen approx 3 seconds then it returns to the normal 1 Press MENU in the TV mode Press or to select Setup then press or ENTER Picture Audio Channel Setup Main Menu Select ENTER Set 2 Press or to select Auto Shut Off Press or to select On or Off Video Label Backlight Auto Shut Off Off Reset 16 Setup Closed Caption Language English Select ENTER Set On Aspect 3 After you desired s...

Page 40: ...n the disc slot with the label side facing forward If the disc has a label Hold the disc without touching either of its surfaces align it with the guides and place it in position If a disc is inserted during some modes other than DVD mode it may switch to DVD mode and then playback may be begun automatically A menu screen will appear on the TV screen if the disc has a menu feature Press or on the ...

Page 41: ...pplied with the DVDs Do not move the unit during playback Doing so may damage the disc Use the EJECT to unload and eject the disc Do not put any objects other than discs on the disc slot Doing so may cause the unit to malfunctions In many instances a menu screen will appear after playback of a movie is completed Prolonged display of an on screen menu may damage your television set permanently etch...

Page 42: ...display the chapter or track number you want Playback starts from the selected chapter or track Playback starts from the beginning of the current chapter or track When you press twice in quick successions playback starts from the beginning of the preceding chapter or track Note A Prohibition symbol may appear at the upper right of the screen This symbol means either the feature you tried is not av...

Page 43: ... of the Audio CD and Video CD only Track and Time can be selected In case of the Video CD playback with PBC the JUMP does not work To turn off PBC see page 49 Only Time search function can be used for DivX CD Locating desired scene DVD VCD CD Press Number buttons 0 9 to input the number Note You can select the Pause Slow or Search playback in the zoom mode Some discs may not respond to zoom featur...

Page 44: ...MARKER to clear the display 3 Note Some discs may not work with the marking operation The marking is cancelled when you eject the disc or turn the power off Some subtitles recorded around the marker may fail to appear In case of Video CD with PBC Marker function is prohibited Press MARKER during playback or stop mode Press or to select the Marker 1 3 1 2 Press ENTER Playback starts from the marked...

Page 45: ...B locations may not be displayed You cannot set the A B Repeat for the scenes that include multiple angles A B Repeat playback does not work when Repeat playback is activated You may not be able to set A B Repeat during certain scenes of the DVD A B Repeat does not work with an interactive DVD and MP3 WMA JPEG CD In case of Video CD with PBC A B Repeat is prohibited To resume normal playback Press...

Page 46: ...ck is cancelled when you eject the disc or turn the power off Press PLAY MODE during playback or stop mode If you set Random during playback mode Random playback will begin after the track that is currently being played has ended To resume normal playback select Mode Off in step 2 1 2 3 Play Mode Repeat Off Program Playback Mode Off 1 2 3 Play Mode Repeat Off Program Playback Mode Program 1 9 2 3 ...

Page 47: ...u may not be able to select the title Depending on the DVD a title menu may simply be called a menu or title in the instructions supplied with the disc 2 Press DVD MENU during playback Some DVDs allow you to select the disc contents using the menu When you playback these DVDs you can select the subtitle language soundtrack language etc using the menu 1 Press ENTER The menu continues to another scr...

Page 48: ...ayed back again If you select DTS in playing DTS encoded disc no sound will be heard from the TV DVDʼs speakers In case of Video CD playback Audio type changes as follows each time you press AUDIO SELECT When playing back a disc recorded with subtitles you can select the subtitle language or turn the subtitle off To turn off the subtitle press SUBTITLE until Off appears The on screen display will ...

Page 49: ... OF AUDIO SUBTITLE LANGUAGE CHAPTER NO Video CD VCD 00 08 32 00 51 03 Track 3 15 DISC OPERATION ELAPSED TIME TOTAL TIME TRACK NO To turn on the PBC Follow the above steps 1 2 then press ENTER repeatedly until PBC appear VCD To turn off the PBC see page 8 Press to select Mode then press ENTER repeatedly until Off appear 1 Press PLAY MODE in the stop mode 2 Press PLAY MODE again to clear the screen ...

Page 50: ...MA JPEG DivX files cannot be played back Standard sampling frequency and the bit rate MP3 CD MPEG 1 Audio 32kHz 44 1kHz 48kHz 32kbps 320kbps constant bit rate or variable bit rate The recommend recording setting for a high quality sound is 44 1kHz of sampling frequency and 128kbps of constant bit rate WMA CD WMA version 7 and 8 32kHz 48kbps 44 1kHz 48kbps 192kbps 48kHz 128kbps 192kbps The file rec...

Page 51: ...les Repeat Off Mode Off Press STOP to end playback 5 The unit records the stopped point appears on the TV screen Press PLAY to resume playback from the scene point If you press STOP again or unload the disc the unit will clear the stopped point Press ENTER The selected file starts playing back 4 PLAY STOP ENTER In case the current directory includes more than 8 files press or to scroll in the file...

Page 52: ...icture 02 Picture 03 Picture 04 Picture 05 Picture 06 Picture 07 Picture 08 JPEG Preview Select Files Repeat Off Mode Off W 2048 H 1536 Picture 01 JPG Rotating an image You can rotate an image by 90 degrees Press ANGLE during playback of the image or appears on the screen Zooming an image Zoom function also can be used in viewing JPEG files Press ZOOM See Zooming 43 If you press PAUSE during the s...

Page 53: ...omatically 4 DivX playback CD Playing DivX VOD content CD DivX VOD content is protected by DRM Digital Rights Management system This restricts playback of content to specific registered devices If the incorrect DRM file is loaded Authorization Error This player is not authorized to play this video will appear on the screen When you attempt to play DivX VOD the number of plays is limited and the ri...

Page 54: ...ter finishing the current track Random playback Audio CD MP3 WMA JPEG DivX To resume normal playback Select Repeat Off in step 2 In the file browser press to select Mode during stop mode Press ENTER to select Random To resume normal playback Select Mode Off in step 2 Note The repeat function is cancelled when you eject the disc or turn the power off Track repeat function is canceled whenever SKIP ...

Page 55: ...MA JPEG DivX Press to select Program View then press ENTER Program View shows only the programmed files that you have added in step 2 Program View In the Program View press PLAY The files start to playback in programed order that were added by you To remove file from program list in stop mode In the Edit Mode switch to Program View Select file you want to remove then press ENTER Select Clear Progr...

Page 56: ...ing to the corresponding pages 57 60 Press ENTER to save the setting Parental Off Set Password Output Interlace DivX R VOD DRC Off QSound On E B L Off TV Screen 4 3 Display On Picture Mode Auto JPEG Interval 5 Seconds Screen Saver On Menu English Subtitle English Audio English Parental Off Set Password Output Interlace DivX R VOD DRC Off QSound On Menu English Subtitle English Audio English TV Scr...

Page 57: ...re Mode To select a preferred picture mode from Video Film or Auto 59 JPEG Interval To select a preferred setting for the slide show playback Night Mode To select On or Off for Night Mode 59 Digital Out To select a digital output sound format corresponding to your system connection Parental To select a preferred parental level for the parental setting 60 Password To change the password DivX R VOD ...

Page 58: ...om of screen 4 3 Pan scan It displays the wide picture on the whole screen with left and right edges automatically cut off 16 9 Wide A wide screen picture is displayed full size Display On screen display can be switched on or off when you press any buttons Off On screen displays do not appear when you press any buttons On On screen displays appear when you press the buttons factory setting Parenta...

Page 59: ...ack images in the form of a slide show at 10 second intervals 15 Seconds Plays back images in the form of a slide show at 15 second intervals Setting details continued Night Mode Night Mode enables you to control the dynamic range so as to achieve a suitable sound for your equipment Off It plays back at the recording level on the disc On Loud sound such as explosion is toned down slightly when pla...

Page 60: ...inued Note If each setup pages 58 60 has completed the unit can always work under the same condition especially with DVD discs Each setup will be retained in the memory even if you turn the power off Set the new password 1 Press or to select Password then press ENTER Enter Current Password screen will appear 2 Press Number buttons 0 9 to input the current password If the password has not been set ...

Page 61: ...Temporary cancel the rating level by DVD disc Depending on the DVD disc the disc may try to temporarily cancel the rating level that you have set It is up to you to decide whether to cancel the rating level or not DVD Load a DVD disc 1 Playback will commence if the entered password is correct 2 4 3 Enter Password To exit from the entry press RETURN 0 9 RETURN ENTER EJECT Note This temporary cancel...

Page 62: ...r Cable selection to the Cable position Station or Cable TV system problems try another station 15 23 26 Horizontal or diagonal bars on screen Check antenna or Cable TV connections reorient antenna Check for sources of possible interference 14 15 64 No reception above channel 13 Make sure Air Cable selection is in the appropriate position If antenna is used check UHF antenna connections 23 14 TV s...

Page 63: ...n key is not functioning Turn off the unit and unplug the AC power cord for several minutes then replug it Playback does not start when the title is selected Check the Parental setup 60 Audio soundtrack and or subtitle language is not changed when you playback a DVD Multilingual language is not recorded on the DVD disc 48 No subtitle Some discs have no subtitles Subtitles are cleared Press SUBTITL...

Page 64: ...Y INTERFERENCE RFI Caused by two way radios this type of interference produces moving ripples or diagonal streaks in the picture Some cases may cause a loss of contrast in the picture Changing the direction and position of the antenna or installing an RFI filter may improve the picture CARE AND MAINTENANCE To prevent fire or shock hazard disconnect the TV DVD from the power source before cleaning ...

Page 65: ... Tibetan 1225 Breton 1228 Icelandic 1929 Panjabi 2611 Tigrinya 3019 Bulgarian 1217 Indonesian 1924 Pashto Pushto 2629 Tonga 3025 Burmese 2335 Interlingua 1911 Persian 1611 Turkish 3028 Byelorussian 1215 Irish 1711 Polish 2622 Turkmen 3021 Cambodian 2123 Italian 1930 Portuguese 2630 Twi 3033 Catalan 1311 Japanese 2011 Quechua 2731 Ukrainian 3121 Chinese 3618 Javanese 2033 Rhaeto Romance 2823 Urdu 3...

Page 66: ...C Applicable disc 1 DVD 12cm 8cm 2 CD 12cm 8cm Pickup 1 Lens 2 Beams System Input Output S Video input Y 1 0 V p p 75 Ω negative sync Mini DIN 4 pin x 1 C 1 0 V p p 75 Ω ColorStream video input Y 1 0 V p p 75 Ω negative sync pin jack x 1 PB PR 0 7 V p p 75 Ω pin jack x 2 Video input 1 0 V p p 75 Ω negative sync pin jack x 1 Audio input 8dBm 50 kΩ negative sync pin jack L R x 2 HDMI input HDMI comp...

Page 67: ...uired the service will either be performed on site or the Television will be taken to an ASP for repair and returned at no cost to you ON SITE SERVICE ONLY APPLIES WITHIN 100 KILOMETERS OF AN ASP IF YOU ARE NOT WITHIN 100 KILOMETERS OF AN ASP YOU MUST DELIVER THE ENTIRE TELEVISION TO AN ASP YOU MUST PAY FOR ALL TRANSPORTATION AND INSURANCE CHARGES FOR THE TELEVISION TO AND FROM THE ASP Rental Unit...

Page 68: ...ourts To the extent not precluded by law you agree to waive any right that you may have to commence or participate in any representative or class proceeding against the Related Parties relating to any Dispute If and where applicable and to the extent not precluded by law you further agree to opt out of any such representative or class proceedings Arbitration of any Dispute will be conducted in the...

Reviews: