background image

– 6 –

Notes:

• 

If the remote control does not operate correctly, 

or if the operating range becomes reduced, 

replace both batteries with new ones.

• 

If the batteries are dead or if you will not use 

the remote control for a long time, remove the 

batteries to prevent battery acid from leaking 

into the battery compartment.
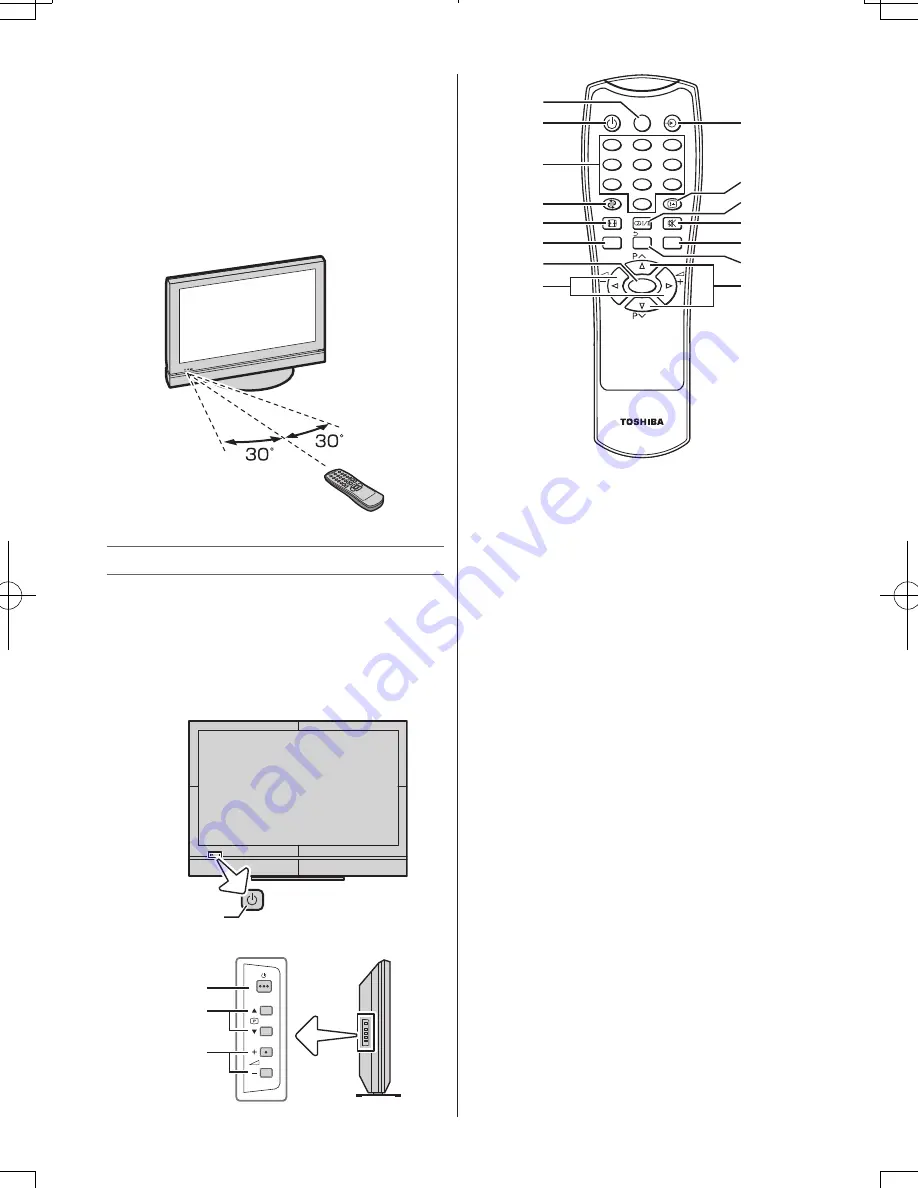
Effective range

within 5 m

TV panel and remote controls

•  You can operate your TV using the buttons on 

the side panel or the remote control. The back 

of the panel provide the terminal connections to 

connect other equipment to your TV.

•  For the use of each control, see the pages in 

brackets.

TV front view

Left side view

GREEN / RED

1

2
3

4

2

5

8

0

BACK

SLEEP

1

4

7

MENU

3

6

9

EXIT

OK

CT-90384

10
12
14
15
3

8

6

9

11

13
16

4

7

2

5

1


Power LED

 — Power indicator.

2


Power on/standby

 — Press to turn the TV 

on/standby.

3


Programme position

 — When no menu 

is on screen, these buttons select the 

programme position. 

MENU up/down

 — When a menu is on-

screen, these buttons function as up/down 

menu navigation buttons.

4


Volume

 — When no menu is on-screen, 

these buttons adjust the volume level. 

MENU left/right

 — When a menu is on-

screen, these buttons function as left/right 

menu navigation buttons or adjust settings.

5

  To set the sleep time

6

  Input source selection

7

  Number buttons (0-9)

8

  To display on-screen information

9

  To return to the previous programme

10

  Stereo/Bilingual selection

11

  Picture Size

12

  This button turns the sound off/on

13

  On-screen Menus

14

  To exit menu

15

  To return to the previous menu

16

  To confirm your selection

110621c1

06/21/2011

Summary of Contents for 19HV10 Series

Page 1: ...mber on the back of the TV Record these numbers in the spaces provided below Refer to them whenever you call upon your TOSHIBA dealer regarding this product Model number Serial number 19HV10 Series 24HV10 Series 32HV10 Series 2011 TOSHIBA CORPORATION All Rights Reserved VX1A00213500 TD J ...

Page 2: ...ion such as on a shaky table incline or location subject to vibration Only use cabinets or stands recommended by the TV manufacturer Only use furniture that can safely support the TV Ensure that the TV is not hanging over the edge of the supporting furniture Never place the TV on tall furniture for example cupboards or bookcases without anchoring both the furniture and the TV to a suitable support...

Page 3: ...lt and result in a fire or an electric shock 8 Never place the TV in an area exposed to high humidity levels such as in a bathroom or close to a humidifier This may cause a fire or an electric shock 9 Never place the TV next to a stove where it will be exposed to oil smoke or steam or in a location where there is a large quantity of dust This may cause a fire or an electric shock 10 Precautions fo...

Page 4: ...If the cabinet is broken be careful when handling the TV to prevent an injury Contact a service technician for inspection and repair 4 When the TV reaches the end of its useful life ask a qualified service technician to properly dispose of the TV Note The lamp unit contains a small amount of mercury Disposal of mercury may be regulated due to environmental considerations Dispose of the used lamp u...

Page 5: ... product and the connected equipment Trademark Information HDMI the HDMI logo and High Definition Multimedia Interface are trademarks or registered trademarks of HDMI Licensing LLC in the United States and other countries Connecting an aerial Optimum reception of colour requires a good signal and will generally mean that an outdoor aerial must be used The exact type and positioning of the aerial w...

Page 6: ...EP 1 4 7 MENU 3 6 9 EXIT OK CT 90384 10 12 14 15 3 8 6 9 11 13 16 4 7 2 5 1 Power LED Power indicator 2 Power on standby Press to turn the TV on standby 3 Programme position When no menu is on screen these buttons select the programme position MENU up down When a menu is on screen these buttons function as up down menu navigation buttons 4 Volume When no menu is on screen these buttons adjust the ...

Page 7: ...ponent video and standard analogue stereo audio inputs or standard composite video and standard stereo audio inputs o 1 VIDEO input terminal Standard video and standard stereo audio input Notes Before connecting any external equipment turn off all main power switches The unauthorized recording of TV programmes DVDs video tapes and other materials may infringe upon the provisions of copyright law T...

Page 8: ...elect main menu headings Press s or r to select an item Press v or w to select or adjust setting Press OK to display the next menu Connecting an HDMI device The HDMI input on your TV receives digital audio and uncompressed digital video from an HDMI device This input is designed to accept HDCP programme material in digital from CEA 861 D compliant consumer electronic devices such as a set top box ...

Page 9: ...xxx Dual 1 SOUND Edit Edit FUNCTION Panel Lock Blue Screen Side Panel Off Off 1 Edit MTS Dual Bass Treble Balance Audio Level Offset Auto 0 0 0 0 Dual 1 SOUND Edit Sort MTS Dual Bass Treble Balance Audio Level Offset Auto 0 0 0 0 Dual 1 100 50 100 100 50 0 0 100 PICTURE Press MENU MENU Structure SOUND SETUP FUNCTION PICTURE SOUND SETUP OK FUNCTION Backlight SOUND Manual Tuning FUNCTION MENU Notes ...

Page 10: ...t the channel which sound of broadcast transmission system adopts M system the sound system may not be tuned correctly if the radio waves transmit badly At that time preset the channel by Manual Tuning The countries such as Myanmar Chile Colombia apply to this case See page 15 for more details Manual Tuning 1 From the SETUP menu press s or r to select Manual Tuning 2 Press OK to display the Manual...

Page 11: ...t appropriate input source VIDEO2 TV VIDEO1 Inputs HDMI 2 Press OK TV analogue aerial input VIDEO1 o 1 standard video input VIDEO2 o 2 standard or component video input HDMI HDMI input Setting the Manual Setting menu 1 From the SETUP menu press v or w to select Manual Setting and then press OK 2 Press v or w to select an item and then press s or r to select the item as shown below Manual Setting C...

Page 12: ...ithout picture clipping Notes Using the special functions to change the size of the displayed image e g changing the height width ratio for the purpose of public display or commercial gain may infringe on copyright laws If the aspect ratio of the selected format is different from the one of the TV transmission or video programme it can cause a difference in vision Change to the correct aspect rati...

Page 13: ...itching from an ATV channel or an external input Using this feature reduces these volume differences 1 From the SOUND menu press s or r to select Audio Level Offset and press OK 2 Press s or r to select an option and press or to adjust the volume level FUNCTION menu Panel Lock Panel Lock disables the buttons on the TV All buttons on the remote control can still be used 1 From the FUNCTION menu pre...

Page 14: ...me is received j Dual appears 2 Press to select the sound to be heard The sound differs according to the transmission system NICAM or German stereo bilingual broadcast Display Sound to be heard NICAM German stereo bilingual broadcast j Dual 1 Sub I sound Main sound J Dual 2 Sub II sound Sub sound e Mono Main sound Note These settings are not stored in the TV memory Selecting the monaural programme...

Page 15: ...t light up it may reach the end of its life Contact a service technician Some pixels of the screen do not light up The LCD display panel is manufactured using an extremely high level of precision technology however sometimes some pixels of the screen may be missing picture elements or have luminous spots This is not a sign of a malfunction The picture brightness varies when you display switch the ...

Page 16: ...M10 S1 S41 Special RF signal NTSC 4 43 colour system 5 5 6 0 6 5 MHz sound system PAL 60 Hz colour system 5 5 6 0 6 5 MHz sound system COMPONENT VIDEO INPUT terminals the signal format 480i 480p 576i 576p 720p 50 60 Hz 1080i 50 60 Hz These signal formats are converted to match the number of pixels of the LCD panel Colour System PAL SECAM NTSC 3 58 4 43 Aspect ratio 16 9 Visible size diagonal 19 47...

Reviews: