background image

15

Toshiba 1520VL56BG (E)

Intr

oduction

Getting started

Basic oper

ation

Ref

er

ence section

Equipment

connections

V

iewing teletext

Using the T

V’s

featur

es

Getting started

Programming channel memory

• First, use the Auto Programme function to preset all the active channels in your area automatically. Then, arrange

the preset channels with the Manual Programme function so that you can tune into only desired channels.

• Up to 100 TV stations can be stored by programme numbers (0 to 99). Once you have preset the stations, you will

be able to use the   or   buttons to scan the stations you have programmed. Stations can be tuned using automatic
or manual modes.

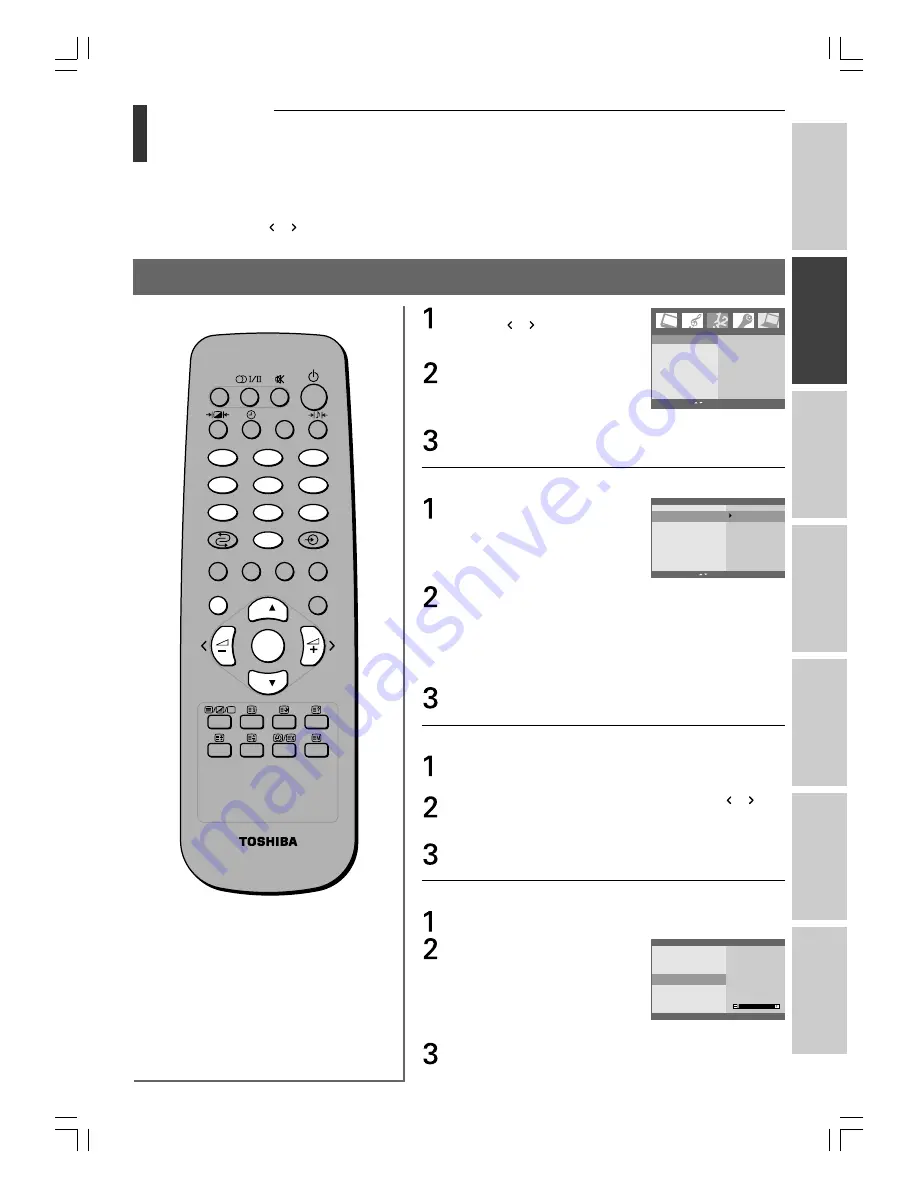
System selection/Auto programme

Press the 

MENU


button, then

press the   or   button to
display the Channel menu.

Press the 

OK

 button, then press

the 

z

 or 

y

 button to select

Auto programme.

Press the 

OK

 button to display the Auto programme menu.

Continue to set each item following the steps described below.

System:

Press the 

z

 or 

y

 button to

select System, then press the

OK

 button.

Select a TV system with the 

z

 or 

y

 button on the System

menu;
B/G : PAL B/G, SECAM B/G (Europe/East Europe)
I :

PAL I/II (U.K./Ireland)

D/K : PAL D/K, SECAM D/K (East Europe)
L :

SECAM L/L’ (France)

M :

NTSC

Press the 

OK


button.

Storage from:

Press the 

z

 or 

y

 button to select Storage from, then press the

OK

 button.

Select the beginning programme position with the   or 
button or 

Number

 button. Any number under 10 is entered

with a numeric “0” in front of it, i.e. “05” for 5.

Press the 

OK

 button.

Search:

Press the 

z

 or 

y

 button to select Search.

Press the 

OK

 button to begin

auto programming.

All receivable stations are
stored.
To stop auto programming,
press the 

MENU

 button.

When auto programming is completed, the Channel menu
appears on the screen automatically.

2

1

3

5

4

6

8

7

9

0

CALL

MENU

EXIT

P

P

OK

C10              B/G

5                  5 %

Auto programme

MENU  EXIT

System

Storage from

Search

To set

Auto programme

Manual programme

MFT

AFT

Blue screen

Channel

OK  MENU  EXIT  

Auto programme

System

Storage from

Search

B/G

I

D/K

L

M

MENU  EXIT  

#01E13-18_1520VL56BG

05.6.24, 0:51 PM

15

Black

Summary of Contents for 15VL56

Page 1: ... on the back of the TV Record these numbers in the spaces provided below Refer to them whenever you call upon your TOSHIBA dealer regarding this product Model number Serial number Introduction Getting started Basic operation Using the TV s features Reference section Equipment connections Viewing teletext 01E01_1520VL56BG 05 6 24 0 50 PM 1 Black ...

Page 2: ...Volume Leveler 21 Stereo Bilingual selection 22 Using the TV s features Panel lock Input selection Sleep Timer 23 Panel lock 23 Input selection 23 Sleep Timer 23 Blue screen function Activating the Auto off function 24 Blue screen function 24 Activating the Auto off function 24 Viewing teletext Teletext Control buttons 25 To view normal text 25 Teletext buttons on the remote control 25 Teletext Au...

Page 3: ...bration The TV may drop or fall down which may cause injury or damage Never block or cover the slots and openings in the cabinet Never place the TV so that it is facing upward or on its side Never place the TV in a closet bookcase or other similar area where the ventilation is poor Never drape a newspaper tablecloth or curtain on the TV When installing the TV near a wall always keep the TV at leas...

Page 4: ...accessories see page 36 Use as short a tie as possible to ensure the TV is stable If the TV is not installed securely it may lean or fall over and cause an injury Precautions for moving the TV When moving the TV be sure to remove the power plug from the wall outlet and disconnect the aerial cable audio video cables and any ties Fire or electric shock may result if the power cord is damaged Never c...

Page 5: ...d remove the power plug from the outlet immediately and contact a service technician Never insert objects metal or paper or pour water inside the TV through ventilation holes or other openings These items may cause a fire or an electric shock If these objects are inserted inside the TV turn off the TV remove the power plug from the outlet immediately and contact a service technician Be especially ...

Page 6: ...or electric shock Contact a service technician if the power cord is damaged If there is thunder or lightning never touch the aerial cable or other connected cables You may suffer an electric shock Service Never repair modify or disassemble the TV by yourself If it may cause a fire or an electric shock Consult a service technician for inspection and repairs When a malfunction occurs or if smoke or ...

Page 7: ...of the LCD display wipe the panel surface gently with a soft dry cloth Periodically disconnect the power plug from the outlet and check it If dust has collected on the power plug connectors clean off the dust This dust may cause a fire due to reduced insulation on the plug Clean here Disposal Following information is only for EU member states The use of the symbol indicates that this product may n...

Page 8: ...and video equipment About using the TV in low temperature conditions If you use the TV in a room of 0 C or less the picture brightness may vary until the LCD monitor warms up This is not a sign of a malfunction About after image If a still picture is displayed an after image ghost may remain on the screen however it will disappear This is not a sign of malfunction Connecting an aerial Your new Tos...

Page 9: ...ctions on pages 29 33 Model 20VL56 series is used in this manual for illustration purposes TV top TV side For the use of each control see the pages in brackets Remote sensor Power button 12 TV front TV top view Top view Programme position 12 TV front view You can adjust the angle of the TV screen Swivel angle 30 degrees to left and right Tilt angle 3 degrees forward or 12 degrees backward from ver...

Page 10: ... cord will vary according to the country or region Power cord supplied VIDEO 3 S VIDEO VIDEO AUDIO input 29 When the power plug is connected to outlet the power standby indicator lights in red You can use the cable holder to hold the aerial and audio video cables Never use the cable holder to carry the TV when moving it Rear terminal cover The connection panel is hidden behind the terminal cover 1...

Page 11: ... 26 To reveal concealed text 26 To hold a desired page 26 To enlarge teletext display size 26 To select a page while viewing a normal picture 26 To switch the teletext mode 26 Programme return To return to the previous programme 13 Power on Standby 12 Y To set Sleep Timer 23 b Sound mode selection 20 Installing the remote control batteries Remove the battery cover Insert two R6 AA batteries matchi...

Page 12: ...ant channel or one whose station has finished its broadcasts for the day see page 24 If power is cut off while you are viewing the TV the Last Mode Memory feature turns on the TV automatically when power is applied again If power is going to be off for a long time and you are going to be away from your TV unplug the power cord to prevent the TV from turning on in your absence To adjust the volume ...

Page 13: ...on to display the following on screen information The information will disappear in 4 seconds Selected programme position or external input mode Programme skip on information Station name if set Mono Stereo Dual audio status Selecting a language Choose from seventeen different languages for the on screen display Press the MENU button then press the or button to display the Setup menu Press the OK ...

Page 14: ...Press the OK button to display the next menu Picture Sound Setup PC Contrast 85 OK MENU EXIT Picture Contrast 85 Bass 0 Sound To set Setup H Position 76 PC Channel Channel OK MENU EXIT Bass 0 Sound mode Bass Treble Balance AVL H Position V Position Clock Phase Auto configure Reset H Position V Position Clock Phase Auto configure Reset Auto programme Manual programme MFT AFT Blue screen Auto progra...

Page 15: ... steps described below System Press the z or y button to select System then press the OK button Select a TV system with the z or y button on the System menu B G PAL B G SECAM B G Europe East Europe I PAL I II U K Ireland D K PAL D K SECAM D K East Europe L SECAM L L France M NTSC Press the OK button Storage from Press the z or y button to select Storage from then press the OK button Select the beg...

Page 16: ...gramme position of your choice Press the z or y button to select Storage then press the OK button Select the desired programme number 0 to 99 with the or button or Number buttons on the Storage menu Press the OK button System Selecting the Colour system Press the z or y button to select System then press the OK button Select a TV system with the z or y button on the System menu B G PAL B G SECAM B...

Page 17: ...e Number button Press the OK button Search Searching for a channel Press the z or y button to select Search then press the OK button Press the or button to begin searching If a station is found the search will stop Press the OK button When a station satellite is found it will be displayed Name Station names appear with the programme position display each time you turn on the TV select a channel or...

Page 18: ... automatically corrects slight fluctuations when receiving signals Select the programme position you want to fine tune with the P or P button or Number buttons Press the MENU button then press the or button to display the Channel menu Press the OK button then press the z or y button to select AFT Press the OK button then press the z or y button to select On MFT AFT Note When operating the MFT func...

Page 19: ...tness darker lighter Colour paler deeper Sharpness softer sharper Tint reddish greenish To select the picture mode using the remote control You can select the picture quality instantly among three preset modes and one user set mode Repeatedly press the button to select one of the following picture qualities Dynamic Standard Movie and Memory user set To select the picture mode through the Picture m...

Page 20: ...sound Memory Press the MENU button then press the or button to display the Sound menu Press the OK button then press the z or y button to select Bass Treble or Balance Press the OK button then press the or button to adjust the level Sound Sound mode Bass Treble Balance AVL Bass 0 OK MENU EXIT 2 1 3 5 4 6 8 7 9 0 CALL MENU EXIT P P OK Bass 0 Flat Sound Sound mode Bass Treble Balance AVL WOW Flat Ha...

Page 21: ...me Leveler AVL maintains an equal volume level automatically even if the channel is changed To activate the AVL Press the MENU button then press the or button to display the Sound menu Press the OK button then press the z or y button to select AVL Press the OK button then press the z or y button to select On To deactivate the AVL Select Off in step 3 above WOW surround setting Sound Sound mode Bas...

Page 22: ...e transmission system NICAM or German stereo bilingual broadcast You can toggle among DUAL I DUAL II and DUAL I II modes Note These settings are not stored in the TV memory Stereo Bilingual selection STEREO DUAL I Display Reception mode STEREO Stereo MONO Monaural 2 1 3 5 4 6 8 7 9 0 CALL MENU EXIT P P OK Basic operation Sound adjustment continued Sound to be heard Display DUAL I Sub I sound Main ...

Page 23: ... the screen VIDEO 1 1 VIDEO 1 input VIDEO 2 2 VIDEO 2 input VIDEO 3 3 VIDEO 3 input PC RGB PC PC input Note If no PC input signal is present the PC menu will not appear Sleep Timer To set the Sleep Timer You don t have to remember to switch the TV off before you go to sleep The Sleep timer automatically switches the TV to standby after the preset time has elapsed Repeatedly press the Y button to s...

Page 24: ...ton then press the z or y button to select Blue screen Press the OK button then press the z or y button to select On Notes If the Blue screen function does not operate properly due to unstable signal strength or frequency select Off in step 3 In the PC input mode the blue screen function is not available Activating the Auto off function With the Auto off function On the TV automatically turns off ...

Page 25: ...remote control To display a page of teletext Press the button to display teletext Press again to superimpose the teletext over a normal broadcast picture Press the button again to return to normal TV mode You need to return to normal viewing if you wish to change channels When you first press the button to access the text service the first page you see will be the initial page In Auto mode this di...

Page 26: ...selection is made and then the button is pressed a normal picture will be displayed The TV will indicate when the page is present by displaying the number of the text page at the top of the screen Press the button to view the page To switch the teletext mode When in teletext mode press the button to switch between List mode and another mode To select the time display with the Teletext service only...

Page 27: ...o to the desired topic page instantly Select a TV channel with the desired FASTEXT service Press the MENU button then press the or button to display the Setup menu Press the OK button then press the z or y button to select Teletext Press the OK button then press the z or y button to select Auto Fastext mode To view Fastext Press the button to select the text mode Four coloured prompts will appear ...

Page 28: ...he button to select the text mode Press the R button to select the red page Press the Number buttons to enter the 3 digit page number that you want to preset the red page Ex page 120 Press 1 2 and 0 The preset page is displayed on the screen Press the OK button to store your choice Repeat steps 2 4 to preset the other three pages using the G Y and B buttons To display a desired page Press the desi...

Page 29: ...he button repeatedly to select VIDEO 3 see page 23 Never plug in any power cords until you have finished connecting all equipments Connect either the S VIDEO input terminal or VIDEO input terminal whichever terminal is used Do not connect to both of these terminals at the same time When connecting a mono sound equipment to VIDEO 3 connect the audio output of the equipment to the L MONO jack on the...

Page 30: ... connecting all equipments Before connecting any external equipment remove the TV back terminal panel cover see page 10 The unauthorized recording of television programmes video tapes and other materials may infringe upon the provisions of copyright laws Additional equipments and cables shown here are not supplied with this TV VCR Set Top Box 01E29 33_1520VL56BG 05 6 24 0 53 PM 30 Black ...

Page 31: ... 15 pin terminal do not require an adapter Some input signals may cause a bar to appear in the upper lower right or left side of the screen or may obscure parts of the picture This is not a malfunction If the edges of the picture are stretched readjust the picture position through the PC s menu Depending on the DVD s title and the specification of the PC on which you are playing the DVD Video some...

Page 32: ... Press the OK button then press the or button to make appropriate adjustments H Position V Position Use this function to adjust the picture to the left right and up down as you prefer Clock Use this function to minimize any vertical bars or stripes visible on the screen background The horizontal screen size will also change Phase Use this function to remove any horizontal noise and sharpen the ima...

Page 33: ...igure Press the OK button The automatic adjustment will start Note The displayed image will disappear for a few seconds while Auto configuration is in progress To reset the PC setting Press the MENU button then press the or button to display the PC menu Press the OK button then press the z or y button to select Reset Press the OK button PC H Position V Position Clock Phase Auto configure Reset OK ...

Page 34: ...ction of the aerial has changed Poor colour or no colour The station may have broadcast difficulties Try another channel Adjust the Tint and or Colour in the Picture menu The top panel buttons do not operate Check the Panel lock feature The remote control does not operate Remove all obstructions between the remote control and the remote control sensor in the TV The remote control batteries may be ...

Page 35: ...H 203 mm D Including TV stand 20VL56B G 491 mm W 469 mm H 228 mm D Mass Weight 15VL56B G 5 6 kg 20VL56B G 9 1 kg Television system Channel coverage Aerial input PAL B G CCIR VHF 2 12 UHF 21 69 CATV X Z 2 S1 S41 PAL I UK VHF UHF 21 69 CATV PAL D K CHINA VHF 1 12 UHF 13 57 CATV Z1 Z38 SECAM B G CCIR VHF 2 12 UHF 21 69 CATV X Z 2 S1 S41 SECAM D K OIRT VHF 1 12 UHF 21 69 CATV X1 X19 SECAM L FRANCE VHF...

Page 36: ...cs Input Output terminals VIDEO 1 Input Output 21 pin Scart RGB A V VIDEO 2 Input Output 21 pin Scart A V VIDEO 3 Input 4 pin S video Phono jacks A V PC Input Analogue RGB Mini D sub 15 pin Audio 3 5 mm stereo mini Headphone jack 3 5 mm stereo mini Operating condition Temperature 0 C 35 C Humidity 20 80 No moisture condensation Supplied accessories Owner s manual 1 Power cord 1 Remote control 1 Ba...

Reviews: