9.
Remove the existing belt.
10.
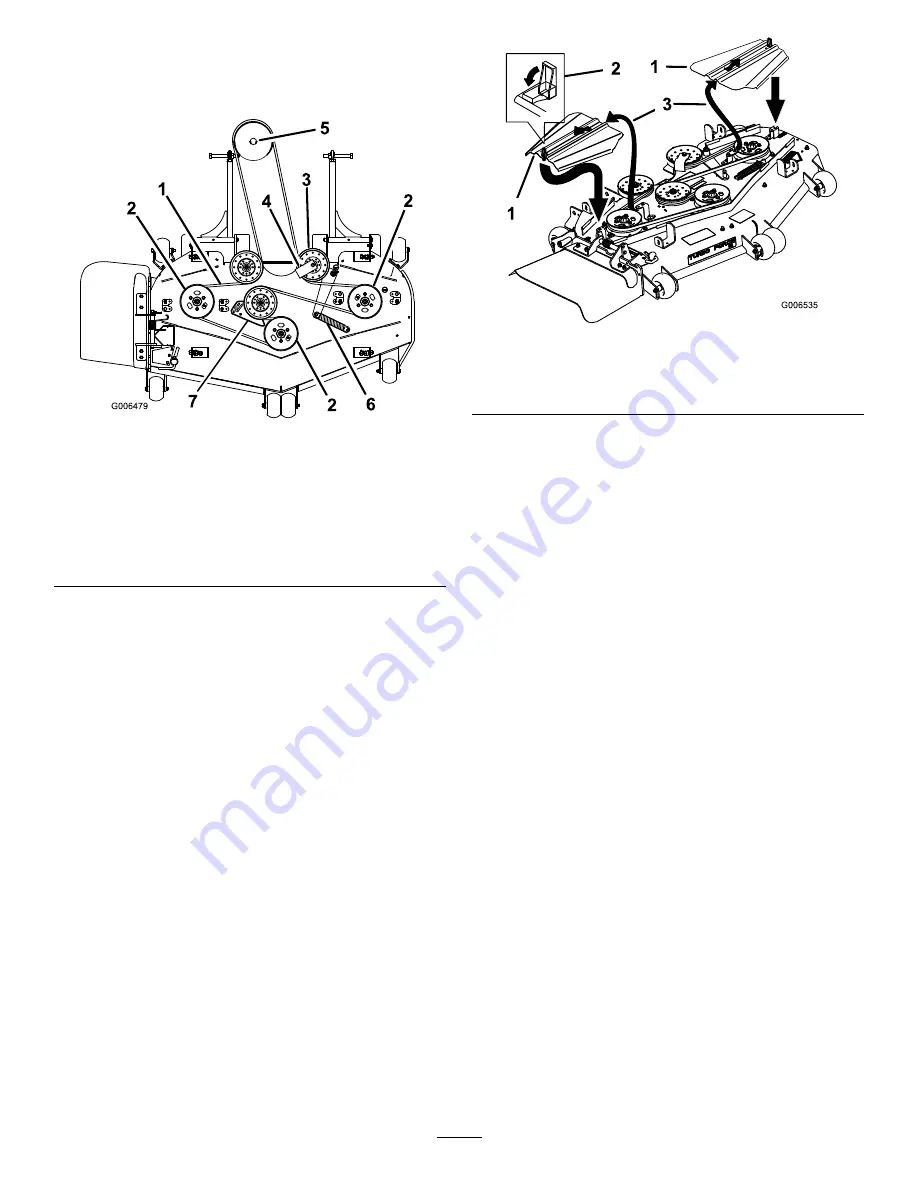
Install the new belt around the mower pulleys and the
gearbox pulley under the engine (
).
g006479
Figure 82
1.
Mower belt
5.
Gearbox pulley
2.
Mower spindle pulley
6.
Idler spring
3.
Spring-loaded idler pulley
7.
Idler plate (for 72 inch
mowers only)
4.
Belt guide at a 45 degree
angle
11.
Install the belt guide on the spring-loaded idler at a
45 degree angle as shown in
and
.
Torque the bolt to 37 to 45 N∙m (27 to 33 ft-lb).
12.
Install the idler spring to the 2 posts (
and
13.
For 72 inch mowers, adjust the belt tension, refer to
Belt Maintenance (page 55)
.
14.
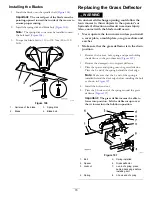
Install the belt covers by sliding the cover into the tab,
install the bolts, and close the latches (
).
g006535
Figure 83
1.
Belt cover
3.
Insert slot into the tab
2.
Latch
15.
Install the sheet-metal guard.
16.
Tighten the bottom bolt holding the mower-deck
curtain to the mower deck.
Adjusting the Mower Belt
Tension
For 72in Mowers Only
Service Interval:
After the first 8 hours
Important:
To ensure proper mower belt tension, which
will result in a longer belt life, check the mower belt
tension after the 8 hours and every 8 hours, thereafter.
1.
Disengage the blade-control switch (PTO), move the
motion-control levers to the N
EUTRAL
-
LOCK
position,
and engage the parking brake.
2.
Shut off the engine, remove the key, and wait for all
moving parts to stop before leaving the operating
position.
3.
Adjust the mower deck to the 76 mm (3 inches)
height-of-cut position.
4.
Measure the spring length (
). If the spring
length is between 25.4 to 26 cm (10 to 10-1/4 inches),
from post to post, no adjustment is needed.
5.
Loosen the bolts holding the idler plate (
).
6.
Insert a ratchet or breaker bar into the square hole in
the idler plate to adjust the tension (
).
7.
Rotate the ratchet or breaker bar to move the idler plate
until the idler spring is between 25.4 to 26 cm (10 to
10-1/4 inches) from post to post as shown in
8.
While holding the belt tension and spring length,
tighten the idler plate bolts that secure the idler plate
(
).
56
Summary of Contents for Z593-D Z Master 74264TE
Page 75: ...Schematics g012068 g012068 Wire Diagram Rev A 75 ...
Page 76: ...Notes ...
Page 77: ...Notes ...
Page 78: ...Notes ...


