


GB–7
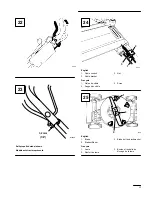
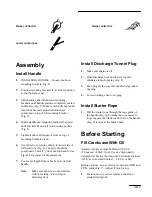
Raise control bar.
Raise control bar.
Lower control bar.
Assembly
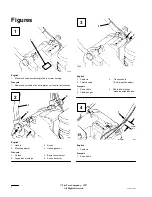
Install Handle
1.
INSTALLING HANDLE—Loosen knobs on
mounting brackets (Fig. 2).
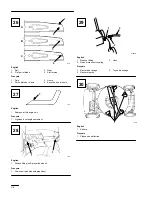
2.
Position mounting brackets in a vertical position
so that holes face up.
3.
Slide handle ends into holes in mounting
brackets until handle ends are completely seated
in brackets (Fig. 2). Make sure throttle cable and
traction cable (self–propelled model) are
positioned on top of left mounting bracket
(Fig. 3).
4.
Rotate handle and mounting brackets rearward
until brackets fit securely into housing pockets
(Fig. 3).
5.
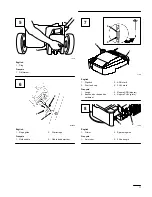
Tighten knobs until edges of slots on top of
mounting brackets touch.
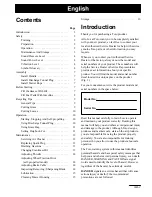
6.
Use cable tie to secure cable(s) to lower side of
left hand tube (Fig. 4). Cable tie should be
positioned 25 mm (1”) from bend in handle. See
Figure 4 for correct cable placement.
7.
Cut excess length from cable tie on lower left
handle.
Note:
Make sure cable(s) do not interfere
with the raising or lowering of
discharge door.
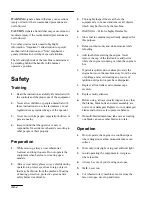
Install Discharge Tunnel Plug
1.
Make sure engine is off.
2.
Open discharge door and insert plug into
discharge tunnel opening (Fig. 5).
3.
Push plug all the way into the discharge tunnel
opening.
4.
Lower discharge door over plug.
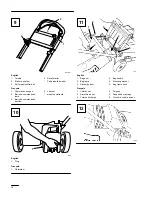
Install Starter Rope
1.
Pull the starter rope through the rope guide on
the handle (Fig. 6). To make the rope easier to
loop, squeeze the blade control bar on the handle
(Fig. 9) to release the blade brake.
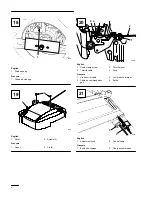
Before Starting
Fill Crankcase With Oil
Initially, crankcase must be filled with 0.6 L
(20 ounces) of SAE 30 oil. Use any high quality
detergent oil having the American Petroleum Institute
(API) “service classification”—SF, SG or SH.
Before each use, assure oil level is between ADD and
FULL mark (Fig. 7). Add oil if level is low.
1.
Position mower on level surface and clean
around oil dipstick.


