background image

Cutting Leaves

After cutting the lawn, ensure that half of the lawn shows
through the cut leaf cover. You may need to make more
than one pass over the leaves.

If there are more than 5 inches (13 cm) of leaves on the
lawn, set the front cutting height one or two notches
higher than the rear cutting height.

Slow down your mowing speed if the mower does not
cut the leaves finely enough.

11

Summary of Contents for Recycler 20331

Page 1: ...ay cause serious injury or death if you do not follow the recommended precautions Figure 2 1 Safety alert symbol This manual uses 2 words to highlight information Important calls attention to special mechanical information and Note emphasizes general information worthy of special attention WARNING CALIFORNIA Proposition 65 Warning The engine exhaust from this product contains chemicals known to th...

Page 2: ...eep clear of the discharge opening at all times Only allow responsible adults who are familiar with the instructions to operate this machine Clear the area of objects such as rocks wire toys etc which could be thrown by the blade Stay behind the handle when the engine is running Be sure the area is clear of bystanders before operating Stop machine if anyone enters the area Do not operate machine b...

Page 3: ...er bed with a plastic liner Always place containers on the ground away from your vehicle before filling Remove gas powered equipment from the truck or trailer and refuel it on the ground If this is not possible then refuel such equipment with a portable container rather than from a gasoline dispenser nozzle Keep the nozzle in contact with the rim of the fuel tank or container opening at all times ...

Page 4: ...g dismemberment hazard of hand or foot mower blade do not operate up and down slopes operate side to side on slopes stop the engine before leaving the operating position and look behind you when backing up Setup Important Remove and discard the protective plastic sheet that covers the engine 1 Installing the Handle No Parts Required Procedure WARNING Folding or unfolding the handle improperly can ...

Page 5: ...s the Full line on the dipstick Figure 4 Wait 3 minutes after adding oil to check the oil level with the dipstick Do not overfill Max fill 20 oz 0 59 l type SAE 30 detergent oil with an API service classification of SF SG SH SJ SL or higher Important Do not overfill the crankcase with oil and run the engine Drain the excess oil until the oil level on the dipstick reads Full 4 Install the dipstick ...

Page 6: ...e fuel all season mixing it with gasoline less than 30 days old Figure 7 Checking the Engine Oil Level Service Interval Before each use or daily 1 Remove the dipstick wipe it clean and fully install the dipstick Figure 8 Figure 8 1 Dipstick 2 Remove the dipstick and check the oil level Figure 8 If the oil level is below the Add mark on the dipstick slowly pour oil into the oil fill tube to raise t...

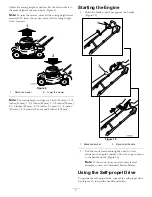
Page 7: ...2 inches 64 mm 2 7 8 inches 73 mm 3 1 4 inches 83 mm 3 5 8 inches 92 mm and 4 inches 102 mm Starting the Engine 1 Hold the blade control bar against the handle Figure 10 Figure 10 1 Blade control bar 2 Recoil start handle 2 Pull the recoil start handle lightly until you feel resistance then pull it sharply Allow the rope to return to the handle slowly Figure 10 Note If the mower does not start aft...

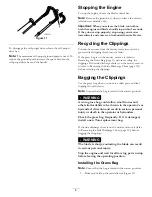
Page 8: ...ide discharge chute is on the mower remove it refer to Removing the Side Discharge Chute page 10 before recycling the clippings Bagging the Clippings Use the grass bag when you want to collect grass and leaf clippings from the lawn Note Ensure that the bag is seated in the correct position WARNING A worn grass bag could allow small stones and other similar debris to be thrown in the operator s or ...

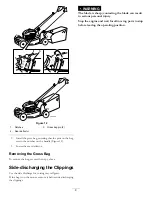
Page 9: ... the Grass Bag To remove the bag reverse the steps above Side discharging the Clippings Use the side discharge for cutting very tall grass If the bag is on the mower remove it before side discharging the clippings WARNING The blade is sharp contacting the blade can result in serious personal injury Stop the engine and wait for all moving parts to stop before leaving the operating position 9 ...

Page 10: ...ight page 6 When cutting grass over 6 inches 15 cm tall mow at the highest cutting height setting and walk slower then mow again at a lower setting for the best lawn appearance If the grass is too long the mower may plug and cause the engine to stall Mow only dry grass or leaves Wet grass and leaves tend to clump on the yard and can cause the mower to plug or the engine to stall WARNING Wet grass ...

Page 11: ...eaf cover You may need to make more than one pass over the leaves If there are more than 5 inches 13 cm of leaves on the lawn set the front cutting height one or two notches higher than the rear cutting height Slow down your mowing speed if the mower does not cut the leaves finely enough 11 ...

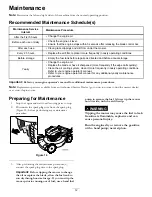
Page 12: ...our engine operator s manual for any additional yearly maintenance procedures Important Refer to your engine operator s manual for additional maintenance procedures Note Replacement parts are available from an Authorized Service Dealer go to www toro com to find the nearest dealer or at www shoptoro com Preparing for Maintenance 1 Stop the engine and wait for all moving parts to stop 2 Disconnect ...

Page 13: ...gure 17 Figure 17 5 Return the mower to the operating position 6 Slowly pour oil into the oil fill tube until the oil level reaches the Full line on the dipstick Figure 16 Wait 3 minutes after adding oil to check the oil with the dipstick Do not overfill Max fill 20 oz 0 59 l type SAE 30 detergent oil with an API service classification of SF SG SH SJ SL or higher 7 Install the dipstick securely 8 ...

Page 14: ...Position the curved ends of the blade to point toward the mower housing 6 Use a torque wrench to tighten the blade bolt to 60 ft lb 82 N m Important A bolt torqued to 60 ft lb 82 N m is very tight While holding the blade with a block of wood put your weight behind the ratchet or wrench and tighten the bolt securely This bolt is very difficult to overtighten Adjusting the Self propel Drive Cable Wh...

Page 15: ...eight page 6 2 Move the mower onto a flat paved surface 3 Wash out the area under the rear deflector where the clippings go from the housing to the grass bag 4 Attach a garden hose that is connected to a water supply to the washout port on the mower housing Figure 21 Figure 21 1 Washout port 5 Turn the water on 6 Start the engine and run it until there are no more clippings that come out from unde...

Page 16: ... 7 Remove the spark plug add 1 oz 30 ml of oil through the spark plug hole and pull the starter rope slowly several times to distribute oil throughout the cylinder to prevent cylinder corrosion during the off season 8 Loosely install the spark plug 9 Tighten all nuts bolts and screws Folding the Handle WARNING Folding or unfolding the handle improperly can damage the cables causing an unsafe opera...

Page 17: ...Notes 17 ...

Page 18: ...Notes 18 ...

Page 19: ...Notes 19 ...

Page 20: ...e on some products This express warranty does not cover the following Cost of regular maintenance service or parts such as filters fuel lubricants oil changes spark plugs air filters blade sharpening or worn blades cable linkage adjustments or brake and clutch adjustments Any product or part which has been altered or misused and requires replacement or repair due to accidents or lack of proper mai...

Page 21: ...de seguridad identificados por el símbolo de alerta de seguridad Figura 2 que señala un peligro que puede causar lesiones graves o la muerte si usted no sigue las precauciones recomendadas Figura 2 1 Símbolo de alerta de seguridad Este manual utiliza 2 palabras para resaltar información Importante llama la atención sobre información mecánica especial y Nota resalta información general que merece u...

Page 22: ...so o mantenimiento incorrectos de este cortacésped pueden causar lesiones o la muerte Para reducir esta posibilidad cumpla las siguientes instrucciones de seguridad Las siguientes instrucciones han sido adaptadas de la norma ANSI OPEIB71 1 2003 Esta máquina de corte puede amputar manos y pies y lanzar objetos al aire El no observar las siguientes instrucciones de seguridad puede dar lugar a lesion...

Page 23: ...les o daños materiales extreme las precauciones al manejar la gasolina La gasolina es extremadamente inflamable y los vapores son explosivos Apague cualquier cigarrillo cigarro pipa u otra fuente de ignición Utilice solamente un recipiente de gasolina homologado No retire nunca el tapón de combustible ni añada combustible con el motor en marcha Deje que se enfríe el motor antes de repostar combust...

Page 24: ... protector de descarga y sustitúyalos por piezas recomendadas por el fabricante cuando sea necesario Las cuchillas del cortacésped están muy afiladas Envuelva la cuchilla o lleve guantes y extreme las precauciones al manejar las cuchillas No cambie los ajustes del regulador del motor ni haga funcionar el motor a una velocidad excesiva Revise o sustituya las pegatinas de seguridad e instrucciones c...

Page 25: ...a otras personas a una distancia prudencial de la máquina 3 Peligro de corte desmembramiento de mano o pie cuchilla del cortacésped retire la llave de contacto y lea las instrucciones antes de realizar cualquier tarea de ajuste o mantenimiento 4 Peligro de corte desmembramiento de mano o pie por la cuchilla del cortacésped no se acerque a las piezas en movimiento 5 Peligro de corte desmembramiento...

Page 26: ...césped se suministra sin aceite en el motor pero incluye una botella de aceite Antes de arrancar el motor llene el motor de aceite Capacidad máxima 0 59 l 20 onzas tipo SAE 30 aceite detergente con clasificación de servicio API SF SG SH SJ SL o superior Nota Cuando el cárter esté vacío vierta aproximadamente tres cuartas partes de la capacidad total de aceite en el cárter y luego haga lo siguiente...

Page 27: ... El producto Figura 5 1 Palanca de altura de corte 4 7 Arrancador de retroceso 2 Bujía 8 Barra de control de la cuchilla 3 Filtro de aire no ilustrado 9 Barra de control de la transmisión autopropulsada 4 Tapón del depósito de combustible 10 Pomo del manillar 2 5 Varilla tapón de llenado de aceite 11 Orificio de lavado 6 Manillar Figura 6 1 Bolsa de recogida 2 Conducto de descarga lateral 7 ...

Page 28: ...ormal con plomo si la gasolina normal sin plomo no estuviera disponible Nota Nunca use metanol gasolina que contenga metanol o gasolina con más del 10 de etanol porque se podrían producir daños en el sistema de combustible No mezcle aceite con la gasolina Importante Para reducir los problemas de arranque añada estabilizador de combustible al combustible durante toda la temporada mezclándolo con ga...

Page 29: ...ha estado en marcha el silenciador estará muy caliente y puede causarle quemaduras graves Manténgase alejado del silenciador si éste está caliente Ajuste la altura de corte según desee Ajuste las ruedas delanteras a la misma altura que las traseras Figura 9 Nota Para elevar el cortacésped mueva todas las palancas de altura de corte hacia atrás Para bajar el cortacésped mueva todas las palancas de ...

Page 30: ...e la barra de control de la cuchilla Nota Retire la llave de contacto si deja el cortacésped sin supervisar modelos con arranque eléctrico solamente Importante Cuando usted suelte la barra de control de la cuchilla el motor y la cuchilla deberán detenerse en 3 segundos o menos Si no se paran correctamente deje de usar el cortacésped inmediatamente y póngase en contacto con un Servicio Técnico Auto...

Page 31: ...er contacto con la cuchilla puede causar lesiones personales graves Pare el motor y espere a que se detengan todas las piezas en movimiento antes de abandonar el puesto del operador Instalación de la bolsa de recogida Nota Asegúrese de que la bolsa está bien asentada en la posición correcta 1 Levante y sujete el deflector trasero Figura 12 Figura 12 1 Muescas 3 Pasador de la bolsa de recogida 2 2 ...

Page 32: ...esto del operador Instalación del conducto de descarga lateral Levante el deflector lateral e instale el conducto de descarga lateral Figura 13 Figura 13 Cómo retirar el conducto de descarga lateral Para retirar el conducto de descarga lateral levante el deflector lateral retire el conducto de descarga lateral y baje el deflector del conducto de descarga lateral Consejos de operación Consejos gene...

Page 33: ...CIA La hierba mojada o las hojas mojadas pueden causarle graves lesiones si usted resbala y toca la cuchilla Siegue solamente en condiciones secas Esté atento al posible riesgo de incendio en condiciones muy secas siga todas las advertencias locales para casos de incendio y mantenga el cortacésped libre de hierba seca y residuos de hojas Alterne la dirección de corte Esto ayuda a dispersar los rec...

Page 34: ...el Manual del operador del motor procedimientos adicionales de mantenimiento Nota Puede adquirir piezas de repuesto en un Servicio Técnico Autorizado vaya a www toro com para encontrar el distribuidor más cercano o en www shoptoro com Preparación para el mantenimiento 1 Pare el motor y espere a que se detengan todas las piezas en movimiento 2 Desconecte el cable de la bujía Figura 14 antes de real...

Page 35: ... Ponga el cortacésped de pie 6 Vierta lentamente aceite en el tubo de llenado hasta que el nivel llegue a la marca Full lleno de la varilla Figura 16 Después de añadir aceite espere 3 minutos antes de comprobar el nivel de aceite con la varilla No llene demasiado Capacidad máxima 0 59 l 20 onzas tipo SAE 30 aceite detergente con clasificación de servicio API SF SG SH SJ SL o superior 7 Vuelva a co...

Page 36: ...dos los herrajes de montaje Figura 19 Figura 19 Importante Coloque la cuchilla con los extremos curvos hacia la carcasa del cortacésped 6 Utilice una llave dinamométrica para apretar el perno de la cuchilla a 82 Nm 60 pies libra Importante Un perno apretado a 82 Nm 60 pies libra queda muy firme Mientras sujeta la cuchilla con un bloque de madera aplique toda su fuerza a la llave y apriete el perno...

Page 37: ...na 9 2 Lleve el cortacésped a una superficie plana pavimentada 3 Lave la zona situada debajo del deflector trasero por donde pasan los recortes en su camino desde la carcasa hasta la bolsa de recogida 4 Introduzca una manguera de jardín conectada a un grifo en el orificio de lavado de la carcaza del cortacésped Figura 21 Figura 21 1 Orificio de lavado 5 Abra el grifo de la manguera 6 Arranque el m...

Page 38: ...able de la bujía 7 Retire la bujía añada 30ml 1onza de aceite a través del orificio de la bujía y tire de la cuerda del arrancador lentamente varias veces para que se distribuya el aceite por el cilindro con el fin de evitar la corrosión durante el periodo de inactividad 8 Instale la bujía sin apretarla 9 Apriete todos los pernos tuercas y tornillos Cómo plegar el manillar ADVERTENCIA Si pliega o ...

Page 39: ...Notas 19 ...

Page 40: ...tía expresa no cubre El coste de mantenimiento regular servicio o piezas como por ejemplo filtros combustible lubricantes cambios de aceite bujías filtros de aire afilado de cuchillas o cuchillas desgastadas ajustes de cables acoplamientos o ajustes de frenos y embragues Cualquier producto o pieza que haya sido modificado o mal utilizado o que haya necesitado ser sustituido o reparado debido a acc...

Reviews: