


ProCore SR Series
Page 3 -- 5
Chassis
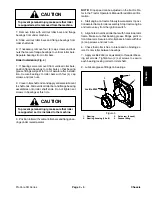
CAUTION
To prevent personal injury, make sure that roller
is supported as it is removed from the machine.
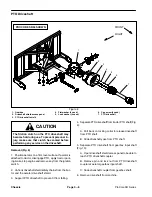
7. Remove roller with vertical roller bars and flange
bearings from under machine.
8. Slide vertical roller bars and flange bearings from
roller shaft ends.
9. If necessary, remove four (4) cap screws and lock
nuts that secure flange bearings to vertical roller bars.
Separate bearings from roller bars.
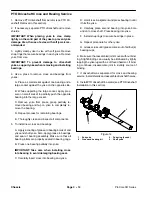
Roller Installation (Fig. 4)
1. If bearings were removed from vertical roller bars,
position flange bearings to roller bars so that bearing
grease fittings will point to front of aerator after installa-
tion. Secure bearings to roller bars with four (4) cap
screws and lock nuts.
2. Clean roller shaft ends and apply antiseize lubricant
to shaft ends. Slide vertical roller bar and flange bearing
assemblies onto roller shaft ends. Do not tighten set
screws in bearings at this time.
CAUTION
To prevent personal injury, make sure that roller
is supported as it is installed to the machine.
3. Position roller with vertical roller bars and flange bea-
rings under raised aerator.
NOTE:
Drop speed can be adjusted on the tractor. Re-
fer to the Tractor Operator’s Manual for additional infor-
mation.
4. Start engine on tractor. Slowly lower aerator to posi-
tion aerator frame to roller assembly. Stop tractor engine
and remove key from the ignition switch.
5. Align holes in vertical roller bars with holes in aerator
frame. Make sure that bearing grease fittings point to
front of aerator. Secure both roller bars to frame with four
(4) cap screws and lock nuts.
6. Check that roller is free to rotate and no binding ex-
ists. Center roller between bearings.
7. Apply Loctite #242 (or equivalent) to threads of bear-
ing set screws. Tighten two (2) set screws to secure
each bearing locking collar to roller shaft.
8. Lubricate grease fittings on bearings.
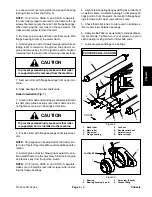
1. Bearing
2. Bearing housing (4 bolt)
3. Set screw (2 used)
4. Grease fitting
Figure 5
1
3
4
2
Loctite #242
Chassis
Summary of Contents for ProCore SR Series
Page 4: ...NOTES _...
Page 6: ...ProCore SR Series This page is intentionally blank...
Page 8: ...ProCore SR Series This page is intentionally blank...
Page 14: ...0 09375 ProCore SR Series Page 2 2 Product Records and Maintenance Equivalents and Conversions...
Page 31: ...ProCore SR Series Page 3 13 Chassis This page is intentionally blank Chassis...
Page 86: ...ProCore SR Series Page 5 24 Coring Head SR48 SR72 This page is intentionally blank...
Page 89: ...ProCore SR Series Page 6 3 Coring Head SR75 This page is intentionally blank Coring Head SR75...
Page 93: ...ProCore SR Series Page 6 7 Coring Head SR75 This page is intentionally blank Coring Head SR75...
Page 99: ...ProCore SR Series Page 6 13 Coring Head SR75 This page is intentionally blank Coring Head SR75...
Page 103: ...ProCore SR Series Page 6 17 Coring Head SR75 This page is intentionally blank Coring Head SR75...
Page 110: ...ProCore SR Series Page 6 24 Coring Head SR75 This page is intentionally blank...
Page 115: ...ProCore SR Series Page 7 5 Gearbox Service This page is intentionally blank Gearbox Service...
Page 119: ...ProCore SR Series Page 7 9 Gearbox Service This page is intentionally blank Gearbox Service...