GB–12
POTENTIAL HAZARD
•
Gasoline and its fumes are highly
flammable, explosive, and dangerous if
inhaled.
WHAT CAN HAPPEN
•
If gasoline contacts a flame or is inhaled,
serious personal injury can occur.
HOW TO AVOID THE HAZARD
•
Never warm up snowthrower with fuel in
tank inside a building where open flame or
sparks are present.
•
Never store snowthrower in house (living
area), basement or anywhere open flame is
present.
•
Always remove gasoline from snowthrower
fuel tank before transporting in a closed
car trunk or vehicle; refer to Draining
Gasoline, page 13.
7.
AFTER CLEARING SNOW—Let engine run
for a few minutes so ice does not freeze moving
parts solid. After engine is shut off, wipe ice and
snow off entire unit.
IMPORTANT: STORE SNOWTHROWER
IN OPERATING POSITION ON ITS
WHEELS OR HANG ON A WALL BY ITS
HANDLE. TIPPING OR STORING UNIT
FORWARD ONTO FRONT HOUSING MAY
CAUSE HARD STARTING.
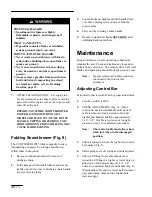
Folding Snowthrower (Fig. 9)
The CCR POWERLITE
folds compactly for easy
transporting or storage. To fold up snowthrower,
follow these instructions:
1.
Remove locknut and washer from rear of
discharge chute.
2.
Fold chute down. Reinstall locknut and washer
tightly onto bolt at rear of discharge chute handle
to prevent losing them.
3.
Loosen knobs on handle and fold handle down
over unit, ensuring that you do not kink the
control cable.
4.
Carry unit by discharge chute handle.
5.
Be sure to tighten all knobs SECURELY after
unfolding handle and chute.
Maintenance
Keep snowthrower in safe operating condition by
cleaning the unit. Check and tighten any loose nuts,
bolts, knobs, and screws. The scraper, drive belt, rotor
blades, and spark plug should be checked once a year.
Note:
Figures referenced in this section are
contained in the front of this
document.
Adjusting Control Bar
Periodically check control bar for proper adjustment.
1.
Turn key switch to OFF.
2.
CHECK ADJUSTMENT (Fig. 5)—Move
control bar back toward handle until slack in
cable is removed. Gap between control bar
bracket and handle should be approximately
1/16”–1/8”. If cable is too loose or too tight,
proceed to step 3 for adjustment procedure.
Note:
The control cable must always have
slack in it when in the disengaged
position.
3.
Unhook spring end from the top hole in control
bar bracket (Fig. 5).
4.
Slide spring cover off spring and cable adjuster.
5.
Unhook Z fitting from cable adjuster and
reposition Z fitting in a higher or lower hole on
adjuster to obtain proper gap of 1/16”–1/8”
between control bar bracket and handle (Fig. 4).
(Positioning cable end in a lower hole decreases
gap; positioning cable end in a higher hole
increases gap.)


