Installation
9
11. Check mower level; refer to Side-to-Side Mower
Leveling page 9, and Front-to-Rear Blade
Leveling page 10.
12. Raise attachment lift lever all the way to the
latched position and adjust mower transport
height adjustment; refer to page 9.
Transport Height Adjustment
Transport height should be properly adjusted after
Tractor Preparation, page 6; however if the rear
brackets contact the footrest or up–stop contacts the
top of mower in the raised position, adjustment is
required.
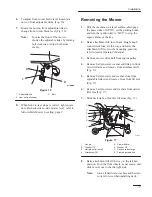
1.
Adjust by turning transport height nut, (Fig. 12)
on lift mechanism, clockwise to raise or
counterclockwise to lower mower.
2.
Adjust nut until there is 1/4” (6 mm) clearance
between rear brackets and footrest and up–stop
and mower.
1223
1
Figure 12
1.
Nut
Side-to-Side Mower Leveling
The mower blades must be level from side to side.
Check the side-to-side level any time you install the
mower or when you see an uneven cut on your lawn.
Before you level the mower, set the air pressure in the
front and rear tires to 20 psi (138 kPa).
3” to 4” (76-102 mm) Height-of-Cut Range
When the mower height-of-cut is set to the 3” to 4”
(76-102 mm) range the mower is suspended from the
tractor.
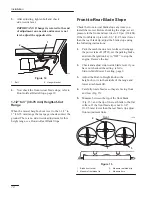
1.
Park the machine on a level surface, disengage
the power take off (PTO), set the parking brake,
and turn the ignition key to “OFF” to stop the
engine. Remove the key.
2.
Raise attachment lift lever all the way to the
latched position.
3.
Carefully rotate blade(s) side to side (Fig. 13).
Measure between the outside cutting edges and
the flat surface (Fig. 13). If both measurements
are not within 3/16” (5 mm), an adjustment is
required; refer to steps 4 and 6.
Front
1
2
3
3
2
Figure 13
1.
Blades side to side
2.
Outside cutting edges
3.
Measure here
4.
Loosen adjustment bolt on one side and rotate
hanger bracket to raise or lower mower (Fig. 14).
Summary of Contents for 78253
Page 26: ...Troubleshooting 24 ...
Page 27: ...Troubleshooting 25 ...
Page 28: ...Troubleshooting 26 ...


