background image

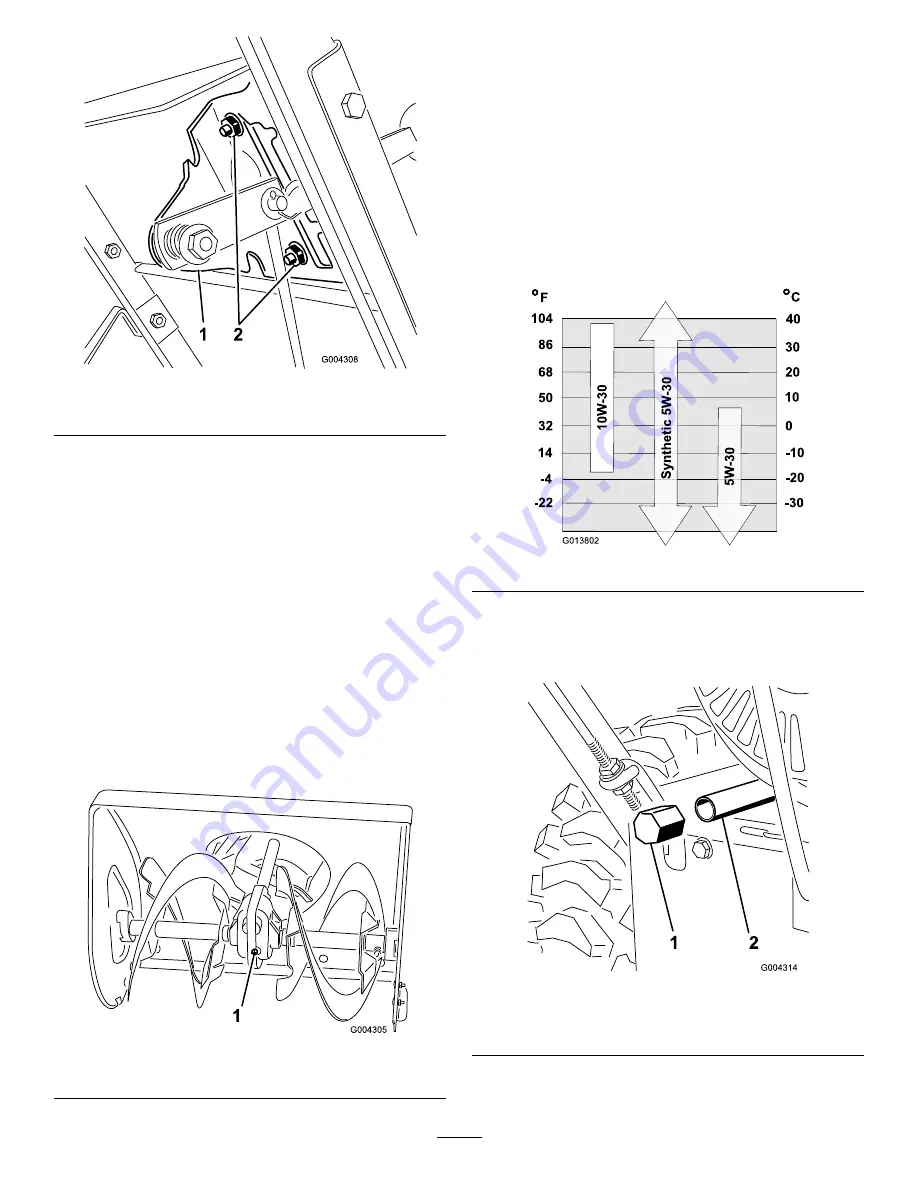
Figure 29

1.

Speed selector plate

2.

Flange nuts

4.

Shift the speed selector lever to third gear. Push down
on the speed selector plate and tighten the flange nuts
that secure the speed selector plate.

5.

If these steps do not resolve the issue, take the unit to
an authorized service location.

Checking the Auger Gearbox
Grease

Service Interval:

Yearly

The auger gearbox is packed with 5 oz. (140 g) of Lubriplate
MAG-1 (a low-temperature, high-pressure grease) and is
sealed at the factory. The pipe plug (Figure 30) is for factory
use only; you do not need to check or add grease. If the
gearbox is leaking grease, contact an Authorized Service
Dealer.

Figure 30

1.

Pipe plug

Changing the Engine Oil

Service Interval:

After the first 5 hours

Yearly

Every 50 hours

If possible, run the engine just before changing the oil because
warm oil flows better and carries more contaminants.

Max. fill: 20 oz. (0.6 l), type: automotive detergent oil with an
API service classification of SF, SG, SH, SJ, SL, or higher.

Refer to Figure 31 to select the best oil viscosity for the
outdoor temperature range expected.

Figure 31

1.

Block up the rear of the machine.

2.

Remove the left wheel.

3.

Clean the area around the oil drain plug (Figure 32).

Figure 32

1.

Oil drain plug

2.

Drain extension

4.

Slide an oil drain pan under the drain extension and
remove the oil drain plug (Figure 32).

21

Summary of Contents for 38818

Page 1: ...cation Model No Serial No This manual identifies potential hazards and has safety messages identified by the safety alert symbol Figure 2 which signals a hazard that may cause serious injury or death if you do not follow the recommended precautions Figure 2 1 Safety alert symbol This manual uses 2 words to highlight information Important calls attention to special mechanical information and Note e...

Page 2: ...sting the Skids and Scraper 20 Adjusting the Speed Selector 20 Checking the Auger Gearbox Grease 21 Changing the Engine Oil 21 Replacing the Spark Plug 22 Adjusting the Traction Drive Belt 23 Replacing the Traction Drive Belt 23 Adjusting the Auger Impeller Drive Belt 23 Replacing the Auger Impeller Drive Belt 23 Storage 24 Preparing the Machine for Storage 24 Removing the Machine from Storage 24 ...

Page 3: ...or trailer and refuel it on the ground If this is not possible then refuel such machine on a trailer with a portable container rather than from a gasoline dispenser nozzle Keep the nozzle in contact with the rim of the fuel tank or container opening at all times until refueling is complete Do not use a nozzle lock open device Replace gasoline cap securely and wipe up spilled fuel If fuel is spille...

Page 4: ...s after throwing snow to prevent freeze up of the auger impeller blades Toro Snowthrower Safety The following list contains safety information specific to Toro products or other safety information that you must know Rotating auger impeller can cut off or injure fingers or hands Stay behind the handles and away from the discharge opening while operating the machine Keep your face hands feet and any...

Page 5: ...d accessories Sound Pressure This machine has a sound pressure level at the operator s ear of 90 dBA which includes an Uncertainty Value K of 1 dBA The sound pressure level was determined according to the procedures outlined in EN ISO 11201 Sound Power This machine has a guaranteed sound power level of 107 dBA which includes an Uncertainty Value K of 3 75 dBA The sound power level was determined a...

Page 6: ...berment hazard impeller stop the engine and wait for all moving parts to stop before leaving the operator s position 2 Engage 4 Warning read the Operator s Manual 6 Cutting dismemberment hazard impeller and auger stay away from moving parts keep all guards and shields in place remove the ignition key and read the instructions before servicing or performing maintenance 8 Auger 119 1586 1 Forward dr...

Page 7: ...Briggs Part No 276925 1 Warning read the Operator s Manual 3 Warning toxic gas inhalation hazard 2 Warning fire hazard 4 Warning hot surface burn hazard Briggs Part No 277566 1 When starting a cold engine close the choke and press the primer two times 2 When starting a warm engine open the choke and do not press the primer Briggs Stratton Part No 277588 1 Primer 3 Ignition key out Engine Stop 2 Ig...

Page 8: ... the speed selector rod 3 Flange locknut 1 Install the traction rod Clevis pin 1 4 Cotter pin 1 Install the auger impeller drive control linkage Chute control rod assembly rod and bracket worm gear and bracket 1 Belleville washer 1 Bolt 2 Carriage bolt 1 Locknut 3 5 Curved washer 1 Install the chute control rod 6 No parts required Fill the engine with oil 7 No parts required Check the tire pressur...

Page 9: ... locknut 4 Position the left side of the handle against the side of the machine and insert the end of the traction rod through the lower traction rod loop Figure 4 5 Align the holes in the left side of the handle with the holes in the left side plate and secure the handle with 2 cap screws and Belleville washers until they are finger tight Figure 3 Note The concave side of the Belleville washer go...

Page 10: ...eed selector lever Figure 14 on the control panel to the R Reverse position 3 Install the speed selector rod into the speed selector arm add a flat washer on the selector rod and secure it with a cotter pin Figure 6 3 Installing the Traction Rod Parts needed for this procedure 1 Flange locknut Procedure 1 Thread the flange locknut flange side up onto the bottom of the traction control rod below th...

Page 11: ... flange nuts if necessary to obtain the proper distance between the top of the handgrip and the bottom of the traction control lever 7 Tighten the flange nuts securely 4 Installing the Auger Impeller Drive Control Linkage Parts needed for this procedure 1 Clevis pin 1 Cotter pin Procedure 1 Loosen the jam nut above the clevis on the upper control rod Figure 8 Figure 8 1 Upper control rod 4 Cotter ...

Page 12: ...clevis Figure 8 5 Installing the Chute Control Rod Parts needed for this procedure 1 Chute control rod assembly rod and bracket worm gear and bracket 1 Belleville washer 2 Bolt 1 Carriage bolt 3 Locknut 1 Curved washer Procedure 1 Secure the upper chute control bracket attached to the chute control rod to the upper left side of the handle with a bolt and a locknut Figure 10 Figure 10 1 Chute contr...

Page 13: ...n API service classification of SF SG SH SJ SL or higher Refer to Figure 12 to select the best oil viscosity for the outdoor temperature range expected Figure 12 1 Move the machine to a level surface to ensure an accurate oil level reading 2 Clean around the dipstick Figure 13 Figure 13 1 Dipstick 2 Filler hole 3 Remove the dipstick by rotating the cap counterclockwise and pulling it out 4 Slowly ...

Page 14: ... to between 12 and 15 psi 82 and 103 kPa 8 Checking the Skids and Scraper No Parts Required Procedure Refer to Checking and Adjusting the Skids and Scraper in Maintenance Product Overview Figure 14 1 Auger impeller drive control lever 6 Oil fill dipstick 2 Traction control lever 7 Chute deflector handle 3 Discharge chute control 8 Snow clean out tool 4 Speed selector lever 9 Auger 5 Fuel tank cap ...

Page 15: ...he primer to pump a small amount of gasoline into the engine for improved cold weather starting Electric Starter The electric starter is on the right side of the engine To start the machine connect the electric starter to an electric power source with an approved extension cord and press the starter button Recoil Starter The recoil starter is on the back side of the engine Pull the recoil starter ...

Page 16: ...uce starting problems add fuel stabilizer to the fuel all season mixing it with gasoline less than 30 days old Do not add oil to the gasoline Figure 18 Starting the Engine 1 Check the engine oil level Refer to Checking the Engine Oil Level in Maintenance 2 Turn the fuel shutoff valve 1 4 turn counterclockwise to open it Figure 19 Figure 19 3 Insert the ignition key Figure 20 Figure 20 1 Ignition k...

Page 17: ...al cord before using the machine If the cord is damaged do not operate the machine Replace or repair the damaged cord immediately Contact an Authorized Service Dealer for assistance Important To prevent damaging the electric starter run it in short cycles 5 seconds maximum then wait one minute before trying to start it again If the engine still does not start take the machine to an Authorized Serv...

Page 18: ...er impeller to clear any remaining snow from inside the housing Rotate the discharge chute control to prevent it from freezing Stop the engine wait for all moving parts to stop and remove all ice and snow from the machine With the engine off pull the recoil starter handle several times to prevent the recoil starter from freezing up Operating Tips DANGER When the machine is in operation the impelle...

Page 19: ...maintenance procedures For engine adjustments repairs or warranty service not covered in this manual contact an Authorized Briggs Stratton Servicing Dealer CAUTION If you leave the wire on the spark plug someone could accidently start the engine and seriously injure you or bystanders Disconnect the wire from the spark plug before you do any maintenance Set the wire aside so that it does not accide...

Page 20: ... 1 Auger blade 3 Mounting screw 5 2 Scraper 5 Check the scraper adjustment The scraper should be 1 8 inch 3 mm above and parallel to a level surface A For Concrete and Asphalt Surfaces If the machine does not clear the snow close enough to the pavement adjust the skids to lower the scraper if the pavement surfaces are cracked rough or uneven adjust the skids to raise the scraper B For Gravel Surfa...

Page 21: ... If the gearbox is leaking grease contact an Authorized Service Dealer Figure 30 1 Pipe plug Changing the Engine Oil Service Interval After the first 5 hours Yearly Every 50 hours If possible run the engine just before changing the oil because warm oil flows better and carries more contaminants Max fill 20 oz 0 6 l type automotive detergent oil with an API service classification of SF SG SH SJ SL ...

Page 22: ...r snow hood ensuring that the primer bulb hose and the ignition wire remain connected 4 Remove the bracket thumb screw and the bracket Figure 34 Figure 34 1 Spark plug wire 3 Thumb screw 2 Bracket 5 Clean around the base of the spark plug Figure 34 6 Remove and discard the old spark plug Note You will need a ratchet wrench extension to remove the spark plug 7 Set the gap between the electrodes on ...

Page 23: ...ter the first operating hour then check and adjust the belt when necessary DANGER Improperly adjusting the auger impeller may cause it to turn when disengaged A rotating auger or impeller can cut off or injure fingers hands or feet Keep your face hands feet and any other part of your body or clothing away from concealed moving or rotating parts Ensure that the impeller brake arm clearance is maint...

Page 24: ...stops When you can no longer start the engine it is sufficiently dry 6 Stop the engine and allow it to cool 7 Remove the ignition key 8 Clean the machine thoroughly 9 Touch up chipped surfaces with paint available from an Authorized Service Dealer Sand affected areas before painting and use a rust preventative to prevent the metal parts from rusting 10 Tighten all loose screws bolts and locknuts R...

Page 25: ...ct the wire to the spark plug 7 The spark plug is pitted fouled or the gap is incorrect 7 Check the spark plug and adjust the gap if necessary Replace the spark plug if it is pitted fouled or cracked 8 The fuel vent cap is restricted 8 Remove the vent restriction or replace the fuel cap Engine does not start or starts hard 9 The engine oil level in the engine crankcase is too low or too high 9 Add...

Page 26: ...adjust the auger impeller drive belt refer to www Toro com for servicing information or take the machine to an Authorized Service Dealer Engine runs but the machine discharges snow poorly or not at all 7 The auger impeller drive belt is worn or broken 7 Replace the auger impeller drive belt refer to www Toro com for servicing information or take the machine to an Authorized Service Dealer Discharg...

Page 27: ...ny Toro respects your privacy In order to process your warranty claim and contact you in the event of a product recall we ask you to share certain personal information with us either directly or through your local Toro dealer The Toro warranty system is hosted on servers located within the United States where privacy law may not provide the same protection as applies in your country BY SHARING YOU...

Page 28: ...use or abuse and failure or repair required due to rust or corrosion are not covered This warranty includes the cost of parts and labor but you must pay transportation costs Warranty may be denied if the hour meter is disconnected altered or shows signs of being tampered with Owner Responsibilities You must maintain your Toro Product by following the maintenance procedures described in the Operato...

Reviews: