g329619
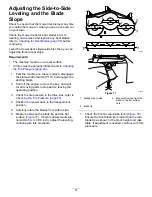
Figure 78
1.
Blades front to rear
3.
Measure from the tip of the
blade to the flat surface
here.
2.
Blade tip
8.
Set the anti-scalp rollers to top holes or remove
them completely for this adjustment.
9.
Place 2 blocks (see Block Height and Rake
Table) under the rear edge of the cutting deck
skirt; 1 on each side of the cutting deck (
10.
Set the height-of-cut lever to the 76 mm (3
inches) position.
11.
Place 2 blocks under each side of the front edge
of the deck, but not under the anti-scalp roller
brackets or welds.
g329631
Figure 79
Bottom view
1.
Rear blocks—78 mm
(3-1/16 inches)
3.
Front blocks—73 mm
(2-7/8 inches)
2.
Welds
Block Height and Rake Table
Block Height
Rake
Front blocks—73 mm (2-7/8
inches)
Rear blocks—78 mm
(3-1/16 inches)
6.4 mm (1/4 inch)
12.
Carefully rotate the blades side to side (
13.
Loosen the locknuts (
) on all 4 corners
and ensure that the mower deck is sitting
securely on all 4 blocks.
14.
Remove any slack from the deck hangers and
make sure the deck-lift foot lever is pushed back
against the stop.
15.
Tighten the 4 locknuts.
g035851
Figure 80
1.
Locknuts
3.
Deck hanger
2.
Deck lift arm
4.
Chain
16.
Ensure that the blocks fit snugly under the deck
skirt and that all attachment bolts are tight
17.
Continue leveling the deck by checking the
front-to-rear blade slope.
18.
Check the blades for levelness and repeat deck
leveling procedure if necessary.
58
Summary of Contents for 2000 Series
Page 2: ......
Page 65: ...Schematics g037072 Wire Diagram Rev A 63 ...
Page 136: ...Schaltbilder g037072 Schaltbild Rev A 70 ...
Page 138: ......
Page 209: ...Schémas g037072 Schéma de câblage Rev A 71 ...
Page 279: ...Schema s g037072 Elektrisch schema Rev A 69 ...


