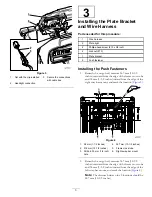
background image

1

2

2
3

g035942

Figure 3

1.

Nut with the clip installed

3.

Secure the connections
with cable ties.

2.

Headlight connection

3

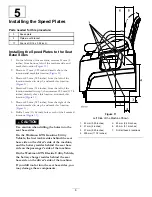
Installing the Plate Bracket
and Wire Harness

Parts needed for this procedure:

1

Wire harness

2

Plate light

4

Phillips-head screw (#10 x 5/8 inch)

4

Locknut (#10)

1

Plate bracket

2

Push fastener

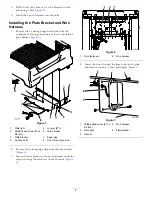
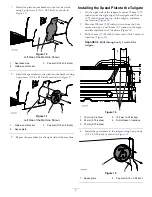
Installing the Push Fasteners

1.

Beneath the cargo bed, measure 267 mm (10-1/2
inches) rearward from the edge of the frame cross tube
and 38 mm (1-1/2 inches) inward from the edge of the
right sway-bar mount, and mark the location (

Figure 4

).

Figure 4

1.

38 mm (1-1/2 inches)

4.

267 mm (10-1/2 inches)

2.

318 mm (12-1/2 inches)

5.

Frame cross tube

3.

Drill a 6.35 mm (1/4 inch)
hole.

6.

Right sway-bar mount
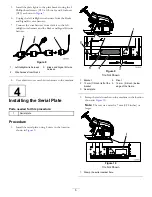
2.

Beneath the cargo bed, measure 267 mm (10-1/2
inches) rearward from the edge of the frame cross tube
and 38 mm (1-1/2 inches) inward from the edge of the
left sway-bar mount, and mark the location (

Figure 4

).

Note:

The distance between the 2 locations should be

267 mm (10-1/2 inches)

3


Summary of Contents for 133-7128

Page 1: ...rt below to verify that all parts have been shipped Procedure Description Qty Use 1 No parts required Prepare the machine Headlight 2 Headlight adapter 2 2 Cable tie 5 Install the headlights Wire harn...

Page 2: ...ded for this procedure 2 Headlight 2 Headlight adapter 5 Cable tie Procedure 1 Remove the existing left and right headlights from the headlight positions 2 Install a headlight adapter to each headligh...

Page 3: ...inches rearward from the edge of the frame cross tube and 38 mm 1 1 2 inches inward from the edge of the right sway bar mount and mark the location Figure 4 Figure 4 1 38 mm 1 1 2 inches 4 267 mm 10...

Page 4: ...screw 10 x 5 8 inch 6 Wire harness 3 Plate bracket 7 Edge clips 4 Existing bolts 8 Front of the cargo bed 2 Remove the existing edge clips from the wire harness Figure 5 3 Secure the wire harness to t...

Page 5: ...l Kit wire harness 2 Wire harness from this kit 8 Use cable ties to secure the wire harness to the machine 4 Installing the Serial Plate Parts needed for this procedure 1 Serial plate Procedure 1 Inst...

Page 6: ...5 Measure 83 mm 3 25 inches from the right of the location marked in step 4 and mark this location Figure 11 6 Drill a 5 mm 13 64 inch hole at each of the 4 marked locations Figure 11 CAUTION Use cau...

Page 7: ...ailgate 1 On the right side of the tailgate measure 95 mm 3 75 inches from the right edge of the tailgate and 70 mm 2 75 inches from the top of the tailgate and mark the location Figure 14 2 Measure 1...

Page 8: ...6 Completing the Installation No Parts Required Procedure Install the negative battery cable to the battery 8...

Reviews: