Viewing Position
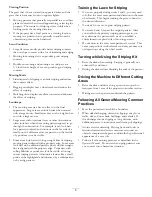
The grass that is bent toward you appears darker, and the
grass that is bent away from you appears lighter.
•
Mowing patterns that generally are parallel to a road have
greater contrast when viewed approaching or leaving the
property. The contrast of striping is less visible when
looking across the mowing direction.
•
If the property has a focal point or a viewing location,
mowing in a pattern that is generally to and from the
observation point can be beneficial.
Lawn Condition
•
Large flat areas usually provide better striping contrast
than on slopes or areas with a lot of trimming and edging.
•
Mowing in morning dew can produce good striping
contrast.
•
Double-cut mowing and mowing a second pass at a
1/2 inch lower height of cut can produce good striping
contrast.
Mowing Mode
•
Side dispersal of clippings can hide striping and reduce
the contrast effect.
•
Bagging can display heavy wheel tracks and reduce the
effect of striping.
•
Mulching often displays excellent contrast and enhances
the effect of striping.
Landscape
•
The mowing area size has an effect on the final
appearance. Large areas can look better when mowed
with a large mower. Small areas may not look right when
cut with a large mower.
•
Large areas with occasional trees or other obstructions
often look best when the mowing pattern appears to go
through the obstruction. For example, it can look best
for a pattern to match and continue on the far side of a
small pond. A different cross cut pattern on the far side
of a pond may not be visible.
•
Some areas look best with long straight lines of striping
mowing pattern aligned with a property edge. Some areas
look best with a diamond pattern, where neither straight
line is aligned with the property edge. Properties with
rolling hillsides or ponds can look best with a flowing
curves striping pattern. A distinctive feature like a small
pond can be highlighted and enhanced by a radial pattern
or by a ring pattern.
Training the Lawn for Striping
•
On a new property during weeks 1 and 2, you may need
to follow the exact same pattern and direction in the same
wheel tracks. This begins training the grass to bend in
the desired direction.
•
On week 3, use a cross-grain striping pattern.
•
On weeks 4 and 5, repeat the original pattern. After
you establish the primary striping-pattern grain, you
may alternate the pattern each week to establish a
checkerboard or a plaid style of mowing pattern.
•
Do not mow in the exact same pattern every week. This
cause compactions in wheel tracks and may produce ruts
or depressions along the wheel tracks.
Turning while Using the Striping Kit
•
Raise the deck when turning. Striping is generally not
enhanced by end turns.
•
Raising the deck reduces blending the ends of the pattern.
Driving the Machine to Different Cutting
Areas
•
Raise the deck and drive along a previous cut path to
transport from 1 area of the property to another section.
•
Driving across the pattern can disturb the pattern.
Following All General Mowing Common
Practices
•
Mow the perimeter to establish a boundary.
•
When side discharging, direct the clippings away from
walks, drives, flower beds, buildings, and vehicles. If
the discharge throws clippings a long distance, mow
additional passes to avoid unwanted cleanup of clippings.
•
Avoid excessive trimming. Driving back and forth or
frequent forward and reverse maneuvers around an
obstacle compresses the grass and disturb the professional
appearance of a nice job.
•
Follow all safe mowing practices as described in the
Operator’s Manual
. Do not let the striping pattern cause
you to mow into a hazardous situation.
5


