background image

Installing the Wiper

Installing the Wiper

1.

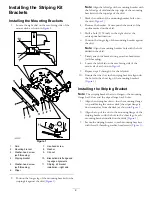
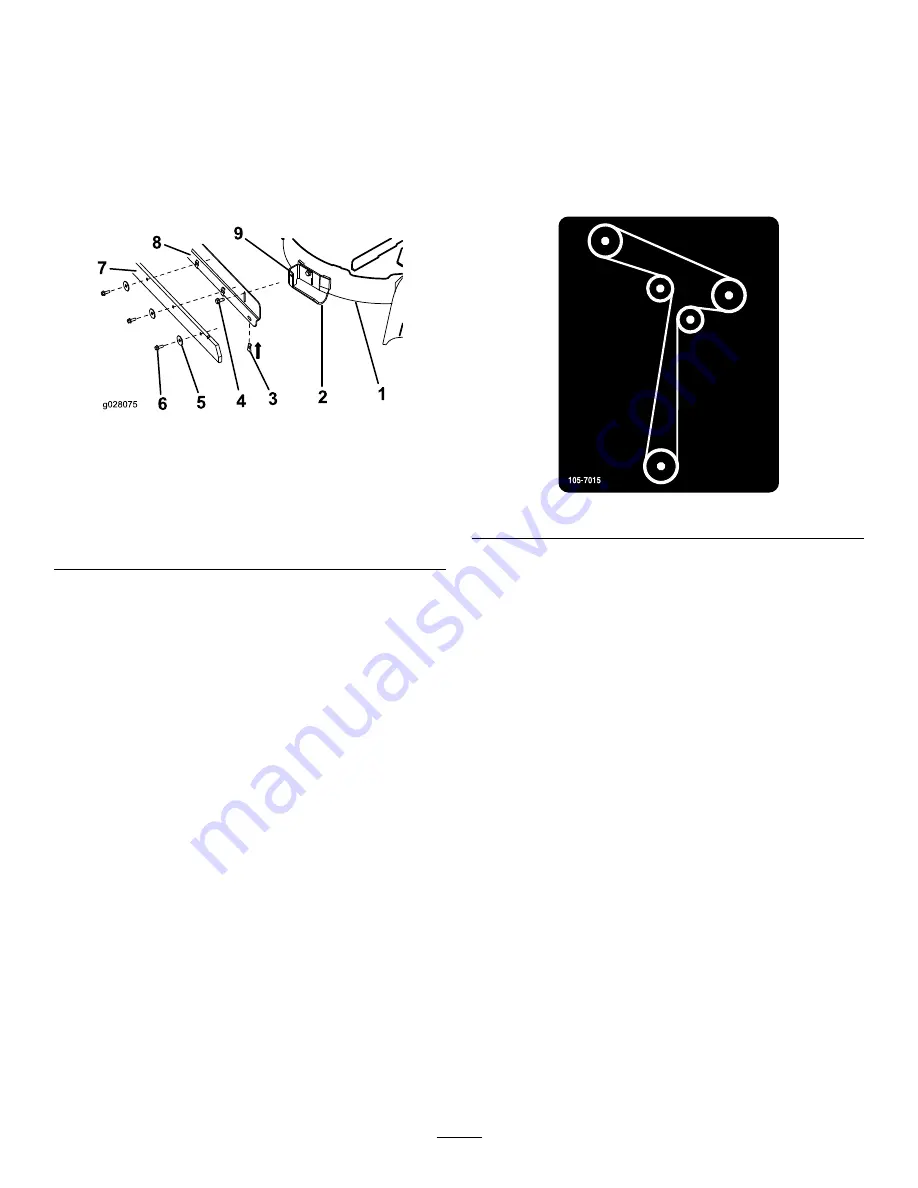
Align the clip nut so that the flat leg of the clip nut
faces away from the mower deck (

Figure 2

).

Note:

Position the 4 clip nuts over the wiper flange

of the striping bracket. Align the clip nuts holes with
the bracket holes.

Figure 2

1.

Mower deck installation

6.

Hex-head screw

2.

Skid

7.

Wiper

3.

Clip nut

8.

Striping bracket

4.

Washer-head screw
(self-threading)

9.

Mounting bracket

5.

Washer

2.

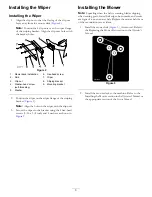
Position the wiper on the wiper flange of the striping
bracket (

Figure 2

).

Note:

Align the holes in the wiper with the clip nuts.

3.

Secure the wiper to the bracket using the 4 hex-head
screws (5/16 x 3/4 inch) and 4 washers as shown in

Figure 2

.

Installing the Mower

Note:

Squealing when the belt is rotating, blades slipping

when cutting grass, frayed belt edges, burn marks, and cracks
are signs of a worn mower belt. Replace the mower belt if any
of these conditions are evident.

1.

Install the mower belt (

Figure 3

), if removed. Refer to

the Replacing the Mower Belt section in the

Operator's

Manual.

Figure 3

2.

Install the mower deck to the machine. Refer to the
Installing the Mower section in the

Operator's Manual

or

the appropriate section of the

Service Manual

3


Summary of Contents for 131-4167

Page 1: ... Washer 4 Clip nut 4 Wiper 1 Installing the striping kit wiper Removing the Mower Deck 1 Park the machine on a level surface and disengage the blade control switch 2 Engage the parking brake stop the engine remove the key and wait for all moving parts to stop before leaving the operating position 3 Remove the mower deck from the machine Refer to the Removing the Mower section in the Operator s Man...

Page 2: ...d at the center punched location 6 Position the longer leg of the mounting bracket against the skid Note Align the mounting bracket hole with the hole drilled in the skid 7 Firmly attach the bracket using a washer head screw self threading 8 Locate the left skid on the rear facing side of the mower deck as shown in Figure 1 9 Repeat steps 2 through 6 for the left skid 10 Ensure that the slots in t...

Page 3: ...t Figure 2 Note Align the holes in the wiper with the clip nuts 3 Secure the wiper to the bracket using the 4 hex head screws 5 16 x 3 4 inch and 4 washers as shown in Figure 2 Installing the Mower Note Squealing when the belt is rotating blades slipping when cutting grass frayed belt edges burn marks and cracks are signs of a worn mower belt Replace the mower belt if any of these conditions are e...

Page 4: ...crease the striping effect by lowering the striping bracket until you attain the desired striping effect Figure 4 Decrease the striping effect by raising the striping bracket until you attain the desired striping effect Figure 4 5 Ensure that the striping bracket is adjusted level to the ground 6 Tighten the 2 washer head screws self threading that secure the striping bracket Figure 4 Figure 4 Str...

Page 5: ...ht line is aligned with the property edge Properties with rolling hillsides or ponds can look best with a flowing curves striping pattern A distinctive feature like a small pond can be highlighted and enhanced by a radial pattern or by a ring pattern Training the Lawn for Striping On a new property during weeks 1 and 2 you may need to follow the exact same pattern and direction in the same wheel t...

Page 6: ...Notes 6 ...

Page 7: ...Notes 7 ...

Page 8: ...Notes 8 ...

Reviews: