Maintenance
Note:
Determine the left and right sides of the machine
from the normal operating position.
Servicing the Bedbar
Removing the Bedbar
1.
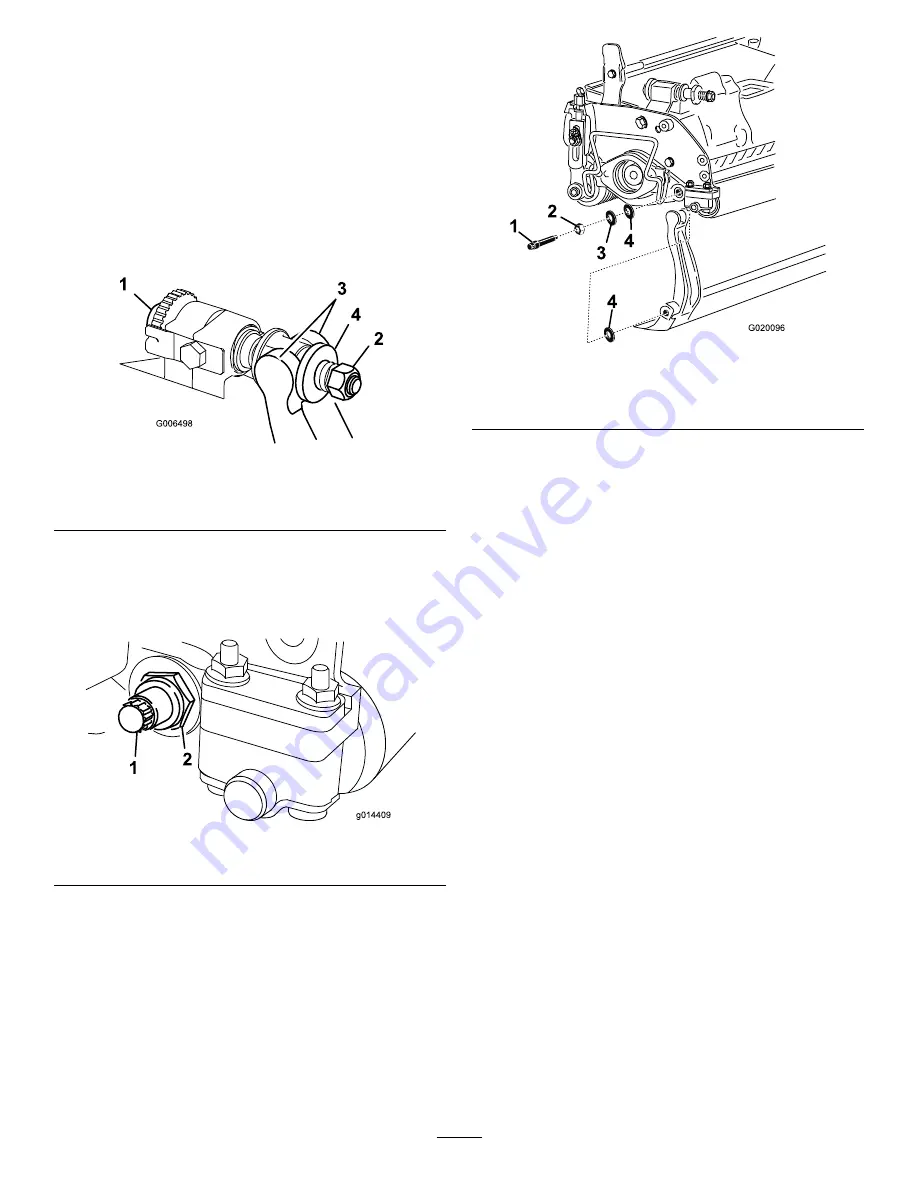
Turn the bedbar adjuster screw counterclockwise, to
back the bedknife away from the reel (Figure 13).
Figure 13
1.
Bedbar adjusting screw
3.
Bedbar
2.
Spring tension nut
4.
Washer
2.
Back out the spring tension nut, until the washer is no
longer tensioned against the bedbar (Figure 13).
3.
On each side of the machine, loosen the locknut
securing the bedbar bolt (Figure 14).
Figure 14
1.
Bedbar bolt
2.
Locknut
4.
Remove each bedbar bolt allowing the bedbar to be
pulled downward and removed from the machine
bolt (Figure 14). Account for the two nylon and one
stamped steel washers on each end of the bedbar
(Figure 15).
1
G020096
Figure 15
1.
Bedbar bolt
3.
Steel washer
2.
Locknut
4.
Nylon washer
Assembling the Bedbar
1.
Install the bedbar, positioning the mounting ears
between the washer and bedbar adjuster.
2.
Secure the bedbar to each side plate with 2 bedbar
bolts, locknuts (nuts on bolts), and 6 washers. Position
a nylon washer on each side of the side plate boss.
Place a steel washer outside of the outer nylon washer
(Figure 15).
3.
Torque the bedbar bolts to 27-36 N-m (240-320
inch-lb).
4.
Tighten the locknuts equally on each side until you
cannot rotate the steel washers by hand().
5.
Loosen the locknuts just until you can rotate the steel
washers by hand and yet there is no end play in the
bedbar.
Important:
If you over tighten the locknuts, you
may deflect the side plates which could interfere
with the bedknife to reel contact.
Note:
The washers on the inside may have a gap.
6.
Tighten the spring tension nut until the spring is
collapsed, then back it off 1/2 turn (Figure 16).
10


