PEGASUS
www.topromobility.com
10
EN
EN
Correct usage of the TOPRO PEGASUS
The user manual of the TOPRO PEGASUS lists the following directions for the correct usage of the device in question.
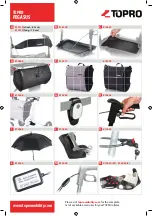
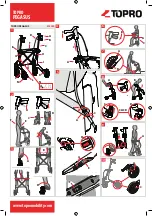
Supporting figures illustrate modes of action, “FIG.
“
Assembling / Adjusting
TOPRO PEGASUS is delivered assembled. Before use, the rollator must be unfolded. The height of the handlebar tubes
will then need adjusting to suit the user’s needs. Please read the following paragraphs carefully.
Unfolding / Folding FIG.
3
Unfolding: Release the lock clamp positioned at the seat bars A. Press the seat bars downwards and outwards B.
Be aware of trapping your fingers. The side frames will slide apart. Press down the seat bars. You will hear a clicking
sound. The rollator is now locked in its open position.
Folding: Pull the strap on the seat C and press the side frames together. Lock the clamp D over the seat bars.
Lowering and height adjusting of the handles FIG.
4
Lowering: Unscrew the lock wheel A (approx. 2 turns). Push the handlebar tubes down until they stop B. Tighten the
lock wheel A again.
Height adjusting: Unscrew the lock wheel A (approx. 2 turns). Adjust the handlebar tubes to a suitable height, then
pull them slightly up and down C until you hear a clicking sound. Tighten the lock wheel A again. Adjust both handle-
bars to the same height. Note the numbers on the handlebars. The maximum height is marked with a Max sign on the
handlebars. The lowest possible position of the handlebars (where the markings are not visible) is not a user height (it
is for transportation only).
It is recommended that the handlebars are set to the same height as your wrists when your arms are positioned
alongside your body whilst standing upright.
TOPRO Ergo Grip
TOPRO Ergo Grip offers ergonomical grip and support surfaces.
It combines an original hand grip position with a hand grip at the front of the handle. This gives you a better gripping
position when getting up from a chair or couch. Always make sure that the parking brake is locked in when you do
this. The new hand grip also offers extra support while standing. Several support options make it easy to vary your
position when standing, thereby increasing your comfort and safety.
When pushing the rollator, your hands should always be kept in the original grip position in order to make the best
possible use of the brakes.
Adjusting / checking / maintaining the brakes FIG.
5
Adjusting / checking: Loosen the nut A on the brake cable. Tighten the top adjusting screw B while holding the bot-
tom adjusting screw in position C. Adjust both brake blocks so the distance to the wheel surface is approximately 1
mm D and then tighten the nut A. Make sure the brakes are not adjusted too tightly and therefore pressing hard into
the rubber of the wheels when the parking brake is on.
Maintaining: If necessary, clean the brake block F and the opening of the brake cover E. The wheels and brakes can
be replaced if they are worn or damaged.
According to section
Inspection // Maintenance // Re-use
screws should be controlled on a regular basis. Remove the
wheels as described in section
Disconnect / connect the wheels.
Control/tighten the screws G and attach the wheels.
Using the brakes FIG.
2
Make sure the brakes work before each trip. Each brake handle A works on each of the rear wheels. Wrong use
can cause unsafe situations and damage to the rollator: The rollator must not be driven or pushed with force
when the parking brakes are on or when the wheels are partly locked using the brakes. This indicates incorrect
use and can cause wear and tear, impairing the quality of both tyres and brakes.
Parking brakes: Push both brake handles B down until they lock. Both rear wheels are now locked. Squeeze
both brake handles upwards to release the parking brakes.
Driving brakes: Pull both brake handles A upwards to reduce speed. Do not use continuously while the rollator
is in motion.


