background image

7.2 File archive 35

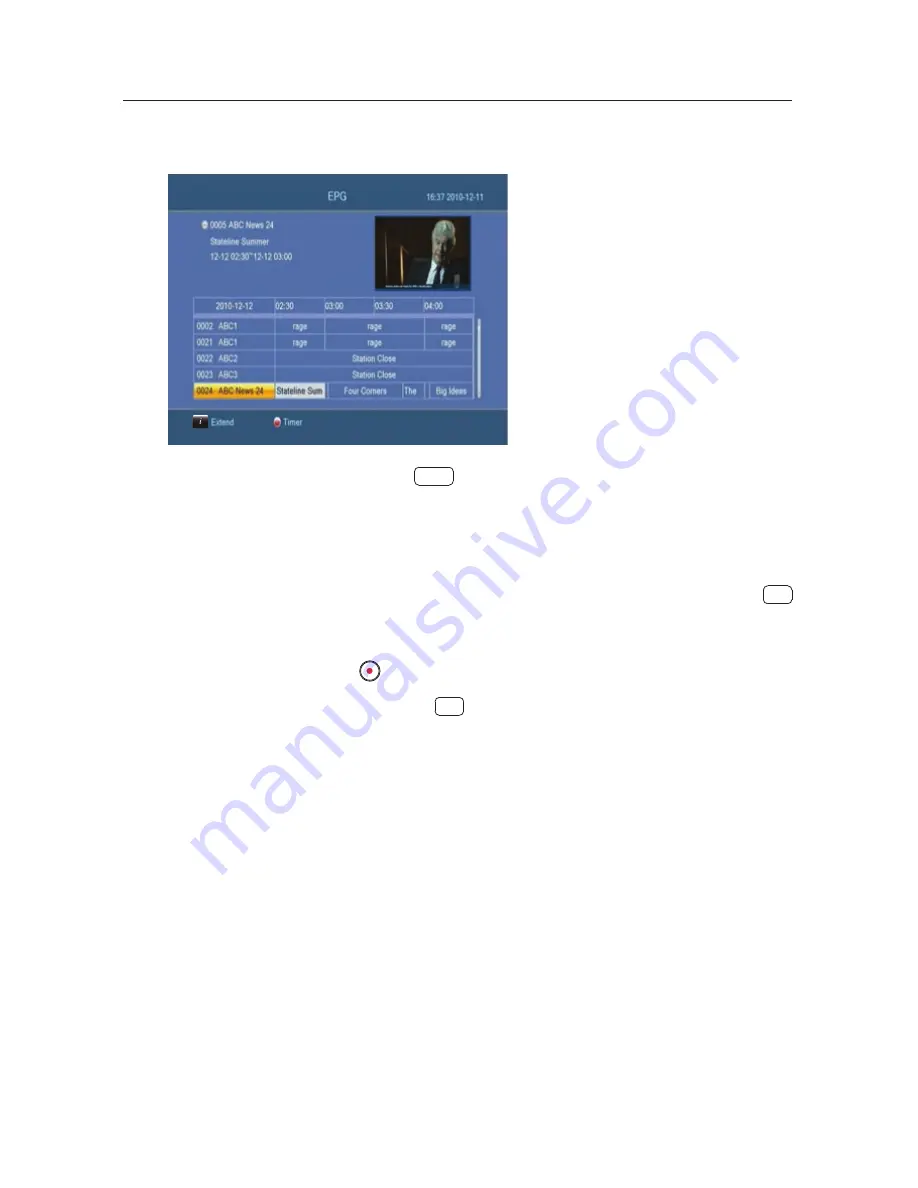
7.1.3 Scheduling recordings using the programme guide

If the electronic programme
guide is properly provided,
you can make timer events on
it. The instructions on how to
make timer recordings using the
electronic programme guide are
as follows:

1. Press the

EPG

button to display the electronic pro-

gramme guide.

2. Select a programme you want to record with the naviga-

tion buttons.

3. To make a timer event without recording, press the

OK

button; the letter

P

is displayed. To make a timer event

with recording, press it once more or alternatively press
the

button, then the letter

R

is displayed.

4. Pressing the

OK

button once more will cancel the timer.

7.2 File archive

When a programme is recorded, it is stored as a file on the hard
drive of the digital receiver. You can select a recording to play
back from the recorded programme list.

Summary of Contents for TBF-200HD

Page 1: ...TBF 200HD User Manual High Digital Terrestrial Receiver USB PVR Ready Default PIN 2010...

Page 2: ...rpose If the provided plug does not t into your outlet consult an electrician for replacement of the obsolete outlet This product is designed for indoor use only Place the digital receiver on a rm and...

Page 3: ...model TBF 200HD Illustrations pictured in this manual may not be exactly the same as the actual product The screenshots used in this manual may not be exactly the same as those you see on the actual o...

Page 4: ...utions 7 2 3 Rear panel connections 9 2 4 Connecting up your digital receiver 10 2 4 1 Connecting to the antenna 10 2 4 2 Connecting to your television set 11 2 5 Switching on for the rst time 12 3 Se...

Page 5: ...cting audio tracks 25 5 2 4 Selecting subtitle tracks 25 5 3 Viewing electronic programme guide 25 5 4 Using time shift 26 6 Organising Services 28 6 1 Editing the services list 28 7 Recording and Pla...

Page 6: ...vi CONTENTS 7 3 3 To play back recordings in sequence 39 39 40 7 4 Playing back a video 7 5 Formatting the hard disk 8 Firmware Update 41 8 1 From a memory stick 41...

Page 7: ...on join the Topfield forum at http www topfield com au NOTE In general we equate a channel with a frequency However unlike analogue broadcasts digital broadcasts are not all assigned to their own freq...

Page 8: ...gain at a later time Then you can quickly go to any part of the current programme by fast forward or rewind search If you have an external hard drive connected to the dig ital receiver via the USB por...

Page 9: ...gital receiver specific lights and a display switches the digital receiver between standby active mode switch to previous or next service Also navigate in menus and interactive screens light blinks ev...

Page 10: ...rvice and the previously viewed one displays the service information box Also displays more information about a programme not used in this model changes aspect ratio switches over between television s...

Page 11: ...rding stops playback recording or jumps back to live television from time shifted television displays connected devices list selects audio track sound mode or video track of multifeed programme starts...

Page 12: ...ided on the screen NOTE When using the remote control point it at the remote sensor on the front panel of the digital receiver The actual images and the number of buttons may be di er ent depending on...

Page 13: ...e User Manual NOTE Accessories may vary according to your local area 2 2 Safety precautions Please read carefully the following safety precautions The mains voltage must range between 100 and 240 volt...

Page 14: ...alked on or pinched If the cord is damaged do not use the digital receiver and get the cord replaced Refer all servicing to a qualified service technician To maintain proper ventilation always leave s...

Page 15: ...RF LOOP OUT Terrestrial broadcasting signal output socket through the ANT IN socket for another digital receiver 3 USB USB port for firmware update and data transfer 4 HDMI Audio and video output sock...

Page 16: ...WARNING Connect any components before plugging the power cord into the wall outlet Always turn off the product TV and other components before you connect or disconnect any ca bles NOTE If you encounte...

Page 17: ...nd video settings after connect ing up the digital receiver See 4 2 for a detailed description To use the HDMI output If you have a high de nition television set you should use an HDMI cable for best...

Page 18: ...is turned on and on the correct video channel so that you will be able to see the display from the digital receiver Before switching on the digital receiver you should insert bat teries into the remot...

Page 19: ...eries Do not use rechargeable batteries Do not recharge the old batteries In order to avoid any risk of explosion observe the po larities indicated inside the battery compartment Do not subject to exc...

Page 20: ...here is no service stored you will be not able to access all menus A is another name for a 3 1 Searching for broadcasting services To perform service search se lect the Installation Auto Scan menu You...

Page 21: ...d Press the OK button to save the list 3 2 Reset to factory settings The digital receiver maintains the following data Services list Favourite list Timer list Preference settings You can reset all dat...

Page 22: ...ack Select the System Setup Language menu You should see a screen like the left gure 4 1 1 Menu language The digital receiver provides menus in several di erent lan guages Set the Language option to y...

Page 23: ...s appropriately for your television set and other devices Select the System Setup TV System menu You should see a screen like the left gure 4 2 1 Video Resolution The digital receiver supports various...

Page 24: ...on to 16 9 You can enjoy both wide screen programmes and normal screen programmes with your wide screen television as the above figures show If you have a normal screen television set the Aspect Mode...

Page 25: ...will be set as Auto 2 Set the GMT O set option to the time di erence between your time zone and GMT referring to Table 4 1 3 Make sure that your local time is correctly displayed on the Time section...

Page 26: ...GMT 3 30 Tehran GMT 4 00 Abu Dhabi Muscat Baku Tbilisi GMT 4 30 Kabul GMT 5 00 Ekaterinburg Islamabad Karachi Tashkent GMT 5 30 Bombay Calcutta Madras New Delhi GMT 6 00 Almaty Dhaka Colombo GMT 7 00...

Page 27: ...l audiences PG restricts to PG or above rated programmes PG stands for Parental Guidance the content of which is mild M restricts to M or above rated programmes M stands for Mature the content of whic...

Page 28: ...g Menu Lock option to On except the System Setup menu If the Menu Lock option is set to On you have to enter the PIN when accessing all menus except the System Setup menu If you enter a wrong number y...

Page 29: ...on Press it again to restore the sound to previous level 5 2 Watching television To change services press the P or P button Pressing the button switches to the previously viewed service In ad dition y...

Page 30: ...down Entering a service number with the numeric buttons puts the highlight bar on its entry You can switch between the television services list and the ra dio services list by pressing the button 5 2...

Page 31: ...tereo Mono Left or Right 5 2 4 Selecting subtitle tracks Some programmes are provided with subtitle tracks in one or more languages If the current programme provides subtitle tracks the subtitle symbo...

Page 32: ...you are watching a pro gramme and you miss something you can rewind and replay it Or when your attention is needed elsewhere you can pause a live TV and resume a short time later without losing any o...

Page 33: ...yback speed See 7 3 1 for slow mo tion For fast motion see 7 3 2 To check your current position in time shift press the button The time di erence compared to live pro gramme is displayed momentarily i...

Page 34: ...e services list You would have got the services list after service search You can lock skip move or rename service entries on the services list Select the Edit Channel TV Channel List menu There are e...

Page 35: ...appear next to the Fav group After your finish press the EXIT and you will see the mark next to the grouped services Lock You can lock some services to prevent your children from watching them To loc...

Page 36: ...mov ing a service entry To move a service entry select the desired service and select the Move option mark will appear next to the service selected As you move it up or down it gets re ordered accordi...

Page 37: ...uld be formatted in NTFS or FAT le system It is also recommended to use an external power socket to have the external hard drive supplied by its own power 7 1 Recording a programme REC Once a recordin...

Page 38: ...ording continues in the digital receiver To stop recording press the button then a box like the left gure appears which shows the programme currently being recorded Select Yes and press OK button to s...

Page 39: ...cord everyday do not record 2 Select the service type Channel Record 3 Set the 4 Set the Date option to a desired date on which the digital receiver will turn on The date format is day month yearday o...

Page 40: ...ight bar on the entry you want and press OK button then appears a box in which you can change its settings in the same manner as making a new one To delete a timer event put the highlight bar on the e...

Page 41: ...uide 2 Select a programme you want to record with the naviga tion buttons 3 To make a timer event without recording press the OK button the letter P is displayed To make a timer event with recording p...

Page 42: ...the highlight bar on it and press the choice of Yes it will be deleted 7 2 2 To lock a recording To lock a recording so that other persons cannot play or delete it take the following steps 1 Put the h...

Page 43: ...or subtitle track are also recorded together So you can enjoy them while playing back a recording The instructions on how to play a recording are as follows 1 Select the USB Media Player PVR menu or a...

Page 44: ...ercentage with the numeric buttons 7 3 1 To play in slow motion To watch in slow motion during a playback press the but ton If you press it repeatedly the playback speed changes in 4 steps 1 2 1 4 and...

Page 45: ...selected recordings are played in the sequence that they are numbered 5 To jump to the beginning of the next recording in the queue press the button to display the progress bar then press the button 7...

Page 46: ...atting the hard disk You can delete permanently all contents stored in a hard drive by formatting it Select the USB PVR Storage Information By pressing the button you get asked for rmation of Formatti...

Page 47: ...rom the Topfield website http www topfield com au 8 1 From a memory stick If you have a USB memory stick you can update the firmware from it by taking the following steps 1 Download a new firmware fro...

Page 48: ...42 Firmware Update press the OK button and a countdown will be displayed on the front display of the digital receiver 6 When the message of END appears restart the digital receiver...

Page 49: ...rk cover of the main part 2 Carefully remove the old batteries if applicable then insert the new batteries matching the and signs 3 Once the batteries are in put the cover back on making sure the cove...

Page 50: ...emote control should now work with your TV and enter it again from step 3 2 Search TV code by Brand code 2 Find your TV Brand Code from list in manual 3 Press TV button on your remote control 4 Hold d...

Page 51: ...ur 3 According to priority press the number 1 2 3 or 4 For example if the TV CODE is 1530 1 time 5 times 3 times 4 After pressing the 4 key the remote control light fast NOTE In this feature you only...

Page 52: ...FW directly To Disable this function key in 9 9 6 All OFF function You can power ON OFF your TV and STB at same time through the POWER button To Enable or Disable this function 1 Press TV button on yo...

Page 53: ......

Page 54: ......

Page 55: ......

Page 56: ...ther the retailer where they purchased this product or their local government office for details of where and how they can dis pose this product for environmentally safe recycling Business users shoul...

Reviews: