7. APPLICATION FUNCTIONS
7-4
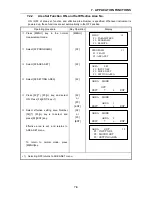
Confirm the sighted point and press
[F4](SET) key. Point A is now set.
Next set point B.
[F4]
AREA
SET
B
[ 1]
V :
110
38' 40"
H :
200
20' 15"
EXIT
SET
Sight the point B with telescope.
AREA
SET
B
[ 1]
V :
140
16' 10"
H :
250
28' 45"
EXIT
SET
SET
OK
[YES]
[NO]
Confirm the sighted point and press
[F4](SET) key.
Press [F3](YES) key.
[F4]
AREA
SET
A
[ 1]
V :
95
45' 10"
H :
140
30' 20"
EXIT
ENT
The area range to be set is diagonal
setting area between Points A and B
(area No.1). To set another area ,
repeat from the step of
.
[F3]
AREA
SET
F1 : INPUT NEZ
F2 : MOVED SET
F3 : SETTING AREA
11
Press [F1](EXIT) key.
Menu returns to AREA SET .
1)
1) Pressing [ESC] key from the AREA SET menu returns you to PROGRAMS menu, and to return to
normal mode, press [MENU] key.
2) Setting by inputting coordinate values
Operating procedure
Key Operation
Display
Press [MENU] key in the normal
measurement mode.
[MENU]
MENU
1/1
F1 : PARAMETERS
F2 : PROGRAMS
F3 : REMOTE
Select [F2:PROGRAMS].
[F2]
PROGRAMS
1/1
F1 : TEACH
F2 : AREA SET
Select [F2:AREA SET].
[F2]
AREA
SET
F1 : INPUT NEZ
F2 : MOVED SET
F3 : SETTING AREA
1/1
Select [F1:IINPUT NEZ].
[F1]
AREA
SET
A
[ 1]
V :
***.***m
H :
***.***m
EXIT
ENT
Summary of Contents for AP-L1A
Page 1: ...INSTRUCTION MANUAL AUTOMATIC TRACKING TOTAL STATION AP L1A AP L1AN...
Page 14: ...1 NOMENCLATURE AND FUNCTIONS 1 3 2 The details of label will be differed by the market...
Page 82: ...11 SETTING ATMOSPHERIC CORRECTION 11 4 Temprerature C Temprerature F...
Page 83: ...11 SETTING ATMOSPHERIC CORRECTION 11 5 Temprerature F...


