background image

23

5x5 m series  

premium

Ins

truc! ons

Select a fl at surface for the tent. Unpack the boxes and check if all listed parts are included.
with a cloth. In colder w

eather condi" ons we suggest to bring the roof to room temperature 

before installing.

Assemble the roof frame by moun" ng parts 7 to 12 on the pipes (parts 1, 2 and 3). 
Use the scr

ews to a# ach the parts.

A# ach the reinforcement braces (parts 4 and 5) using screws (20) and wing nuts (21).

Li$  one side of the tent frame and a# ach the legs (4). Place the roof (28) onto the frame 
and use the bungees (25) to fasten it.
Be sure not to put too much tension on the bungees in order not to make a# aching the 
other side more diffi

  cult.

A# ach the legs on the other side and install the feet (13, 13a and 14) at the bo# om. Make sure, 
that the leg pipes are in v

er"

 cal posi" on, to avoid overten" on on the endwalls. A# ach the side 

covers to the pipes (4) using hooks (27). Complete the bo# om frame with the required pipes 
(2, 3 and 16) and connector (15). Use the long ground pegs (18) to fasten the legs to the ground.

Unfold the side walls (29) and the end walls (30) and a# ach the side walls to the frame using 
the bungees (24). A# ach the end walls directly to the roof using the short bungees (25). 
Use the short ground pegs (19) to fasten the end walls to the ground. The guy rope runs from 
every corner of the tent and is braced using the screw hooks (17).

GB

4

3

2

1

5

Summary of Contents for 5x5 m premium Series

Page 1: ...u auanleitung PVC Zelt GB Assembly instruc on PVC Tent PL Instrukcja monta u PVC Namioty NL Gebruiksaanwijzing PVC Tent FR Mode d emploi Tente PVC CZ Mont ni instrukce PVC Stan ES Manual de instruccio...

Page 2: ...r die Sicherheit des Zeltes Die Ver ankerung muss regelm ig gepr werden um stets die Sicherheit des Zeltes zu gew hrleisten Sch den am Zelt vorzubeugen und Dri e zu sch tzen Eine rich ge Verankerung...

Page 3: ...sammengelegt und verpackt werden Bewahren Sie das Zelt trocken auf Sehen Sie davon ab das Metallgest nge zu ver ndern weder durch das Anbauen und oder Anschwei en ander wei ger Materialien noch durch...

Page 4: ...adverse weather condi ons 2 Always be sure to keep su cient distance to hoses as well as gas and power lines to avoid possible damage Please check the area for power cables and gas lines Ask your loc...

Page 5: ...s must be ghtened manually using a hexagon key or an automa c screw driver set at a max level 2 to avoid material wear Cleaning and storage Please do not use agressive chemicals to clean the tarp mate...

Page 6: ...i od przewod w wodnych gazowych i elektrycznych aby ich nie uszkodzic Prosze dowiedziec sie od lokalnych dostawc w gdzie przebiegaja wszelkie przewody aby nie uszkodzic ich przy montazu namiotu W przy...

Page 7: ...ac sie rysunkowa instrukcja poszczeg lnych krok w montazu Polaczenia srubowe rur z lacznikami nalezy wykonac recznie za pomoca klucza imbusowego lub automatycznej wkretarki ustawionej maks na poziom 2...

Page 8: ...sleidingen zodat deze niet beschadigd raken Verzoek de lokale toeleveranciers om informa e over de loop van de diverse leidingen zodat u jdens het opze en van de tent beschadigingen ervan kunt voorkom...

Page 9: ...opeenvolgende montagestappen Maak de schroefverbindingen van de buizen met de koppelstukken met de hand met behulp van een inbussleutel of met een automa sche schroevendraaier die maximaal op niveau...

Page 10: ...nduites de gaz ou aux lignes lectriques a n d viter de les endommager Veuillez vous renseigner aupr s des fournisseurs locaux o se trouvent tous les conduits a n d viter de les endommager lors du mont...

Page 11: ...les Veuillez suivre les images du sch ma de monatge rela ves aux tapes par culi res Il convient de faire ma nuellement les assemblages par boulons des tuyaux et des joints l aide d une cl allen ou d u...

Page 12: ...dy pros m dodr ujte dostate nou vzd lenost od hadic a veden plynu i elekt iny Abyste po t to str nce p ede li kod m informujte se pros m u m stn ch ad P i pou i vhodn ch topn ch t les pot ebn informa...

Page 13: ...e o n co v ce asu P i ka d m dal m sestavov n bude postup rychlej Princip se staven je jednoduch Dbejte na ich vyobrazen jednotliv ch krok Trubky se spojovac mi prvky pros m se roubujte pomoc inbusov...

Page 14: ...distancia adecuada con tubos y conducciones de gas o electricidad para evitar que se da en Pregunte a las autoridades locales sobre la localizaci n de los cables para no da arlos al montar la carpa 3...

Page 15: ...incipios de montaje son sencillos Siga todos los pasos mostrados en los dibujos de las instrucciones Atornille los tubos con los conectores manualmente con ayuda de una llave Allen o con un atornillad...

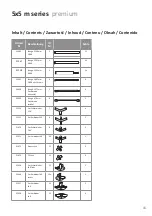
Page 16: ...Stange 1895 mm 38 38 mit L chern 4 6 30058 Stange 1275 mm Dachstrebe horizontal 5 6 30060 Stange 470 mm Dachstrebe ver kal 6 3 31110 3er Eckverbinder 110 7 4 31111 4er Verbinder 110 8 2 31470 3er Eckv...

Page 17: ...44 Schraubhaken 17 4 30046 Erdnagel 6x180 mm 18 6 30047 Erdnagel 4x160 mm 19 30 31106 Schraube 50 mm mit Fl gelmu er 20 90 30384 Schraube 30 mm 21 12 30052 Fl gelmu er 22 12 30382 Inbusschl ssel 23 1...

Page 18: ...Zeltplane vorher auf Zimmertemperatur zu bringen Beim Mon eren achten Sie bi e darauf das die Mu ern immer innen liegen Setzen Sie den Rahmen f r das Dach zusammen indem Sie die Teile 7 bis 12 an die...

Page 19: ...19 2 Befes gen Sie die Verst rkungsstreben Teile 5 und 6 mit Schrauben 21 und Fl gelmu ern 22 5x5 m series premium 6 5 5 2 2 2 12 11 8 7 8 10 1 2 2 2 2 2 2 2 3 3 3 3 3 3 3 3 3 3 5 5 6 6 1 1 1 1 7...

Page 20: ...4 ein Setzen Sie das Dach 28 auf den Rahmen und befes gen Sie es mit den Gummischlaufen 25 Achten Sie darauf nicht zu viel Spannung auf die Gummischlaufen zu geben um das Anbringen der anderen Seite n...

Page 21: ...uf um zu hohe Spannung auf den Giebelw nden zu vermeiden Die Dachschals werden mit Haken 27 an den Stangen 4 befes gt Anschlie end vervollst ndigen Sie den Bodenrahmen mit den entsprechenden Stangen 2...

Page 22: ...die Seitenw nde mit den Gummischlaufen 24 am Ger st und die Endw nde mit den kurzen Gummischlaufen 25 direkt am Dach Mit den kurzen Erdn geln 19 befes gen Sie die Endw nde am Boden Die Spannleine l u...

Page 23: ...nsion on the bungees in order not to make a aching the other side more di cult A ach the legs on the other side and install the feet 13 13a and 14 at the bo om Make sure that the leg pipes are in ver...

Page 24: ...by p telki nie by y za bardzo napr one poniewa mog oby to utrudni monta drugiej strony namiotu Po przeciwnej stronie namiotu zamontuj nogi a na ich dolnym ko cu zamontuj stopki 13 13a i 14 Nogi namiot...

Page 25: ...er op de rubberen lussen niet te strak te spannen om het aanbrengen van de andere zijde niet te bemoeilijken Steek de benen aan de tegenoverliggende zijde in en monteer de voeten aan het onderste uite...

Page 26: ...vitez de tendre exag r ment les boucles en caoutchouc a n de ne pas rendre le montage de l autre c t plus di cile Emmanchez les montants du c t oppos et montez les pieds 13 13a et 14 leur extr mit s...

Page 27: ...pevn te ji pry ov mi smy kami 25 Dejte pozor abyste pry ov smy ky nenapnuli p li a nez ili si tak instalaci druh strany Nasa te nohy na pro lehlou stranu a na spodn konec namontujte patky 13 13a a 14...

Page 28: ...echo 28 sobre el armaz n y suj telo con los pasadores de goma 25 Procure que los pasadores de goma no queden muy rantes para no di cultar la colocaci n de la otra parte Coloque las patas de la parte c...

Reviews: