
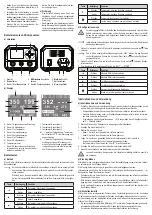

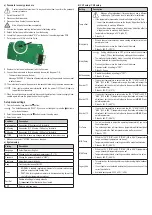

Operating elements
a) Soldering Station
1
3
4
5
6
7
8
2
1 Display
2 Button controls
3 Channel 1: Tool socket
4
ESD-Safe
socket
5 Channel 2: Tool socket
6
Power
switch
7 Power socket
8 Fuse holder
b) Display
A
B
C
D
E
G
H
I
J
K
L
F
M
N
A Channel 1: Tool indicated
B Channel 1: Target temperature
C Channel 1: Actual temperature
D Channel 1: Power load indicator
E Channel 2: Power load indicator
F Channel 2: Actual temperature
G Channel 2: Target temperature
H
Unit of temperature measurement
I Channel 2: Tool indicated
(highlight indicates the channel is active)
J Temperature shortcut 1
K Temperature shortcut 2
L Temperature shortcut 3
M "---" indicates: Tip temp. <50 ºC or tool not
connected
N "---" indicates: Tool not connected, tool not
recognized, legacy tool connected (need
to switch legacy support on), or damaged
tool.
Button controls
a) Active mode
Switch the power ON, the station will enter into active mode on startup.
If the station is in standby mode, press any button or move a handle to return to
active mode.
Select a channel by long pressing ◄ or ►. The selected channel will be highlighted
on the display.
Button
Press
Function
◄
Short
Select temperature shortcut 1.
Long
Select channel 1.
►
Short
Select temperature shortcut 3.
Long
Select channel 2.
▲
Short
Increase the temperature in single increments.
Long
Increase the temperature in multiple increments.
▼
Short
Decrease the temperature in single increments.
Long
Decrease the temperature in multiple increments.
Short
Select temperature shortcut 2.
Long
Exit "active mode" and enter "setup menu".
b) Setup menu
Risk of burns! When entering the setup menu heating will be paused but the solder-
ing iron tip and barrel will still be hot! Always place irons in the holder when not used.
Refer to section "Setup menu settings" for details about each setting.
1. From active mode, long press the button.
The default password is "0000". If you have not changed it, press the button to
enter the setup menu.
2. Enter the password then press the button to enter the setup menu.
3.
To save any changes: Select "EXIT" → "STORE"
Button
Press
Function
◄
Short
Select next digit to the left.
►
Short
Select next digit to the right.
▲
Short
Move up in the menu.
▼
Short
Move down in the menu.
Short
Accept selected item (enter).
Long
Exit menu without saving.
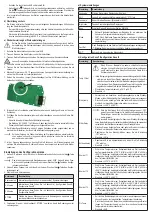
Operation
a) General use
1. Connect a soldering iron handle to an available tool socket, then secure the connection by
tightening the screw on the plug.
-
Supported handles will automatically be detected after switching the power ON.
- Legacy handles should be set up through the setup menu. See section:
"Setup menu settings
→ b) CH1 setup / CH2 setup → Legacy Hnd."
2. Connect the power plug to a mains power outlet.
3.
Switch the power ON.
4. Select a channel.
-
Channel 1: Press and hold ◄ to select.
-
Channel 2: Press and hold ► to select.
5. For the selected channel, set a working temperature by:
- Pressing a temperature shortcut button.
-
Pressing ▲or ▼to manually adjust.
6.
Turn the power OFF when finished.
7. Disconnect the power plug from the power outlet.
Allow all parts to cool down completely before storing away.
b) Standby mode
The station enters standby mode if it does not detect any input for a preset time interval.
Standby settings can be set for each channel.
See section: "Setup menu settings
→ b) CH1 setup / CH2 setup".
• A short beep will sound and the temperature on the active channel will blink.
• The channel will return to active mode if the station detects handle or button activity.
• The station will not enter standby mode if a legacy tool is connected to the station.
c) Auto shutdown
The station will exit standby mode and enter shutdown mode if no activity of the handle or but-
tons are detected for the set interval.
When shut down, heating will stop, and the station stops monitoring channel activity.
•
A long beep will sound and the temperature on the active channel will show "OFF".
• Return to active mode one in of two ways:
-
Switching the power OFF then ON again.
- Long press the button to enter setup menu, then long press the button to exit set
up. The previously selected channel will start heating again.
• The station will not auto shutdown if a legacy tool is connected to the station.
d) Temperature protection
• The station will enter protection mode 90 seconds if one of the following errors is detected:
- If there is a temperature measurement or heating circuit malfunction, the affected channel
will be forced to shutdown.
- If both channels are used at high power, and the internal housing temperature reaches
>65 ºC, channel 2 will be forced to shutdown.


