background image

11

Step 5.

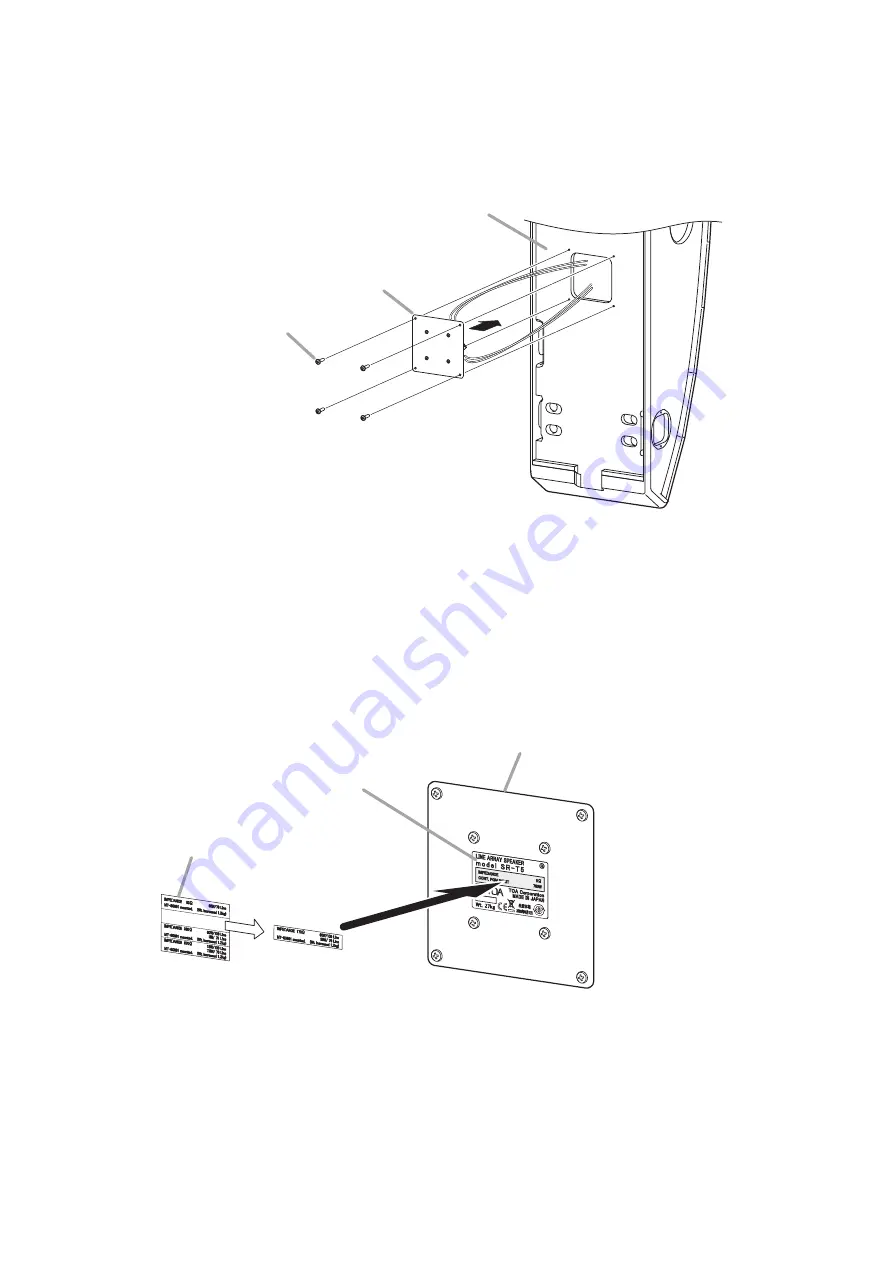
Replace the blank panel with the matching transformer fixed in the speaker. 

Note 

When replacing the blank panel, take care not to pinch the lead wire.

Step 6.

Attach the supplied impedance indication label to the given place in the speaker nameplate. 

Select the indication label corresponding to the impedance set in step 3 from 4 different labels. 

Speaker

Blank panel

Machine screw M4 x 25

Blank panel replaced to the speaker

Nameplate of the speaker

Impedance indication label sheet 
(supplied with the MT-S0601)

Note

The above figure shows an example for attaching the indication label of 170 Ω. 

Summary of Contents for SR-PB5

Page 1: ...TIONS LINE ARRAY SPEAKER WALL PAN BRACKET optional SR T5 SR PB5 Thank you for purchasing TOA s Line Array Speaker Please carefully follow the instructions in this manual to ensure long trouble free use of your equipment ...

Page 2: ... TO HIGH IMPEDANCE 9 8 BEFORE INSTALLING THE SPEAKER 8 1 Anchor Bolt Mounting Dimensions 12 8 2 Speaker Cable Outlet Position When Installing the SR T5 Flat against Wall 12 9 MOUNTING TO THE WALL 9 1 When Installing the SR T5 Using the Supplied Mounting Bracket Only Downward angle adjustable 9 1 1 Coverage area 13 9 1 2 Rough installation plan 14 9 1 3 Installation procedure 14 9 2 When Installing...

Page 3: ...and bolt securely Ensure that the bracket has no loose joints after installation to prevent accidents that could result in personal injury Use the specified mounting bracket and matching transformer in combination Doing otherwise may cause the unit to fall off or generate heat resulting in personal injury or fire Do not mount the unit in locations exposed to constant vibration The mounting bracket...

Page 4: ...orting Doing so may cause the connected speakers to heat resulting in a fire Do not stand or sit on nor hang down from the unit as this may cause it to fall down or drop resulting in personal injury and or property damage Have the unit checked periodically by the shop from where it was purchased Failure to do so may result in corrosion or damage to the unit or its mounting bracket that could cause...

Page 5: ...peaker is not subject to the influence of rear wall or ceiling allowing clear audio output even in spaces with poor acoustic conditions due to long reverberation Sturdy impact resistant construction allows the speaker to be used without requiring additional protector grilles even in gymnasiums Internal two way passive crossover network circuitry adaptable to single amplifier operation Supplied mou...

Page 6: ...over Mounting Bracket A joint section Safety wire mounting bolts Use either of 2 bolts Refer to p 12 Blank panel The optional MT S0601 Matching Transformer can be installed inside Input terminal 2 6 0 1 145 5 71 Unit mm inches 273 2 10 76 213 8 39 173 6 81 4 ø10 0 39 4 ø12 0 47 50 1 97 80 3 15 For anchor bolt Refer to p 12 and p 15 Use this hole to joint the optional SR PB5 Wall Pan Bracket Refer ...

Page 7: ...ed with the SR T5 Refer to p 18 2 6 0 1 Input terminal Interlocked connectors for the matching transformer Network pc board About the input over voltage protection circuitry The speaker system has a built in input over voltage protection circuitry for the tweeters If an excessive input signal is applied to the speaker the protection circuitry works to cut off the signal input to the tweeters A sud...

Page 8: ...in the speaker s rear panel then lead it out from the side panel Pull out the cable slightly longer than needed from under the input terminal for ease of wiring Step 2 Connect the speaker cable to the input terminal Pull the speaker cable from the speaker s rear side to take up the slack Note Pay attention to the correct polarity at the time of connection Step 3 Attach the supplied side cover Inpu...

Page 9: ...ibly pull it since the interlocked connectors used to connect the matching transformer is tied to the blank panel s back side Speaker rear panel Blank panel Machine screw M4 x 25 Step 1 Mount the optional MT S0601 Matching Transformer to the back side of the blank panel with the machine screws and nuts attached to the blank panel Note Use 2 screw holes located diagonally opposite This screw and an...

Page 10: ... to an 83 Ω tap when using the speaker on high impedance 100 V line Otherwise heat builds up in the matching transformer possibly causing a fire CAUTION Note Make wiring to the tap before installing the transformer into the speaker Note that the tap cannot be changed from the outside once the transformer has been installed The following table shows usable impedance Connector primary Red White MT S...

Page 11: ...ication label to the given place in the speaker nameplate Select the indication label corresponding to the impedance set in step 3 from 4 different labels Speaker Blank panel Machine screw M4 x 25 Blank panel replaced to the speaker Nameplate of the speaker Impedance indication label sheet supplied with the MT S0601 Note The above figure shows an example for attaching the indication label of 170 Ω...

Page 12: ...viewed toward the stage Mount B M10 Bracket Anchor Bolt Be sure that the following bolt lengths project from the wall surface Mount the supplied mounting bracket A or optional Pan Bracket A Mount the supplied mounting bracket B or optional Pan Bracket A Unit mm inches 213 2 8 39 0 08 50 2 1 97 0 08 300 5 11 81 0 2 50 2 1 97 0 08 850 3 33 46 0 12 A B In the case of a single nut In the case of a dou...

Page 13: ...itting person The figures below show the coverage area for a 4 kHz frequency 9 1 1 Coverage area 0 1 2 3 30 m 98 43 ft 1 8 m 5 91 ft 3 m 9 84 ft 30 m 98 43 ft 3 5 m 11 48 ft 30 m 98 43 ft 4 m 13 12 ft 30 m 98 43 ft 4 5 m 14 76 ft 1 8 m 5 91 ft 1 8 m 5 91 ft 1 8 m 5 91 ft Height of the speaker s top surface from the floor Speaker s downward angle 4 m 13 12 ft 0 Height of the speaker s top surface f...

Page 14: ...olt mounting position refer to p 12 Anchor Bolt Mounting Dimensions 9 1 2 Rough installation plan Mounting Bracket A accessory Anchor bolt required separately Wall surface Mounting Bracket B accessory Speaker Safety wire accessory Anchor bolts driven into a wall and their suited nuts are not included Use bolts and nuts that are appropriate for the wall s material and construction Failure to do so ...

Page 15: ...e notch points upward Step 3 Attach the supplied safety wire to the speaker Remove the safety wire mounting bolt on the speaker s rear panel then secure the safety wire to the speaker using the removed bolt Note Attach the safety wire on the side facing the safety wire anchor bolt installed in Step 1 Safety wire mounting bolt Safety wire accessory Speaker rear Remove the hole plug on the speaker s...

Page 16: ...ther side Step 5 Mount the speaker to the mounting brackets Mount the speaker in the way that the Mounting Brackets A and B secured to the wall are inserted into the slits in the speaker s rear panel About 5 7 mm 0 2 0 28 Fix the hex bolt loosely leaving about 5 7 mm 0 2 0 28 protruding Hex bolt M8 x 40 accessory Loosely fitted hex bolt Mounting Bracket A Mounting Bracket A Mounting Bracket B Note...

Page 17: ... are securely tightened Hex bolt M10 x 40 accessory Hex bolt M8 x 40 Bolt loosely screwed in Step 4 Hex bolt M10 x 40 accessory 8 1 8 2 Downward angle 0 Downward angle 3 Downward angle 1 Downward angle 2 8 3 About downward angle settings Angle adjustment holes are provided in both sides of the Mounting Bracket A as shown in the figure below Set the speaker s downward angle using the desired hole S...

Page 18: ...ied with the SR PB5 Pan Bracket B supplied with the SR PB5 Anchor bolt required separately Wall surface Speaker Safety wire accessory 9 2 2 Installation procedure The example here shows the procedure to install the speaker on the left side wall as viewed toward the stage Step 1 Install the anchor bolts for the brackets and safety wire into the wall Use the M10 anchor bolts Note For the anchor bolt...

Page 19: ... bracket anchor bolt required separately M10 safety wire anchor bolt required separately 1 2 Step 3 Attach 2 SR PB5 s Pan brackets B to the Mounting Brackets A and B supplied with the SR T5 Note When installing the speaker on the right side wall as viewed toward the stage position each Pan Bracket B upside down Pan Bracket B supplied with the SR PB5 Pan Bracket B supplied with the SR PB5 Mounting ...

Page 20: ... M8 x 25 supplied with the SR PB5 The mounting position of this bolt determines the horizontal angle Horizontal angle adjustment Wall 5 Wall 10 Pan Bracket A Pan Bracket A Speaker s horizontal angle can be adjusted to 5 or 10 left or right The diagrams below are viewed from upper side Notes Step 5 Attach the supplied safety wire to the speaker Remove the safety wire mounting bolt on the speaker s ...

Page 21: ...Bracket A Note In this event check to be sure that the loosely fitted bolts are inserted fully into the notches in the Mounting Bracket until they will not go any further Mounting Bracket A Mounting Bracket B Mount the speaker in the way that the Mounting Bracket is inserted into the slits in the speaker s rear panel Remove the hole plug on the speaker s top then install the supplied eye bolt inst...

Page 22: ...A and B Note Check that all bolts are securely tightened Hex bolt M10 x 40 accessory 10 1 Hex bolt M10 x 40 accessory Hex bolt M8 x 40 Bolt loosely screwed in Step 4 10 3 10 2 Downward angle 0 Downward angle 3 Downward angle 1 Downward angle 2 About downward angle settings Angle adjustment holes are provided in both sides of the Mounting Bracket A as shown in the figure below Set the speaker s dow...

Page 23: ... for attaching the covers to the upper side Mounting Bracket A side Follow the same procedure to attach other side covers Step 11 Attach the supplied side covers Attach the supplied side covers to the upper side Mounting Bracket A side the lower side Mounting Bracket B side and the input terminal section 5 points ...

Page 24: ...crylic paint 310 w x 1239 h x 341 d mm 12 2 x 48 78 x 13 43 29 kg 63 93 lb including accessories Wall Pan Bracket SR PB5 to be used with SR T5 s accessory bracket Matching Transformer MT S0601 Enclosure Power Handling Capacity Rated Impedance Sensitivity Frequency Response Crossover Frequency Directivity Angle Speaker Component Recommended Installation Height Angle Adjustment Range Input Terminal ...

Reviews: