background image

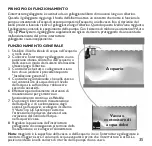
WERKINGSPRINCIPE

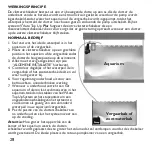
De vlotterschakelaar bestaat uit een vrij bewegende vlotte op een as. Als de vlotter de
onderkant van de as bereikt, wordt een stroomcircuit gesloten waardoor de pomp wordt
ingeschakeld, zodat water het aquarium of de vergaarbak wordt ingepompt, totdat het
waterpeil is hersteld, de vlotter naar boven gaat en zodoende de pomp uitschakelt. Bij het
systeem V

2

Auto Top Up 

Plus

fungeert de extra vlotterschakelaar als een

reservevlotterschakelaar, die ervoor zorgt dat er geen storing optreedt wanneer een vlotter
op de eerste vlotterschakelaar blijft steken. 

NORMAAL BEDRIJF

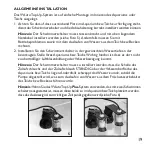
1.  Stel vast wat het ideale waterpeil is in het

aquarium of de vergaarbak.

2. Plaats de vlotterschakelaar op een geschikte

positie in het aquarium of de vergaarbak zodat
de vlotter de hoogste positie op de as inneemt.

3. Alles moet stevig aangesloten zijn (zie

“ALGEMENE INSTALLATIE” hierboven).

4. Controleer dagelijks of het waterpeil de in

vergaarbak of het zoetwaterbak dealt en vul
waar nodig water bij. 

6. Voer regelmatig onderhoud uit voor een

betrouwbare, ononderbroken werking.

7. Wanneer u onderhoud verricht aan het

aquarium of dieren laat acclimatiseren in het
aquarium, trek dan de stekker van het V

2

Auto

Top Up System uit het stopcontact om een
ongewenste inschakeling van het systeem te
voorkomen als gevolg van een veranderd
waterpeil in uw aquarium/vergaarbak.

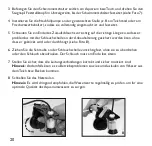
8. Pas de positie van de vlotterschakelaar aan

na onderhoud en sluit het systeem weer aan
op de voeding.

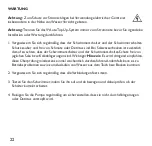
Attentie: 

Hoe groter het oppervlak van de

kamer of het aquarium waarin de vlotter-
schakelaar wordt geplaatst, des te groter het volume dat zal verdampen voordat de schakelaar
wordt geactiveerd. De ideale plaats is de retour-pompkamer van een vergaarbak.

28

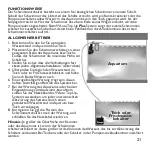
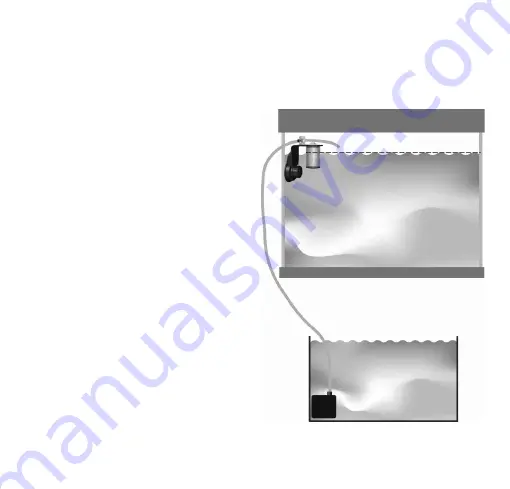
Aquarium

Vergaarbak of

zoetwaterbak

Pomp

Summary of Contents for V2 Auto Top Up Compact

Page 1: ......

Page 2: ...6 9 7 ENGLISH 3 FRAN AIS 10 DEUTSCH 17 NEDERLANDS 24 ITALIANO 31 ESPA OL 38 PORTUGU S 45 1 2 3a 4 5 11 10 8 Standard System...

Page 3: ...der code 9509 Support de fixation avec ventouse de verrouillage code 3a 9508 code 3b 9509 Anbauhalterung mit feststellbarem Saugnapf Bestellnummer 3a 9508 3b 9509 Ophangbeugel met zuignap voor bevesti...

Page 4: ...exible top up hosing 2m order code 9518 Tuyau flexible de remplissage 2 m code 9518 Zulaufschlauch 2 m Bestellnummer 9518 Flexibele bijvulslang 2 m bestelnr 9518 Tubo flessibile di rabbocco 2m codice...

Page 5: ...ys be installed in an upright position with the power cable pointing upwards Failure to do so will result in operating problems and water overflowing from your sump or aquarium Pump rating 220 240V 50...

Page 6: ...te an advanced professional set up PARTS REQUIRED FOR INSTALLATION AND OPERATION 1 Residual current device RCD with a rated residual operating current not exceeding 30mA ASSEMBLY TheV2 Auto Top Up Sys...

Page 7: ...er depth in your preferred location in your aquarium or sump ensuring that it is in a position where it will not be subject to excessive air bubbles or vigorous water movement Please Note The float sw...

Page 8: ...fully secured in the hosing securing clamp on the mounting bracket without any kinks or sagging see photo 8 6 Making sure not to over tighten or restrict the hosing in any way carefully tighten the sc...

Page 9: ...quarium or sump so that the float is at its maximum height on the shaft 3 Ensure all connections are secure see General Installation above 4 Check on a daily basis to ensure the sump or freshwater con...

Page 10: ...r detritus If using in a marine saltwater tank ensure that the float switch and the float switch guard are also free of any salt and or calcium deposits Please note We highly recommend that this is ch...

Page 11: ...shaft ensuring they are free from deposits and detritus which may build up over time Problem Pump constantly on 1 Possible cause Float in the float switch is stuck Solution Clean float and shaft ensu...

Page 12: ...e d alimentation dirig vers le haut Ne pas le faire se traduira par des probl mes de fonctionnement et par un d bordement de l eau de votre puisard ou de votre aquarium Puissance nominale de la pompe...

Page 13: ...on de pointe PI CES N CESSAIRES L INSTALLATION ET AU FONCTIONNEMENT 1 Disjoncteur diff rentiel r siduel RCD avec un courant de fonctionnement r siduel nominal ne d passant pas 30 mA MONTAGE Le syst me...

Page 14: ...f r dans votre aquarium ou puisard en vous assurant qu il est dans une position o il ne sera pas soumis des bulles d air excessives ou des mouvements d eau importants Remarque L interrupteur flotteur...

Page 15: ...x dans la bride de fixation de tuyau sur le support de montage sans aucun pli ou fl chissement voir photo 8 6 Veillez ne pas trop serrer ou restreindre le tuyau en aucune fa on et bien serrer la vis s...

Page 16: ...uteur maximale sur l arbre 3 Assurez vous que tous les raccordements sont bien serr s voir Installation G n rale ci dessus 4 V rifiez quotidiennement que le puisard ou le r servoir d eau douce ne manq...

Page 17: ...ervoir d eau sal e marine assurez vous que l interrupteur flotteur et la protection d interrupteur flotteur sont aussi exempts de tous d p ts de sel et ou de calcium Remarque Nous recommandons forteme...

Page 18: ...surant qu ils sont exempts de d p ts et de d tritus qui peuvent s accumuler avec le temps Probl me Pompe constamment en marche 1 Cause possible Le flotteur dans l interrupteur flotteur est coinc Solut...

Page 19: ...m ssen Sie mit Betriebsproblemen sowie mit dem Auslaufen von Wasser aus dem Teich bzw Becken rechnen Pumpenleistung 220 bis 240V 50 Hz sofern nicht anders angegeben Betreiben Sie keineVorrichtungen di...

Page 20: ...etrieb auf fortschrittlichem professionellem Niveau erm glicht wird BEN TIGTETEILE F R INSTALLATION UND BETRIEB 1 Fehlerstrom Schutzeinrichtung mit einem Fehler Betriebsnennstromwert von nicht mehr al...

Page 21: ...gew nschten Wassertiefe an der bevorzugten Stelle Ihres Aquariums bzw Teichs Wichtig hierbei ist dass es dort nicht zu berm iger Luftblasenbildung oder Wasserbewegung kommt Hinweis Der Schwimmerschalt...

Page 22: ...mit der Schlauchschelle an der Anbauhalterung gesichert werden kann ohne dass er geknickt wird oder durchh ngt siehe Foto 8 6 Ziehen Sie die Schraube an der Schlauchschelle vorsichtig fest ohne sie zu...

Page 23: ...llen Sie sicher dass alleVerbindungen fest sitzen siehe Allgemeine Installation weiter oben 4 berpr fen Sie t glich den Wasserstand im Teich oder im Frischwasserbeh lter und f llen Sie nach Bedarf Was...

Page 24: ...darauf zu achten dass der Schwimmerschalter und der Schwimmerschalter Schutz frei von jeglichen Salz bzw Kalkablagerungen sind Wichtiger Hinweis Es wird dringend empfohlen diese berpr fung mindestens...

Page 25: ...mmer und den Schaft sodass diese frei von Ablagerungen und Detritus sind die sich mit der Zeit anh ufen Problem Pumpe schaltet nicht ab 1 M gliche Ursache Schwimmer klemmt im Schwimmerschalter L sung...

Page 26: ...it niet het geval is zal dit tot problemen leiden en uw vergaarbak of aquarium overstromen Vermogen pomp 220 240V 50 Hz tenzij anders aangegeven Een apparaat waarvan de kabel of stekker beschadigd is...

Page 27: ...eerd professioneel systeem tot stand brengen BENODIGDE ONDERDELENVOOR INSTALLATIE EN BEDRIJF 1 Aardlekschakelaar met een waarde van maximaal 30 mA als lekstroom MONTAGE Het bijvulsysteemV2 Auto Top Up...

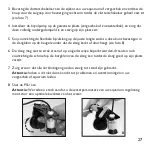
Page 28: ...uarium of vergaarbak en zorg dat deze schakelaar zich op een plaats bevindt waar deze geen last heeft van buitensporig veel luchtbellen of krachtige waterstromen Attentie De vlotterschakelaar moet zod...

Page 29: ...kunt bevestigen in de slangklem op de beugel zonder dat de slang knikt of doorhangt zie foto 8 6 De slang mag niet te strak staan of op enigerlei wijze beperkt worden draai dan ook voorzichtig de sch...

Page 30: ...e positie op de as inneemt 3 Alles moet stevig aangesloten zijn zie ALGEMENE INSTALLATIE hierboven 4 Controleer dagelijks of het waterpeil de in vergaarbak of het zoetwaterbak dealt en vul waar nodig...

Page 31: ...el Als u het systeem in een aquarium met zeewater zout water gebruikt zorg dan ook dat de vlotterschakelaar en de vlotterschakelaarbescherming vrij zijn van zout en of kalkafzettingen Attentie We rade...

Page 32: ...et gehinderd worden door gruis of bezinksel dat zich in de loop der tijd kan ophopen Probleem Pomp is constant in werking 1 Mogelijke oorzaak Vlotter in de vlotterschakelaar zit vast Oplossing Maak de...

Page 33: ...alimentazione rivolto verso l alto Il mancato rispetto di questa indicazione pu causare problemi di funzionamento con conseguente traboccamento di acqua dalla vasca o dall acquario Caratteristiche de...

Page 34: ...professionale PARTI RICHIESTE PER L INSTALLAZIONE E L USO 1 Interruttore differenziale RCD con corrente residua di funzionamento nominale non superiore a 30 mA ASSEMBLY Il sistema di rabbocco automati...

Page 35: ...ggiante nell acquario o nella vasca alla profondit dell acqua e nel punto desiderati verificando che in tale posizione non sia soggetto ad un eccessivo flusso di bolle d aria o a massicci spostamenti...

Page 36: ...l apposito fermaglio alla staffa di supporto senza che presenti gomiti o insellamenti vedere la foto 8 6 Fare attenzione a non serrare eccessivamente o schiacciare il flessibile in alcun modo serrando...

Page 37: ...da risultare alla massima altezza lungo l alberino 3 Controllare che tutti i collegamenti siano ben chiusi vedere il precedente punto Installazione generale 4 Controllare giornalmente che nella vasca...

Page 38: ...residui e detriti Se il dispositivo viene utilizzato in una vasca di acqua marina controllare che sull interruttore galleggiante e la relativa protezione non vi siano depositi di sale e o calcio Nota...

Page 39: ...che su di essi non vi siano tracce di depositi e detriti che potrebbero accumularsi nel corso del tempo Problema la pompa resta sempre in funzione 1 Causa possibile il galleggiante dell interruttore i...

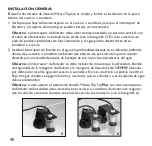
Page 40: ...on el cable de alimentaci n orientado hacia arriba En caso contrario se podr an producir problemas de funcionamiento y el agua podr a desbordarse de su sumidero o acuario Alimentaci n de la bomba 220...

Page 41: ...do PIEZAS NECESARIAS PARA LA INSTALACI NY EL FUNCIONAMIENTO 1 Interruptor diferencial con una corriente de disparo nominal no mayor de 30 mA MONTAJE El sistema de llenadoV2 Auto Top Up se suministra c...

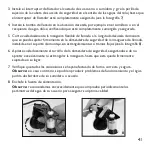
Page 42: ...ada en su ubicaci n preferida dentro de su acuario o sumidero verificando que est en una posici n en la que no resulte afectado por una cantidad excesiva de burbujas de aire ni por los movimientos del...

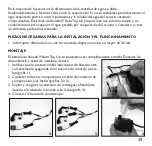
Page 43: ...ar firmemente en la abrazadera de seguridad de la manguera de llenado instalada en el soporte de montaje sin estrangulamientos o tramos flojos vea la fotograf a 8 6 Apriete cuidadosamente el tornillo...

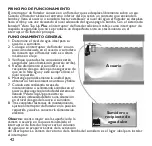
Page 44: ...ique que todas las conexiones est n aseguradas vea Instalaci n general arriba 4 Revise diariamente el sumidero o el recipiente de agua dulce para asegurarse de que no le falte agua y est siempre lleno...

Page 45: ...n limpios y libres de suciedad o detritos Si usa un estanque de agua marina verifique que el interruptor de flotador y su protecci n est n limpios de dep sitos de sal o calcio Observe recomendamos co...

Page 46: ...impie el flotador y el eje de los residuos y detritos que se podr an haber acumulado con el tiempo Problema la bomba funciona constantemente 1 Causa posible el flotador del interruptor de flotador est...

Page 47: ...com o cabo de alimenta o a apontar para cima O n o cumprimento destas instru es pode dar origem a problemas de funcionamento e ao extravasamento da gua do tanque ou aqu rio Especifica o da bomba 220 2...

Page 48: ...la o profissional avan ada PE AS NECESS RIAS PARA INSTALA O E UTILIZA O 1 Dispositivo de corrente residual RCD com uma corrente de opera o residual nominal n o superior a 30 mA MONTAGEM O SistemaV2 Au...

Page 49: ...no local que preferir do seu aqu rio ou tanque certificando se de que se encontra numa posi o em que n o estar exposto a bolhas de ar excessivas ou a movimentos vigorosos da gua Note que O interruptor...

Page 50: ...ixa o da mangueira no suporte de fixa o sem dobras ou abatimento ver foto 8 6 Certificando se de que n o est a apertar demais nem a restringir de qualquer forma a mangueira aperte cuidadosamente o par...

Page 51: ...e sua altura m xima sobre o veio 3 Certifique se de que todas as liga es est o presas ver Instala o Geral acima 4 Verifique diariamente para garantir que o tanque ou recipiente de gua doce n o est a f...

Page 52: ...anque marinho certifique se de que o interruptor de b ia e a respectiva protec o tamb m n o t m dep sitos de sal e ou de c lcio Note que Recomendamos vivamente que isto seja verificado pelo menos uma...

Page 53: ...dep sitos nem detritos os quais se podem ir acumulando medida que o tempo passa Problema A bomba est constantemente ligada 1 Causa poss vel A b ia do interruptor de b ia est presa Solu o Limpe a b ia...

Page 54: ......

Page 55: ......

Page 56: ...ne Chorleywood Hertfordshire WD3 5SX UK Technical Information Lines Tel 44 0 1923 284151 Fax 44 0 1923 285840 Open between 9am 5pm Monday to Thursday 9am 12pm Friday www tropicalmarinecentre co uk tmc...

Reviews: