background image

800W BELT SANDER 

TTB136SDR

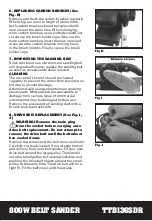
6. REPLACING CARBON BRUSHES (See 

Fig. H)

Remove and check the carbon brushes regularly. 

When they are worn to length of about 6mm, 

both carbon brushes should be replaced with 

new ones at the same time. When changing 

worn carbon brushes, use a slotted screwdriver 

to remove the brush holder caps. Take out the 

worn carbon brushes, insert the new ones and 

make sure the carbon brushes moving freely 

in the brush holders. Finally, secure the brush 

holder caps.

7. INSPECTING THE SANDING BELT

Since continued use of a worn-out sanding belt 

will degrade efficiency, replace the sanding belt 

as soon as excessive abrasion is noted.

CLEANING 

The air-vent of the tool should be cleaned 

regularly to prevent the motor from become too 

hot due to air-vent blockage.

Attention: Avoid using solvents when cleaning 

plastic parts. Most plastics are susceptible to 

damage from various types of commercial 

solvents and may be damaged by their use. 

Remove the pieces and all sending dust with a 

broom and clean tack cloth.

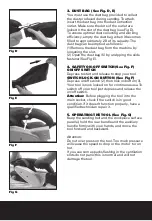
8. DRIVE BELT REPLACEMENT (See Fig. I, 

J)

WARNING! Remove the main plug 

from the socket before carrying out a 

drive belt replacement. Do not attempt to 

remove the drive belt until the belt wheel 

has cooled down.

Remove the screws and the belt cover as shown. 

Carefully cut the drive belt if not already broken 

and remove from your belt sander. Fit your new 

drive belt around the large pulley. Then install 

onto the small pulley by rotating clockwise and 

pushing the drive belt shown around the small 

pulley at the same time. The drive belt will be a 

tight fit. Fit the belt cover and the screws.

Fig H

Fig I

Fig J

Summary of Contents for TTBI36SDR

Page 1: ...800W BELT SANDER TTB136SDR SAFETY AND OPERATING MANUAL...

Page 2: ......

Page 3: ...f use of the goods This guarantee does not affect your statutory rights This guarantee is only valid in the UK For further technical advice spare parts or repair service outside of guarantee please co...

Page 4: ...ntering a power tool will increase the risk of electric shock d Do not abuse the cord Never use the cord for carrying pulling or unplugging the power tool Keep cord away from heat oil sharp edges or m...

Page 5: ...annot be controlled with the switch is dangerous and must be repaired c Disconnect the plug from the power source before making any adjustments changing accessories or storing power tools Such prevent...

Page 6: ...by applying a force to the base plate 7 Only use sanding paper in good condition Do not use torn or worn sanding paper 8 Do not eat or drink in the working area of the sander 9 Do not allow people to...

Page 7: ...alue may also be used in a preliminary assessment of exposure Warning The vibration emission value during actual use of the power tool can differ from the declared value depending on the ways in which...

Page 8: ...LE INSULATION The tool is double insulated This means that all the external metal parts are electrically insulated from the mains power supply This is done by placing insulation barriers between the e...

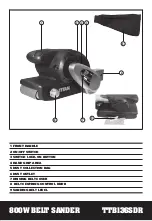
Page 9: ...NDER TTB136SDR 1 FRONT HANDLE 2 ON OFF SWITCH 3 SWITCH LOCK ON BUTTON 4 HAND GRIP AREA 5 DUST COLLECTION BAG 6 DUST OUTLET 7 DRIVING BELT COVER 8 BELT CENTRING CONTROL KNOB 9 SANDING BELT LEVEL 1 8 7...

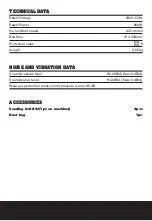
Page 10: ...m min Belt Size 76 x 533mm Protection class II weight 3 05kg NOISE AND VIBRATION DATA Sound pressure level 80 2dB A Kpa 3 dB A Sound power level 91 2dB A Kwa 3 dB A Wear ear protection when sound pres...

Page 11: ...belt tension lever returns to its original position inside the housing 2 BELT CENTRING CONTROL See Fig C WARNING Wear eye protection before carrying out a belt centring adjustment Turn the machine ups...

Page 12: ...to stop your tool SWITCH LOCK ON BUTTON See Fig F Depress on off switch 2 then lock on button 3 Your tool is now locked on for continuous use To switch off your tool just depress and release the on of...

Page 13: ...vent the motor from become too hot due to air vent blockage Attention Avoid using solvents when cleaning plastic parts Most plastics are susceptible to damage from various types of commercial solvents...

Page 14: ...At all times let the sander do the work do not force it or apply excessive pressure to the sanding belt 5 If the surface shows excessive making from the abrasive motion you may be using a grit which i...

Page 15: ...ing belt have been worn replace the new sanding belt and try again The sanding belt must be kept in a dry place 3 If a fault can not be rectified return the sander to an authorised dealer for repair E...

Page 16: ...roceed as follows The wire which is coloured blue must be connected to the terminal which is marked with N The wire which is coloured brown must be connected to the terminal which is marked with L War...

Page 17: ...Directive 98 37 EC until December 28th 2009 and then with 2006 42 EC from 29th December 2009 Machinery Directive 2002 95 EC Restrictions of the Use of Certain Hazardous Substances in Electrical and E...

Page 18: ......

Page 19: ...800W BELT SANDER TTB136SDR...

Page 20: ......

Reviews: