22
EN
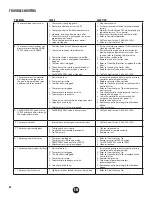
TROUBLEShOOTING
PROBLEM
CAUSE
SOLUTION
A. The sprayer does not turn on.
1. The sprayer is not plugged in.
2. Pressure control knob is set to OFF.
3. The sprayer shuts off while under pressure.
4. No power is coming from power outlet.
5. The extension cord is damaged or is not the
proper gauge or length.
6. There is a problem with sprayer motor.
7. Spray tip clogged.
1. Plug the sprayer in.
2. Turn pressure control knob to recommended
setting.
3. Motor will cycle ON and OFF while spraying to
regulate pressure. This is normal.
4. Reset circuit breaker or find another outlet.
5. Refer to General Information.
6. Call Technical Service (1-866-848-2698).
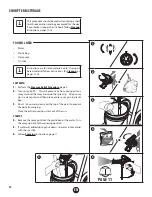
7. Refer to Clear the Spray Tip.
B. The sprayer starts but does not
draw material when the PRIME/
SPRAY knob is set to PRIME
1. The inlet valve is stuck from old material.
2. There is no suction at the inlet valve.
3. The suction tube is not properly installed.
4. The suction tube is damaged or completely
clogged.
5. The inlet filter is clogged.
6. The outlet valve is stuck or contains debris.
7. The inlet valve or outlet valve is worn or
damaged.
8. The PRIME/SPRAY valve is plugged.
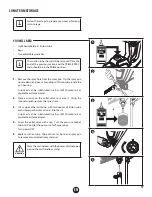
1. Push pusher stem to release. If still stuck refer to
Cleaning the Inlet Valve.
2. Remove suction tube and check suction by
placing finger on bottom of inlet valve. If no
suction, refer to Cleaning the Inlet Valve.
3. Reinstall the suction tube
4. Replace with a new suction tube.
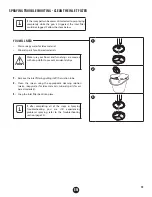
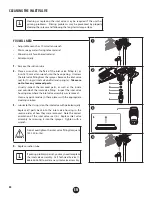
5. Refer to Clean the Inlet filter or replace the inlet
filter.
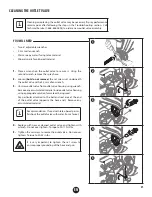
6. Refer to Cleaning the Outlet Valve.
7. Replace the inlet valve or outlet valve.
8. Call Technical Service (1-866-848-2698).
C. The sprayer draws up material
but the pressure drops when
the gun is triggered (bad spray
pattern or no spray pattern)
1. Pressure too low.
2. The spray tip is worn.
3. The inlet filter is clogged.
4. The spray tip is plugged.
5. The material is too heavy or thick.
6. The material is too coarse.
7. The outlet valve assembly is damaged or worn.
8. Spray hose is too long.
9. Filter accessory is dirty or plugged.
1. Increase the pressure by turning the pressure
control knob to a higher setting.
2. Replace spray tip with a new one.
3. Refer to Clean the Inlet filter, or replace with a
new inlet filter.
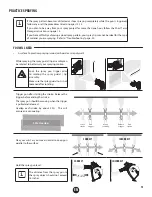
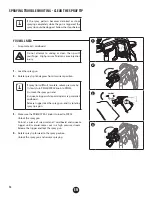
4. Refer to Clear the Spray Tip or replace with a
new spray tip.
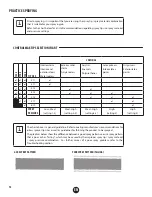
5. Thin the material, or use a larger tip (see Tip
Selection Chart, page 12).
6. Strain the material or purchase the filter
accessory (see Accessories, page 72).
7. Replace the outlet valve.
8. Remove any extra hose length that has been
added.
9. Clean or replace.
D. The PRIME/SPRAY knob is set to
SPRAY and there is flow through
the material return tube
1. The PRIME/SPRAY valve is dirty or worn.
1. Call Technical Service (1-866-848-2698).
E. The spray gun leaks
1. Internal parts of spray gun are worn or dirty.
1. Call Technical Service (1-866-848-2698).
F. The spray tip assembly leaks
1. The tip guard nut is loose.
2. Tip guard was assembled incorrectly.
3. Tip seal is worn
1. Tighten tip guard nut.
2. Remove and assemble correctly.
3. Replace tip seal
G. The spray gun will not spray
1. The spray tip plugged.
2. The spray tip is in wrong position.
3. PRIME/SPRAY knob not set on SPRAY.
4. Filter accessory is dirty or plugged.
1. Refer to Clear the Spray Tip .
2. Rotate spray tip to SPRAY position.
3. Turn PRIME/SPRAY knob to SPRAY.
4. Clean or replace.
H. The spray pattern is poor (tailing) 1. Pressure too low.
2. The spray tip is plugged.
3. The inlet filter is clogged.
4. The spray tip is worn.
5. The material is too heavy or thick.
6. Spray hose is too long.
1. Increase the pressure by turning the pressure
control knob to a higher setting.
2. Refer to Clear the Spray Tip
3. Refer to Clean the Inlet filter or replace with a
new inlet filter.
4. Replace the spray tip.
5. Thin material per manufacturer’s
recommendations.
6. Remove any extra hose length that has been
added.
I. The spray tip will not turn
1. High pressure has locked the spray tip in place.
1. Refer to Clear the Spray Tip.

