background image


TP04601

Rev Date 02-09

BACK COVER BLANK

BRAVO ONE

TM

MARKER

TM

LINE

TM

• Owner’s Manual

• Le Manuel du Propriétaire

• Manual del Usuario

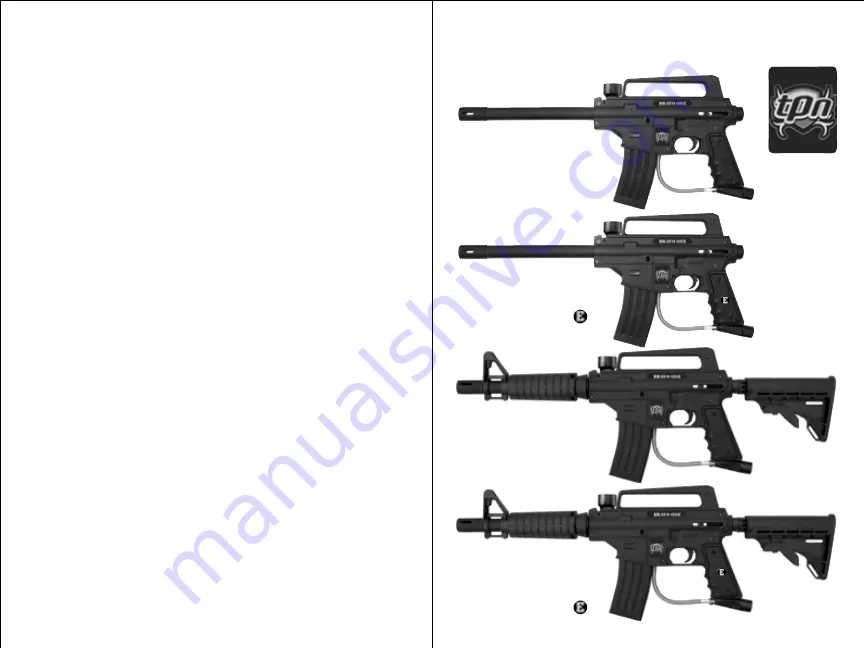
BRAVO ONE

BASIC

BRAVO ONE

BASIC

E-TRIGGER

TM

BRAVO ONE

TACTICAL

EDITION

BRAVO ONE

TACTICAL

EDITION

E-TRIGGER

TM

TM

TM

TM

TM

Summary of Contents for BRAVO ONE SERIES

Page 1: ...ACK COVER BLANK BRAVO ONETM MARKERTM LINETM Owner s Manual Le Manuel du Propriétaire Manual del Usuario BRAVO ONE BASIC BRAVO ONE BASIC E TRIGGERTM BRAVO ONE TACTICAL EDITION BRAVO ONE TACTICAL EDITION E TRIGGERTM TM TM TM TM ...

Page 2: ...RODUCTO LEA EL MANUAL DEL USUARIO E S P A Ñ O L E S P A Ñ O L WARNING AVERTISSEMENT SAFETY IS YOUR RESPONSIBILITY ALWAYS KEEP TRIGGER SAFETY IN SAFE MODE UNLESS FIRING AS DETAILED IN INSTRUCTIONS ON PAGE 4 ALWAYS KEEP THE BARREL BLOCKING DEVICE INSTALLED WHEN NOT IN SHOOTING SITUATION SEE INSTRUCTIONS ON PAGE 2 READ FAMILIARIZE YOURSELF AND ANY OTHER USER OF THIS MARKER WITH THE SAFETY INSTRUCTION...

Page 3: ...Marker 14 Air Supply Cylinder Removal 14 Cleaning Maintenance 14 Repairing Air Supply Leaks 15 Storage 15 Marker Disassembly Assembly 16 Warranty and Repair Policy 20 Warranty or Repair Procedure 20 Warranty Registration 20 3 E N G L I S H 2 E N G L I S H EXCEPT WHEN YOUR MARKER IS IN USE ALWAYS MAKE S U R E THAT THE TRIGGER SAFETY IS IN THE SAFE MODE SEE INSTRUCTIONS ON PAGE 4 AND THE BARREL BLOC...

Page 4: ...SAFE TRIGGER SAFETY ACTIVATION Do not load or fire this marker until you have completely read this manual and are familiar with its safety features mechanical operation and handling characteristics Handle this and any marker as if it were loaded at all times Keep your finger off the trigger until ready to shoot Do not look down the barrel of a paintball marker Accidental discharge into the eyes ma...

Page 5: ...aded parts when assembling For Bravo OneTM Basic models Install the barrel Apply marker oil onto the barrel o ring insert the barrel into the receiver and carefully screw it in Avoid alcoholic beverages before and during the use of this marker Handling markers while under the influence of drugs or alcohol is a criminal disregard for public safety Avoid shooting an opponent at point blank 6 feet or...

Page 6: ...TEP 5 Velocity Adjustment Each time you play paintball the velocity of your paintball marker should be checked with a chronograph an instrument for measuring velocity prior to playing paintball to verify that the marker s velocity is set below 300 feet per second or less if required by playing field Velocity Adjustment Screw 3 16 Allen Wrench To adjust the velocity use the 3 16 allen wrench includ...

Page 7: ...u must pull the trigger 4 single pulls within 1 00 second and hold the 4th pull to fire 12 shots per second until you release the trigger 3 flashes of the LED light indicates FULL AUTO NORMAL mode Press mode button to get 4 FULL AUTO FAST 15 shots per second To fire in Full Auto Fast mode you must pull the trigger 4 single pulls within 1 00 second and hold the 4th pull to fire 15 shots per second ...

Page 8: ...SSURIZED WITH AIR DO NOT PRESSURIZE A PARTIALLYASSEMBLED MARKER Basic Parts List 13 For Tactical Edition markers Shroud and Collapsible stock parts see page 16 For E TriggerTM markers E TriggerTM parts see page 18 Bravo One TM Tippmann Service Department 1 800 533 4831 www tippmann com ...

Page 9: ...disassembly assembly To reduce the chance of accidental discharge First follow Unloading Your Marker and Air Supply Cylinder Removal instructions on page 14 Do not disassemble this marker while it is pressurized with air Do not pressurize a partially assembled marker Follow warnings listed on the air supply cylinder for handling and storage Familiarize yourself with instructions listed on air supp...

Page 10: ...art all threaded parts and do not overtighten and strip threaded parts when assembling First complete Marker Disassembly Instructions see page 16 Power tube removal To remove the power tube and valve unscrew the two valve lock bolts from the right side receiver Storage continued from page 15 To remove the left side receiver unscrew the 7 receiver connection bolts 3 long 4 short Then carefully lift...

Page 11: ... Carefully tilt and insert the battery wire attached end first into the receiver Install the left receiver grip with 2 bolts Press in the 2 magazine tabs and slide the magazine up into the marker until the tabs lock it in place NOTE The magazine may be used to store tools and lubricating oil for your marker shown with 2 allen wrenches and oil Reassembling Receiver Halves continued on page 19 Doubl...

Page 12: ...u can request for NEXT DAY AIR UPS OR SECOND DAY AIR UPS You will be charged for this service and must include your credit card number with the expiration date Your card will be charged the difference in additional cost over regular ground shipping service Tippmann Sports LLC warrants that this product is found free from defects in materials and workmanship for a period of 1 year from the original...

Page 13: ...S YEUX LE VISAGE ET LES OREILLES CONSTRUITE POUR LA BALLE DE PEINT DOIT ÊTRE PORTÉE PAR L UTILISATEUR ET N IMPORTE QUELLE PERSONNE DANS LE CHAMP DE TIR NOUS RECOMMENDONS QU ON A DIX HUIT ANS AU MOINS POUR L ACHETER LES PERSONNES SOUS L ÂGE DE DIX HUITANS DOIVENTAVOIR LASUPERVISION D UNADULTE QUAND ON EMPLOIE CE PRODUIT IL FAUT LIRE TOUT DE CE MANUEL AVANT DE L UTILISER AVERTISSEMENT F R A N Ç A I ...

Page 14: ...r des billes de peinture doit être portée par l utilisateur et toute personne située dans le champ de tir Ne tirez jamais sur une personne qui n a pas de protection des yeux du visage et des oreilles construite pour le paintball Mettez le marqueur sous pression et charger le seulement lorsqu il sera utilisé immédiatement NOTE Avant de l entreposer ou de le désassembler assurez vous d avoir retiré ...

Page 15: ...tes les pièces filetées et ne les serrez pas trop lorsque vous les assemblez Préparez le marqueur pour installation continué de la page 5 Pour les marqueur de Tactical Edition munis de la E TriggerTM vous devez d abord lire et suivre les instructions sur le fonctionnement de la E TriggerTM aux pages 8 10 avant d effectuer l ÉTAPE 2 Pour les marqueurs de Tactical Edition sans la E TriggerTM référez...

Page 16: ...uctions continué à la page 9 ÉTAPE 1 Sécurisez le marqueur avant toute programmation Lisez complètement chaque étape avant de la mettre en application AVERTISSEMENT INSTALLEZ LA SOURCE D AIR ET CHARGEZ LE LOADER AVEC DES BILLES SEULEMENT LORSQUE L APPAREIL DU CANON BLOQUANT INSTALLÉE VOIR PAGE 1 LASÉCURITÉ DE LADÉTENTE EST EN MODE SÉCURITÉ VOIR PAGE 3 LA PILE EST CORRECTEMENT INSTALLÉE ÉTAPE 2 VOI...

Page 17: ...z appuyer sur la détente 4 fois 9 FULL AUTO RAPIDE continué à la page 10 Vous êtes désormais prêt à retourner à la page 6 et à lire complètement les étapes 2 3 4 et 5 de la section Pour Commencer NOTE Si le marqueur ne tire pas voire les problèmes liés au tir ci dessous E TRIGGERTM Problèmes liés au tir PROBLÈME La lumière LED ne s allume pas lorsque vous appuyez sur le bouton d allumage 1 Il se p...

Page 18: ...LORSQU IL EST SOUS PRESSION NE METTEZ PAS SOUS PRESSION UN MARQUEUR PARTIELLEMENT ASSEMBLÉ Pour les pièces du garde main et de la crosse réglable des marqueurs de Tactical Edition voir page 15 Pour les pièces de la E TriggerTM voir page 17 BRAVO ONE TM Tippmann Service Department 1 800 533 4831 www tippmann com ...

Page 19: ...ns une direction sécurisée et videz le gaz restant en appuyant plusieurs fois sur la détente jusqu à ce que le marqueur s arrête de tire Ceci peut nécessiter 4 5 tirs Si votre marqueur continue de tirer la goupille de la valve ne s est pas fermée les goupilles de valve varient chaque bouteille varie légèrement selon la profondeur de vissage requise et vous devez tournez un peu plus la bouteille da...

Page 20: ...les joints Réinstallation de la la valve Insérez la valve propre et huilée dans le power tube et alignez les trous de la valve et du power tube Appliquez la bande ou colle de Téflon sur les filetages du raccord du câble d air et vissez le soigneusement dans la valve et verrouillez le avec une clef ne serrez pas trop fort les boulons vis et les pièces filetées Essuyez tout excès de colle Réinstalla...

Page 21: ...tique aux pages 11 12 TA06020 goupille de l armature TA09935 assemblé éléctronique TA05014 aimant solénoïde l armature 02 88 Le ressort du sear TA01135 Le sear Les Marqueurs munis de la E TriggerTM Attachez la pile de 9 volt à l adaptateur de la pile et assurez vous que les câbles soient bien à plat dans la partie prédécoupée du receveur Inclinez et insérez soigneusement la pile les extrémités du ...

Page 22: ...es Tippmann Sports LLC réparera ou remplacera sans aucun frais un de ses marqueurs présentant des défauts matériels ou de manufacture Tippmann s engage à vous fournir le marqueur ultime de paintball et la qualité nécessaire à un jeu appréciable GARANTIE ET POLITIQUE DE RÉPARATION Si vous rencontrez des problèmes avec votre marqueur et que vous avez des pièces accessoires sur votre marqueur essayez...

Page 23: ...749 6022 F 260 749 6619 www tippmann com BRAVO ONE ESTO NO ES UN JUGUETE UN USO INAPROPIADO PUEDE CAUSAR SERIAS HERIDAS O LA MUERTE OJOS CARA Y OIDOS DEBEN ESTAR PROTEGIDOS TODO EL TIEMPO CON LA PROTECCIÓN DISEÑADA PARA PAINTBALL TANTO PARA JUGADORES COMO PARA CUALQUIER PERSONA QUE ESTE EN EL RADIO DE ALCANCE RECOMENDAMOS AL MENOS 18 AÑOS DE EDAD PARA LA COMPRA Y USO LAS PERSONAS MENORES DE 18 AÑO...

Page 24: ...sabilidad continua en la página 5 crecer si se mantiente como un juego SEGURO No cargue o dispare este marcador hasta que usted haya leído completamente este manual y este familiarizado con su manejo seguro operación mecánica y características de manejo Mantenga su dedo lejos del gatillo hasta que este listo para disparar Nunca mire dentro del barril del marcador Una descarga accidental en un ojo ...

Page 25: ...l Apliqueaceiteparamarcadoresenelempaque del barril e introdusca el barril dentro del recibidor y con cuidado atornillelo Instale la cubierta antes instale el barril Para instalar la cubierta Retire el tornillo del recibidor y inserte la cubierta Reemplace y ajuste el tornillo para sostener la cubierta en su lugar Instale el barril con la cubierta instalada Aplique aceite para marcadores en el emp...

Page 26: ...O 5 Para Marcadores que no tienen E TriggerTM Siga a el PASO 5 Para ajustar la velocidad use una llave allen de 3 16 que viene incluída con su marcador El ajuste de velocidad se hace con el tornillo localizado al lado izquierdo del recibidor Para disminuir la velocidad mueva el tornillo en el sentido de la manecillas del reloj Para aumentar la velocidad mueva el tornillo en sentido contrario a las...

Page 27: ...x 5 segundos hasta que la luz verde en el tablero se prenda luego libere el boton de encendido 1 EncendidodelaE TriggerTM yoperacionnormal ListoparaDisparar PASO 3 MANEJO NORMAL Botón de encendido La luz LED sostenga el gatillo en el cuarto para disparar 15 disparos por seguro hasta que usted suelte el gatillo 4 intermitencias de la luz de tablero indiaca FULLAUTO FAST Haga presion sobre el botón ...

Page 28: ...ENTE ENSAMBLADO E S P A Ñ O L E S P A Ñ O L 12 11 Partes de Básicas Para las partes del Tactical Edition la cubierta de barril y la culata colapsible ver página 15 Para las partes de E TriggerTM ver página 17 bravo one TM El Departamento de Servicio al Cliente de Tippmann 1 800 533 4831 www tippmann com ...

Page 29: ...rario de las manecillas del reloj un poco más y repetir este paso hasta que el marcador no dispare luego puede retirar el tanque NOTA Si durante este paso usted dio vuelta al tanque y este presento un escape antes de hacer algun disparo el empaque del tanque debe ser revisado y cambiado antes de reensamblarlo 3 Despues de remover el tanque apunte y dispare el marcador en direccion segura hasta que...

Page 30: ...de potencia NOTA No remueva la linea de gas a no ser que exista un escape o necesite reemplazar la válvula Si es necesario hacerlo necesitará cinta de teflón o pasta para reinstalar NOTA Con mucho cuidado y usando su mano coloque todaslaspartesquevanenroscassinapretarlasdemasiadoparanoalterarlas Remoción de la válvula del tubo de potencia Si es necesario la remoción de la válvula utilice una llave...

Page 31: ...l con cuidado de le vuelta Deslice el codo de alimentacion dentro de el recibidor y de vuelta hasta que quede asegurado E TriggerTM marcadores Introduzca una bateria de 9 voltios asegúrandose que los cables se encuentren planos y no sean pellizcados Cuidadosamente incline e inserte la bateria asegure los cable primero Reinstale el mango del recibidor izquierdo con dos tornillos Haga presion en las...

Page 32: ...tes al marcador por favor haga una prueba con la partes originales antes de enviarla Siempre descargue y remueva el suministro de aire antes de enviar el marcador ver instrucciones en las páginas 13 14 No nos envie el tanque de suministro de aire si este no esta completamente desocupado Para garantía y reparaciones sin garantía 1 Envíe su producto a la siguiente dirección Tippmann Sports LLC 2955 ...

Page 33: ...6803 USA Male Age Female TIPPMANN E mail City State Zip City State Zip Warranty Registration online at www tippmann com or complete this warranty card and mail to Tippmann Model Bravo One TM Basic Bravo One TM Basic E Trigger TM Bravo One TM Tactical Edition Bravo One TM Tactical Edition E Trigger TMT 21 THIS PAGE INTENTIONALLY LEFT BLANK ...

Page 34: ...COVER Modèle Modelo Bravo One TM Basic Bravo One TM Basic E Trigger TM Bravo One TM Tactical Edition Bravo One TM Tactical Edition E Trigger TMT Acheté chez Date Nombre comprador Fecha Numéro de Série au dessus du grip avant gauche Número de Serie Número sobre el mango delantero izquierdo Votre nom Nombre letra de molde Téléphone Teléfono Pays País Adresse Dirección Pays País Homme Hombre Âge Edad...

Reviews: