background image


04 

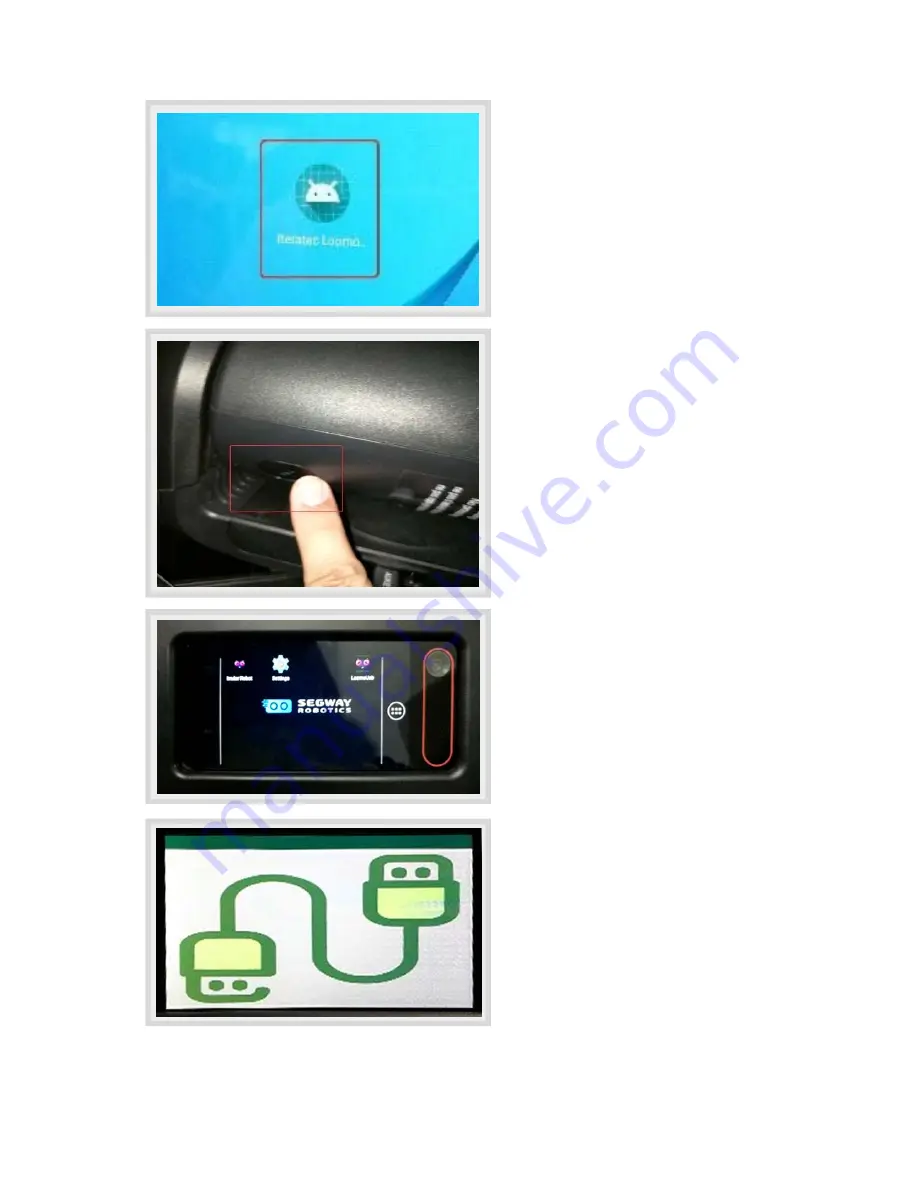
Open the ‘Iteratec Loomo’ app that 
has been installed into Tablet. 

05 

Switch on the the ‘Hubot’ ‘transform’ 
button. 

06 

Open the ‘LoomoUsb’ app on the 
‘Loomo’ unit. 

07 

Then, wait for the USB connection 
icon to appear on the ‘Loomo’ unit 
LCD screen. 

Summary of Contents for Hubot DV

Page 1: ...1 QUICK START GUIDE Revision HUB2019B1 0 0 1 Last Modified 2019 09 20 2019 Timetec Computing Sdn Bhd...

Page 2: ...NTENTS 1 READ ME FIRST 2 PRODUCT OVERVIEW 3 PRODUCT SPECIFICATIONS 3 1 Hardware Specifications 3 2 Dimensions 4 QUICK SETUP AND OPERATION GUIDE 5 GENERAL MAINTENANCE GUIDE 6 SUPPORT AND WARRANTY 03 04...

Page 3: ...o Unit Complete the steps in Section 4 Quick Setup and Operation Guide to start using the Hubot Complete the steps in Section 5 General Maintenance Guide for general maintenance of the Hubot Thank you...

Page 4: ...g automation and security for the visitor management for office towers and residential communities The Hubot XV is taking artificial intelligence AI to the next level for a better safer and more effic...

Page 5: ...nal power 400W x 2 with high precision hall and magnetic encoders Camera Front Facing Camera 720p HD Input Keyboard Camera Output Voice Greeting Guidance On Board Sensors Ultrasonic Sensors Voice Dist...

Page 6: ...6 3 2 Dimensions...

Page 7: ...ERATION GUIDE 01 Turn on the power switch to Boot up Hubot 02 Make sure the USB Type C cable of the Tablet unit is connected to the Loomo unit 03 When the Use USB for screen appeared in Tablet select...

Page 8: ...atec Loomo app that has been installed into Tablet 05 Switch on the the Hubot transform button 06 Open the LoomoUsb app on the Loomo unit 07 Then wait for the USB connection icon to appear on the Loom...

Page 9: ...the Loomo unit LCD screen to request for access grant for LoomoUsb click OK 10 Next Iteratec Loomo remote message prompt will appear at Tablet unit screen Click OK 11 Next prompt to request user to gr...

Page 10: ...10 13 User should be able to see an interactive eyes UI at Tablet unit s screen and Live captured images appear at the Loomo unit s screen...

Page 11: ...own the Hubot on the ground carefully 02 Turn off the Hubot s power button 03 Plug the charger onto the Hubot s charger port 04 Connect the 3 pins AC power cord onto the wall plug socket 05 Turn On th...

Page 12: ...12 07 Connect the Tablet Unit s USB Type C cable to the Loomo unit 08 Turn on the Hubot s power button and it should charge the Tablet Unit automatically...

Page 13: ...nship when used normally in accordance with TimeTec s published guidelines for a period of up to ONE 1 YEAR Warranty Period from the delivery date of the end user s pre order purchase depending on the...

Page 14: ...he storage media to protect the content and as a precaution against possible operational failures Before providing warranty service TimeTec may require that you furnish proof of purchase details respo...

Page 15: ...transportation process and to complete returns processing so it is recommended that you keep the original packaging for at least ONE 1 YEAR from the date of delivery It is your responsibility to reta...

Reviews: