background image

24

25

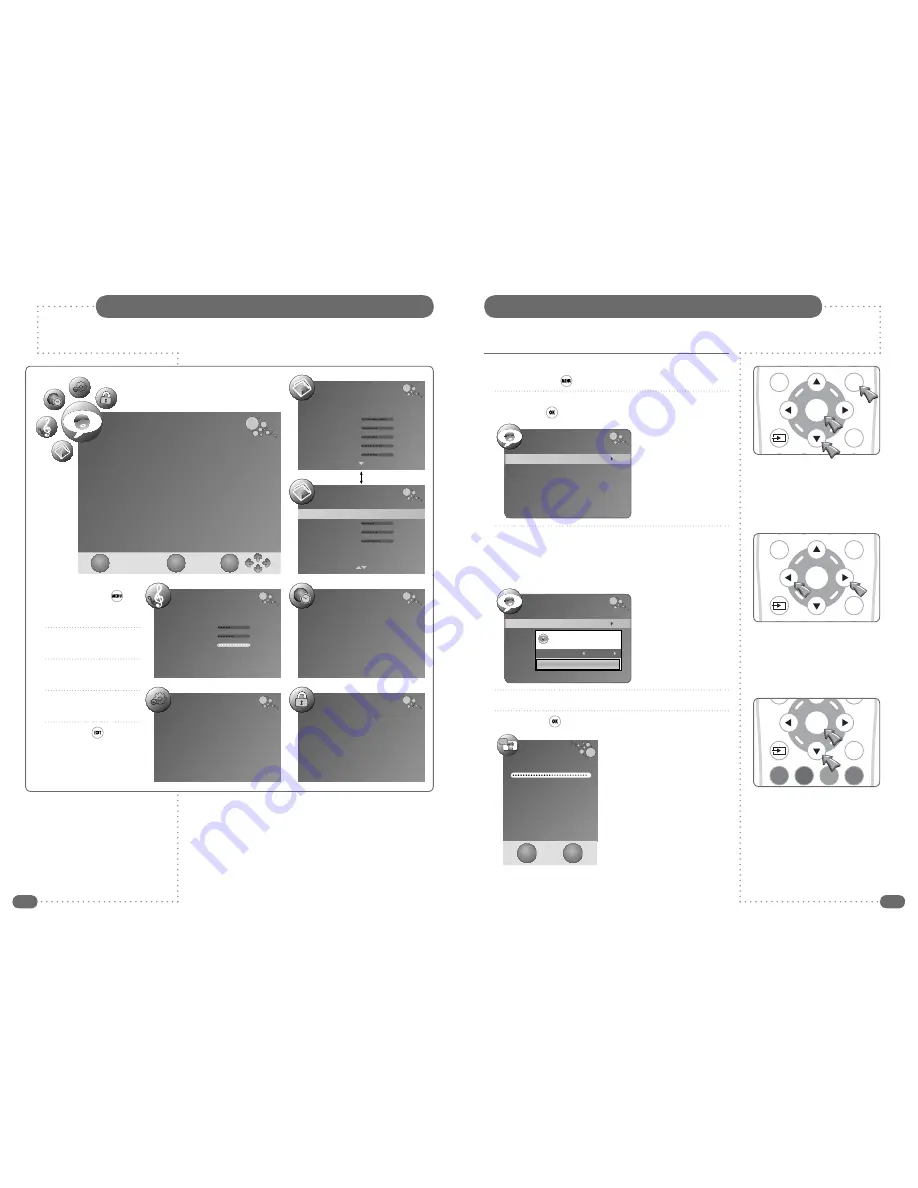
The CHANNEL menu is the default menu if the menu button is pressed whist watching DTV 
or ATV – the PICTURE menu is the default menu at all other times.

Auto Tuning

1

 Press the 

MENU

 (

) button to display the 

CHANNEL

 menu.

2

 Press the 

D

 button to select the 

Auto Tuning

 and then press

the 

R

 or 

OK

 (

) button.

3

  Select the required country with the 

LR

 buttons. Choose from:

Australia, Austria, Belgium, Bulgaria, Croatia, Czech, Denmark, 
Finland, France, Germany, Greece, Hungary, Italy, Luxembourg, 
Netherlands, Norway, Poland, Portugal, Romania, Russia, Serbia, 
Slovenia, Spain, Sweden, Switzerland, UK.

4

 Press the 

D

 button to select 

Start

.

5

 Press the 

OK

 (

) button to start the auto tuning.

The Channel Tuning dialogue will 
be displayed to show the 
progress of the tuning.

When tuning is complete the 
Channel Tuning dialogue will be 
cleared and, the first available, 
TV channel will be selected. 

To delete, skip, move or name the stored programmes see

Programme Edit

, on page 28.

Auto Tuning

Note: 

It is recommended that Auto Tuning is used when installing the TileVision

®

 as all available digital 

and analogue programmes will be stored.

On-screen Menu Summary

LOCK

Lock System 

Off

Set Password
Block Programme
Parental Guidance 

Off

Restore Factory Default

OPTION

Language English
Audio Languages 

English

Subtitle Languages 

English

Hearing Impaired 

Off

Country UK

PICTURE

Color Temperature 

Medium

Red  

43

Green  

50

Blue  

60

Aspect Ratio 

Auto

Noise Reduction 

Auto

SOUND

Sound Mode 

Standard

Treble  

50

Bass  

50

Balance  

0

Auto Volume 

Off

Surround Sound 

Off

TIME

Clock --  --  --  --
Off Time 

Off

On Time 

Off

Sleep Timer 

Off

Auto Sleep 

Off

Time Zone 

London GMT

PICTURE

Picture Mode 

Standard

Contrast  

80

Brightness  

50

Colour  

50

Sharpness  

65

Tint  

0

CHANNEL

Auto Tuning
DTV Manual Tuning
ATV Manual Tuning
Program Edit
CI Information

EXIT

OK

MENU

1

 Press the 

MENU

 (

button to display the 
Channel menu.

2

 Press the 

LR

 buttons to 

select alternative menus.

3

 Press 

UD

 buttons to 

select menu items.

4

 Press 

LR

 buttons to alter 

a select menu item.

5

 Press 

EXIT

 (

) to save 

settings and exit the 
menus.

  To move between the two Picture menus press the 

UD

 buttons until the required menu is displayed.


The EXIT, MENU, OK and Arrow prompts are 
common to all seven menus and have not been 
included on the following pages.

OK

EPG

MENU

EXIT

CHANNEL

Auto Tuning

DTV Manual Tuning
ATV Manual Tuning
Programme Edit
CI Information

OK

EXIT

CHANNEL

Auto Tuning

DTV Manual Tuning
ATV Manual Tuning
Programme Edit
CI Information

Please select country first,
Then select Start to update info.

Country selection   UK

Start    Cancel

Channel Tuning

98 %... UHF CH68 DTV

ATV : 

Programme(s)

DTV 

:   61 Programme(s)

Radio 

:  36  Programme(s)

Press <Menu> to skip.
Press <Exit> to exit.

EXIT

MENU

OK

EPG

MENU

EXIT

Summary of Contents for TV/19/FR1

Page 1: ...the bathroom television DVB T DVB T T TILE ILEVISION ISION 19 19 HIGH DEFINITION MULTIMEDIA INTERFACE TM ...

Page 2: ...DANCE WITH THE INSTALLATION INSTRUCTIONS CAUTION DO NOT REMOVE COVER NO USER SERVICEABLE PARTS INSIDE REFER SERVICING TO QUALIFIED SERVICE PERSONNEL BEWARE OF STATIC SENSITIVE PARTS This symbol is intended to alert the user to the presence of important operating and maintenance servicing instructions in the literature accompanying the appliance RoHS COMPLIANT This product contains Electrical Elect...

Page 3: ...ctors 14 The SCART Connector 15 The IR Link RJ12 and RS 232 Connectors 16 Installing the TileVision Setup and Tuning 17 Installing the TileVision Sealing 19 The Waterproof Remote Control 20 The Standard Remote Control 21 Switching the TileVision On Off 22 Selecting the On screen Language 22 Selecting a Source 23 On screen Menu Summary 24 Auto Tuning 25 DTV Manual Tuning 26 ATV Manual Tuning 27 Pro...

Page 4: ...lled in a solid wall Unpacking your TileVision Within the back box there are two right angled brackets and eight fixing screws Screw the brackets to the outside of the back box but be aware these will need to be loosened to allow adjustment of the back box when fitted into the wall As shown below the brackets allow 36mm of forwards backwards adjustment so that the front of the back box can fit flu...

Page 5: ... can be changed on the Sky receiver using the Sky remote control via the TileVision To use this facility install a good quality coaxial cable that runs directly from the RF2 outlet of the Sky receiver or from the outlet of a Remote Link amp in a continuous uninterrupted run The TileVision will accept additional inputs from many sources and can be integrated with home automation and interactive hot...

Page 6: ...h the power disconnected Take a note of the Smart Card s serial number and follow the CAM Smart Card manufacturer s instructions to insert the Smart Card into the CAM and access the service The Smart Card must be activated in accordance with its service provider s instructions before installation is completed and the TileVision is sealed see page 19 See page 29 for additional CI Smart Card informa...

Page 7: ...tings 7 Press the sky button to return to the previously viewed channel Use the cable clips provided to secure the earth and speaker cables to prevent them obstructing the TileVision as it is fitted into the back box S 232 RJ12 IR LINK ANTENNA INPUT CVBS IN CI PORT AUDIO COMPONENT S VIDEO IN AUDIO L PR PC IN OUT OUT IN PB Y R Red LED indicator will light when power is received from the Sky RF2 out...

Page 8: ...put B For Composite Video 1 Connect the audio cable to the Left and Right Audio connectors white and red and the video cable to the CVBS Composite connector yellow on the TileVision and the corresponding connectors on the external equipment such as a satellite receiver or DVD player 2 If the external equipment only has a mono audio output it should be connected to the left white connector of the A...

Page 9: ... SCART socket is fully wired as shown above The audio output from the EURO SCART can be connected to a separate amplifier to allow integration with a multi room audio video system This should be carried out by a qualified engineer SCART Connection Reference Pin Name Description 1 AOR Audio Out Right 2 AIR Audio In Right 3 AOL Audio Out Left Mono 4 AGND Audio Ground 5 BGND RGB Blue Ground 6 AIL Aud...

Page 10: ...tugês Pyccкий and Deutsch 1 Press the LR buttons to select the required menu language 2 Press the D button once to select Auto Tuning and display the Country selection window as shown on page 18 only the top strip is removed before tuning NEW INSTALLATION Language English Auto Tuning EXIT MENU OK OK EPG MENU EXIT EPG MENU 16 9 AUDIO If a Sky box is being used as a source it should be switched on b...

Page 11: ...licone sealant to the joint between the sides of the back box and the sides of the TileVision Ensure that the sealant is worked into the space evenly and is applied without any gaps bubbles or voids Wipe any excess sealant away and check for any imperfections Rectify any errors as necessary This seal is essential for the reliable and safe operation of the TileVision and must be completely waterpro...

Page 12: ...s the TileVision on from or off to standby page 22 2 MUTE button Turns the sound on or off page 40 3 Number buttons Input programme numbers DTVText menu options Teletext page number input 4 NICAM button Stereo Mono 5 TV RADIO button switches between DTV and Radio 6 MENU button Displays or closes the menus 7 INPUT button Displays the Input Source menu and allows source selection DTV ATV SCART etc p...

Page 13: ...sion will display a picture within ten seconds 2 To switch the TileVision to standby press the POWER button again The LED indicator will show red to indicate that the TileVision is in standby mode Switching the TileVision On Off EPG MENU 16 9 AUDIO OK EPG MENU EXIT EPG MENU 16 9 AUDIO OK EPG MENU EXIT OK EPG MENU EXIT Selecting the On screen Language The on screen menus can be in any of the follow...

Page 14: ...udio Languages English Subtitle Languages English Hearing Impaired Off Country UK PICTURE Color Temperature Medium Red 43 Green 50 Blue 60 Aspect Ratio Auto Noise Reduction Auto SOUND Sound Mode Standard Treble 50 Bass 50 Balance 0 Auto Volume Off Surround Sound Off TIME Clock Off Time Off On Time Off Sleep Timer Off Auto Sleep Off Time Zone London GMT PICTURE Picture Mode Standard Contrast 80 Bri...

Page 15: ...ill show the number of DTV and Radio programmes that have been tuned When the dialogue clears the newly tuned station with the lowest number will be shown To tune additional programmes repeat steps 1 to 4 DTV Manual Tuning DTV Manual Tuning UHF CH 68 Please select channel then Press ENTER to search Bad Normal Good Searching Please Wait Frequency 850 00 MHz EXIT OK MENU 3 Select the required channe...

Page 16: ...ressing the FAV button Programme Edit in DTV Mode 1 Press the MENU button to display the CHANNEL menu 2 Press the D button four times to select Programme Edit and then press the R or OK button 3 Select a programme with the UD buttons and press the Red button to delete the programme completely and make it unavailable until the TileVision is retuned Press the Blue button to select to skip past the p...

Page 17: ...edown DATE Reminder OK When the Programme Guide is displayed use the UD buttons to select a programme and press the OK button to select the chosen programme Press the Red button for page down and the Green button for page up Press the EPG or EXIT button to close the EPG Press the BACK button to switch between the current and last programme that was viewed Because detailed information is not broadc...

Page 18: ...in OK EPG MENU EXIT EPG MENU 16 9 AUDIO OK EPG MENU 16 9 OK EXIT TEXT SIZE HOLD INDEX OK EXIT TEXT SIZE HOLD INDEX PROGRAMME GUIDE 21 Aug 2008 10 33 DTV 1 BBC ONE 2 BBC TWO 3 ITV1 4 Channel 4 5 Five 6 ITV2 DTV 2 10 00 11 00 BBC TWO Cash in the Attic 21 Aug 10 30 11 30 Cash in the Attic This Morning T4 Bea T4 Vo Michaela s Zoo Babies Airline BBC News North Olympics 2008 Olympics 2008 Diagnosis Murd...

Page 19: ...ess the MENU button or to cancel setting the reminder and return to the television programme press the EXIT button If the reminder is to repeat either daily or weekly proceed to step 5 on the next page If the reminder is to be set for a single event press the OK button and the Schedule List will be displayed with the new reminder added to the list 4 Press the EXIT button to close the Schedule List...

Page 20: ...ICTURE menu Setting the Picture Mode Four preset picture modes can be selected or using the Personal option the Contrast Brightness Colour Intensity and Sharpness can be set to preferred levels 1 Press the MENU button 2 Press the R button to select the first PICTURE menu and then press the D button once to select Picture Mode 3 Press the LR buttons to select any of the different modes as shown bel...

Page 21: ...le DTV can be set to Auto and the HDMI input can be set to Zoom1 for DVD playback Setting the Aspect Ratio If the Aspect Ratio is set to Auto the TileVision will alter the picture to best suit the programme being received and there will be little need to change the setting manually 1 Press the MENU button 2 Press the R button to select the first PICTURE menu and then press the D button until the s...

Page 22: ...utton until Surround Sound is selected 3 Press the LR buttons to switch between TruSurround and Off 4 Press the EXIT button once or the MENU button twice to save the setting and close the SOUND menu Auto Volume If there is an large difference between the volume of one programme and another setting Auto Volume to on will reduce the disparity 1 Press the MENU button 2 Press the R button twice to sel...

Page 23: ... time except that settings are included for Volume and Mode The range for the initial volume is 0 100 and the options for Mode are DTV ATV and Radio Time Functions Some DTV broadcasts can include multiple audio languages and or narrative audio descriptions for the visually impaired V I The Audio Languages menu allows available languages to be selected and broadcasts with audio descriptions to be c...

Page 24: ...ally switch off after two minutes with no signal from the chosen source Audio Language The primary or secondary language are used as appropriate if they are available when a multiple language source is broadcast Set the preferred audio languages as follows 1 Press the MENU button 2 Press the L button twice to display the SETUP menu 3 Press the D button until Audio Language is selected and press th...

Page 25: ...UP menu SETUP Language English Audio Language English Subtitle Language English Hearing Impaired Off Country UK Primary English Secondary English Close SETUP Language English Audio Languages English Subtitle Languages English Hearing Impaired On Country UK OK EPG MENU EXIT OK EPG MENU EXIT OK EPG MENU EXIT Hearing Impaired If a broadcast includes alternative audio for the hard of hearing it will b...

Page 26: ...uidance Off Restore Setting LOCK Lock System Off Change Password Block Program Parental Guidance 18 Restore Setting Block Programme 1 BBC ONE 2 BBC TWO 3 ITV 4 Channel 4 5 Five 6 ITV2 7 BBC THREE 9 BBC FOUR 10 ITV3 11 SKY THREE DTV DTV DTV DTV DTV DTV DTV DTV DTV DTV LOCK MENU EXIT OK The OK button will make the TileVision switch to the selected channel so it can be viewed when the list is closed ...

Page 27: ...m six 800 Item seven 160 Item eight 850 Item nine 121 Latest news item Home MENU SHORTCUTS HELP HOME adveretising banner Typical inset example Some broadcasters show a red on screen prompt when DTV Text is available To remove the prompt from the screen press the Green button DTV Text is not available immediately after changing channel as it takes a few seconds for the TileVision to receive the dat...

Page 28: ...ure Status Memory Functions Sound Status Memory AVL Auto Volume Leveller ARC Aspect Ratio Control Teletext TOP FLOF MHEG 5 Specifications Troubleshooting The red green LED is not lit No picture and no sound or poor picture and poor sound Remote control not working Check for power failure Make sure remote isolation switch is set to on Make sure the mains socket or fused spur is set to on and has po...

Page 29: ...TV 19 FR1 19 Tilevision Operating Instructions December 2009 Part No TVS 00378 04 PORTER LANCASTRIAN LIMITED www tilevision tv ...

Reviews: