


13
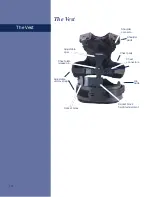
• With one hand firmly holding the
camera or the center post, use
the T-handle Allen wrench to
loosen the gimbal locking screw.
Remember to always keep the
post horizontal when the screw
is loosened!
Take the wrench out
of the screw but keep it within
reach.
• Grasp the center post and carefully
slide the post in the gimbal. Use
your thumb to push against the
gimbal. Find the place where the
sled is balanced on the gimbal like
a seesaw on a fulcrum. Then slide
the post through the gimbal about
1/2” (12mm) towards the battery.
This will place the sled’s c.g. 1/2”
(12mm) below the gimbal yoke
bearings, and be slightly bottom
heavy.
• Tighten the gimbal locking screw.
Be careful not to over tighten as
the Allen wrench can generate
tremendous force.
WARNING:
IF YOU
LOOSEN THE GIMBAL
LOCKING SCREW WHEN
THE CENTER POST IS
VERTICAL, THE WHOLE
SLED WILL DROP
RAPIDLY AND DAMAGE
THE STEADICAM.
We will fine-tune top to bottom balance
after we get close to fore-aft and side-to-
side balance. We may need to fine-tune
each axis as we balance in another axis,
and we get closer to the perfect balance
for the shot.
Look at the Steadicam from the side. If the sled is tipped up or down:
• Hold the center post vertical.
• Loosen the dovetail locking knob.
• Move the camera forward or
backward by turning the fore-aft
knob until the camera is level. You
can use a bubble level to help you
find vertical.
• Re-tighten the dovetail locking
knob.
Now we are ready to fine-tune the top-to-bottom balance by using the
“drop time” test
• Make sure the dovetail locking knob is tight.
• It’s good to have our assistant hold the stand.
• Rotate the sled to horizontal. • Let go of the center post.
• Count how many seconds it takes the center post to fall to vertical.
If the rig has a drop time of less than two seconds it is too bottom heavy. You need to
move the sled’s c.g. upwards, closer to the gimbal. If the drop time is more than two
seconds, move the sled’s c.g. lower, further from the gimbal:
• With the rig horizontal, loosen the clamp and slide the centerpost though
the gimbal about 1/8” (3mm) in the proper direction.
• Re-tighten the gimbal locking screw.
• Re-do the drop test. Keep making small adjustments until the sled has a 2
second drop time.
• Recheck the fore-aft and side-to-side balance by looking at the sled. Trim
with the fore/aft and side-to-side knobs as necessary.
Note: A drop time of 1 to 4 seconds might be best for a
particular shot. You will eventually determine what works
best for you for average shooting, and what works best for
you for each shot. But let’s start with a 2 second drop time.
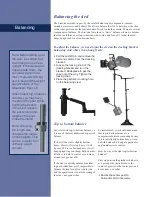
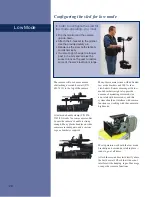
fore and aft
adjustment
knob
side to side
adjustment
knob
Fine tune the side-to-side balance:
• Look at the sled from the front or rear.
Adjust the side-to-side knob on the stage
until the center post is vertical. Again, you
can use a bubble level to help you find
vertical.
balance point of
the gimbal