background image

10

Attaching the 

Camera

Attaching the camera to the sled

We attach the camera to the sled via a dovetail plate. With the Flyer-LE, this plate has 

a rack for adjusting fore-aft balance on the left side, safety stops on the right side, and 

several holes for mounting screws. We want to attach the dovetail to the camera so that 

we have the widest possible range of adjustment, both fore-aft and side-to-side. 

We start this process by finding the 

camera’s center of gravity (c.g.) or 

balance point, then properly position the 

dovetail plate relative to the camera’s c.g.

• If you like, remove the battery from 

your camera if it has an auxiliary 
power input, either 12 or 24 volts. 
With a very heavy camera (15+ 
pounds/6.8kg or so), this is a good 
idea, but it’s not necessary or 
advisable with a very light camera.

• Attach all accessories, matte 

boxes, obie lights, etc. and load 
the tape or film. If the camera 
has a quick-release plate (tripod 
adaptor), leave it on the camera.

• Balance the camera fore-aft on a 

rod or pencil (as shown) and mark 
the balance point with a piece of 
tape. 

• Repeat for side-to-side.

• Examine the dovetail. Turn it over 

to locate the rack, the three rows 
of large and small slots, and the 
stops. 

• Remove the screws that are stored 

at the front of the dovetail.

Finding the camera’s side to 
side center of gravity. 

Finding the camera’s fore-aft 
center of gravity.

• Place the dovetail against the 

bottom of the camera (or quick 
release plate) and move the dovetail 
fore-aft until the Second slot from 
the rear is over the camera’s c.g. 

This position is not intuitive, so 
pay close attention to this detail.

stops

forwar

d

rack

place this hole 

at the c.g.

Summary of Contents for STEADICAM FLYER LE

Page 1: ...Contents Operating Manual p n LIT 602740 ...

Page 2: ...ppauge New York 11788 631 273 2500 800 645 2522 631 273 2557 fax www steadicam com steadicam tiffen com www tiffen com Technical Support 1 818 843 4600 ext 17 Manufactured in the United States of America The Tiffen Company LLC manual version 4 14 2008 written by J Holway L Hayball ...

Page 3: ...ort and practice you put into Steadicam operating the better you will be so it s important to develop good habits from the beginning Several two hour sessions will get you started but an operator can always be more skilled with a Steadicam and also be more effective and artistic in choosing how to start move and stop the camera In the beginning it s helpful and more fun to have a friend work with ...

Page 4: ...t 2 section indexed carbon fiber no tools extendable post Index system and increased post diameter assures the alignment and stability of the sled Safety system prevents separation in normal operation Friction free gimbal assembly now with a larger knurled extended handle fits securely in the operator s hand Precision stage adjustments enable careful balancing of the camera to the rig Operates in st...

Page 5: ...g design with rounded arm sections Pinch zone eliminated No tools Arm Vest interface Ergonomic new Flyer LE Vest Based on the comfortable Flyer vest New ergonomic breastplate Metal shoulder connection with 100 positive vest to shoulder clips New removable vest and pad covers Proprietary tool free arm to vest connector with two axis arm to body angle adjustments Stiff front spar and yoke Vertical a...

Page 6: ...6 Camera mounting platform The Flyer LE Sled The Flyer LE Sled Fore aft adjustment knob Stage connectors Post Post clamp Side to side adjustment knob ...

Page 7: ...7 Docking collar Gimbal handle Monitor bracket Battery mount PowerCube Batteries Dovetail lock Gimbal ...

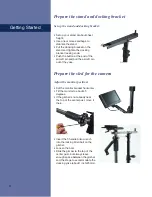
Page 8: ...button at the end of the aircraft pin and pull the aircraft pin out of the yoke Adjust the monitor position Set the monitor bracket horizontal Tilt the monitor to about 45 degrees If the gimbal is not already near the top of the center post move it there Insert the T handle Allen wrench into the locking Allen bolt on the gimbal Loosen the bolt Slide the gimbal to the top of the center post but alw...

Page 9: ...tage and set aside Loosen the dovetail locking knob about one half turn If you unscrew this knob all the way the spring may pop out Safety stops on the dovetail and a safety catch on the sled keep the dovetail from sliding off the stage when the dovetail locking knob is loose Pull the dovetail to the back of the stage until the safety catch stops it Pull the safety catch down and slide the dovetai...

Page 10: ...s is a good idea but it s not necessary or advisable with a very light camera Attach all accessories matte boxes obie lights etc and load the tape or film If the camera has a quick release plate tripod adaptor leave it on the camera Balance the camera fore aft on a rod or pencil as shown and mark the balance point with a piece of tape Repeat for side to side Examine the dovetail Turn it over to lo...

Page 11: ...r if necessary from the camera to the video input on the back of the stage If necessary choose the camera s video output that allows you to watch playback as well as live video If necessary connect the power cable by plugging the three pin Lemo into the Power output on the back of the stage and the other end into the appropriate DC power input on your camera Several power cables are available for ...

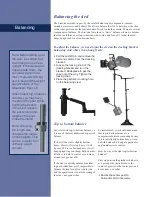
Page 12: ... bottom heavy it will hang upright a good thing but be hard to tilt and very hard to control as you move around not good at all If the sled is neutrally balanced neither top nor bottom heavy it s impossible to balance the sled fore aft or side to side and the operator must do all the aiming of the sled not good either Note Before letting go of the sled be certain that it will hang more or less upr...

Page 13: ...can use a bubble level to help you find vertical Re tighten the dovetail locking knob Now we are ready to fine tune the top to bottom balance by using the drop time test Make sure the dovetail locking knob is tight It s good to have our assistant hold the stand Rotate the sled to horizontal Let go of the center post Count how many seconds it takes the center post to fall to vertical If the rig has...

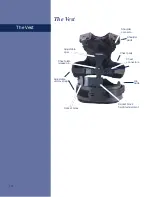
Page 14: ...14 The Vest The Vest Shoulder pads Chest pads Adjustable spar Adjustable velcro straps Chest connectors Shoulder connector Socket block Hip pads Socket block height adjustment Chest plate release pin ...

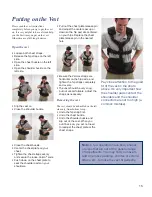
Page 15: ...r remove padding shorten or extend straps etc to make the vest fit perfectly Pay close attention to the good fit of the vest in the photo above It s very important how the shoulder pads contact the shoulders and the shoulder connectors are not too high a common mistake Putting on the Vest Pull out the chest plate release pin and adjust the center spar up or down so the hip pad sits centered on you...

Page 16: ...of the arm determine the lift angle of the arm These two adjustments are your threads and they are specific to your body size and shape Setting your threads correctly is critical for good operating Some combination of adjustment of these screws and your physique and posture will make the arm lift straight up when carrying the sled The angles of adjustment are not directly in out and side to side b...

Page 17: ...pe Adjusting your threads If you have big pectorals and a flat stomach the top screw is almost all the way in If you ve been eating well and exercising less the top screw will be further out Always dial in the top screw first to your setting then turn in the bottom screw until it just snugs up against the fitting There is no need to tighten the bottom screw very hard Always keep a hand on the free...

Page 18: ...ioned behind the rig i e not to the side aimed at you Use your right hand to hold the arm and gimbal together frame 4 above Place your left hand on the center post just below the gimbal to control the Steadicam Do not touch the camera frame 4 above Step forward and stand up straight You are now flying the Steadicam but still locked in the dock Pull the aircraft pin out of the docking yoke frame 6 ...

Page 19: ...ed to adjust your threads Typically it s a matter of the in out screws rather than the side to side screws Holding the Steadicam might feel awkward at first Don t worry you will gain control and endurance rapidly as you practice The first time is typically the most annoying because there are so many adjustments to make before it all falls into place and magically works with you It may be that you ...

Page 20: ...LE nor if the arm sections are boomed too far up or down Do not force the lift knobs At the right angle they turn very easily Ideally each section of the arm should come to rest slightly above horizontal about 5º Adjust the arm section nearest the sled first the forearm section If the arm floats at too high an angle pull the sled down with your left hand until the forearm section is about 5º above...

Page 21: ...r use a tool to adjust the arm lift Now let s fly the rig again Move the sled off your left hip as before Keep the camera close This is what we call the Missionary Move your torso ever so slightly to test how your body angle controls the Steadicam Repeat with the sled further away from you but keep your torso vertical The sled should stay in place with only a little help from your right hand Boom ...

Page 22: ...fore it happens One of the big Steadicam operating skills is anticipating how the sled will behave as we move along There are several classic grips we use to aim and control the sled Finding your grip Grab the center post with your left hand just below the gimbal All five fingers should be LIGHTLY in contact with the post but this isn t a tea party Don t just use your fingertips wrap you fingers a...

Page 23: ...rkshop we once again strongly urge you to do so as it is the quickest way to learn how to operate a Steadicam properly However there are several good training videos including the 1990 Classic EFP Video Training Tape which has been remastered to DVD Although some of the information on the EFP video is specific to the EFP most of the concepts information and exercises are common to all Steadicams a...

Page 24: ...ng dynamic balance The top figure looks like the Model One or the SK Steadicams The camera c g is centered over the post the monitor and battery are on the same horizontal plane and their common c g is in the post This unit is in dynamic balance and pans flat The second figure has the monitor raised a bit This looks like most Steadicam configurations including the Flyer LE in either high or low mo...

Page 25: ...ou have two choices for moving the battery Re rack rebalance and spin again and again until the sled pans flat This should not take a lot of time When the battery is within about 1 4 inch 6mm of ideal the sled will behave nicely pan flat and feel sweet We suggest you do not attempt to do this for the first time on set Adding any accessory to the sled will affect both static and dynamic balance Cha...

Page 26: ...078 7393 01 works for some cameras but be sure the camera s handle is strong enough Many plastic handles on video cameras are inadequate and a custom cage or bracket is required Many film cameras come with dedicated low mode brackets and 100 video viewfinders Some camera specific low mode bracketry might also provide a means of mounting motor rods or a dovetail with motor rods and this system shou...

Page 27: ...will still be on top but it is upside down Balance statically and dynamically Once balanced adjust your drop time so the camera now falls to the bottom of the rig simply slide the gimbal towards the electronics to achieve a proper drop time Cautionary Tip In low mode the dovetail lock works better if the camera weight is supported as you lock the dovetail A useful trick The range of low mode lens ...

Page 28: ...ly as the battery is discharged When the voltage reaches 13 8 volts the voltage drops off very quickly to 11 volts within 8 minutes The batteries have a self limiting cut off of 11 volts If the voltage drops below 26 volts when the camera is not running you will not get any appreciable run time with most 35mm 24 volt film cameras Charging your batteries There is no memory effect with Lithium Ion b...

Page 29: ...harge Characteristics of PowerCube 10 11 12 13 14 15 16 17 0 20 40 60 80 100 120 140 160 180 200 Elapsed Time min Voltage V Discharge Condition 30W 11V EDV Ambient Temp Room Temp Discharge Time 184 6min 92 3Wh ...

Page 30: ...30 The Monitor Monitor lock Standard 7 Color LCD Monitor p n 602 7500 7 color LCD monitor with optional frameline generator p n 302 7500 01 available on the SE version see opposite page for specs ...

Page 31: ...lection menu Release the PWR button then release both the DN and UP buttons at the same time 3 Press DN button to select OFF mode 4 Press again the PWR button to complete this setting After this setting is completed even when you press DEFAULT RESET this setting will not be reset back to ON mode If you want to go back to ON mode you can select the menu to get ON mode IV SPECIFICATIONS Specificatio...

Page 32: ...32 The Monitor Optional 7 HD Composite 16 9 LCD Monitor p n 257 7500 ...

Page 33: ...33 ...

Page 34: ...ly sensor 800 7930 Low Mode Kit 078 7393 01 Battery Mount V Loc 24V 602 7303 01 Battery Mount Anton Bauer 602 7300 01 PowerCube 2 2 Starter Kit FFR 000040 Docking bracket LE 803 7900 T handle Allen wrench 5 32 MSC 093270 Tool pouch FFR 000013 Sand bags FFR 000014 Cap Steadicam FFR 000021 Turtle base C stand FGS 900041 Adaptor Phono BNC JCK 130000 Adaptor BNC RCA JCK 130001 Flyer LE instruction man...

Page 35: ...aps for vest 803 7817 Long arm post 602 7237 01 Cable 12V power RED 802 0106 Cable video RED 802 0107 Spare 3 ft video cable 078 4122 01 Spare 1 4 20 camera screws 078 1121 Spare 1 3 16 camera screws 078 1122 Soft case LE 078 7358 01 Foam insert 602 7905 SteadyStand 601 7910 Monitor 7 16 9 w FLG 302 7500 01 PowerCubeTM Battery FFR 000035 IDX VL 4S battery charger FFR 000008 PowerCube battery hard ...

Reviews: