Thuraya Atlas IP and Atlas IP+
© 2017 Addvalue Innovation Pte Ltd. All rights reserved.
3
A.
Getting Started
1.
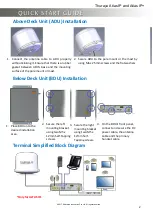
Connect the cables and accessories as shown on the
Terminal Simplified Block Diagram on page 2.
2.
Insert a Thuraya SIM card, with the gold printed circuit
facing down and switch on the terminal.
3.
User can access the web console when the Terminal LED
turns blinking green while Antenna and Registered LEDs
turn green.
System is ready for normal operation at the default
DATA mode.
B.
Select DATA or VOICE Mode
1.
On the Web Console, select
Settings
>
Admin
>
System
Operation Mode
, there are 2 modes of “Data” and
“Voice”.
2.
Select DATA mode for browsing internet, emailing and
**calling using the VoIP services.
3.
Select VOICE mode for initiating a voice call using a
Primary Handset.
Note:
When switching between DATA and VOICE mode, it
will take about 2 to 3 minutes to take effect.
C.
BDU LEDs States
Terminal:
Blinking
Green
Steady
Red
BDU is functioning.
During BDU power up or detect
failure.
Antenna:
Steady
Green
Steady
Red
No Light
ADU is functioning.
ADU detects failure.
ADU is calibrating.
Registered:
Steady
Amber
Steady
Green
Registration to network in progress.
Registered to network.
Data:
Steady
Green
No Light (OFF)
In
Data
Mode, data connection is
activated.
In
Data
Mode, data connection is not
activated.
In
Voice
Mode, user can initiate a
voice call using the Primary Handset.
Note:
Check with your service provider for a valid VoIP
service subscription.
Use Primary Handset
(Optional)
For Voice Call
1.
On the Web Console, select
Settings
>
Admin
>
System Operation Mode
, click “
Voice
” and
then select “
Update Settings
”. Check the
handset to ensure the voice icon
is ON.
2.
On the primary handset, dial phone number in
the format:
<00><Country Code><Telephone
Number>
.
3.
Disconnect the call by pressing the
key.
For SMS Messaging
1.
Select
Menu
>
Messaging
>
OK
>
New
message
>
OK
.
2.
Enter your text message using the keypad.
3.
Select
OK
>
Send
. Check the handset to
ensure the data icon
is ON.
4.
Enter the destination mobile number format:
<00><Country Coode><Telephone Number>
or Select
OK
to choose an existing contact and
then select
OK
to send text message.
Activate Wi-Fi Setting using
Web Console
1.
Select
Settings
>
Wi-Fi
.
2.
Select
Enable
and click
Update
.
Update successfully completed.
3.
Use a Wi-Fi Enabled device to search for
Network Name (SSID):
atlas
.
Activate VoIP Setting for
Phone Call using Web Console
1.
By default, VoIP is enabled. LED should be
steady green in Data mode. Otherwise, select
DATA
>
Connection
, and then select
Activate
Default Profile
.
2.
Select
Settings
>
VoIP
.
3.
Select
Enable
and click
Update
.
Check for the VoIP icon
is activated
before making a call.


