THOR H-2/4HD-EM Manual Download Page 22


                          H-2/4HD-EM(S/H) 


General 

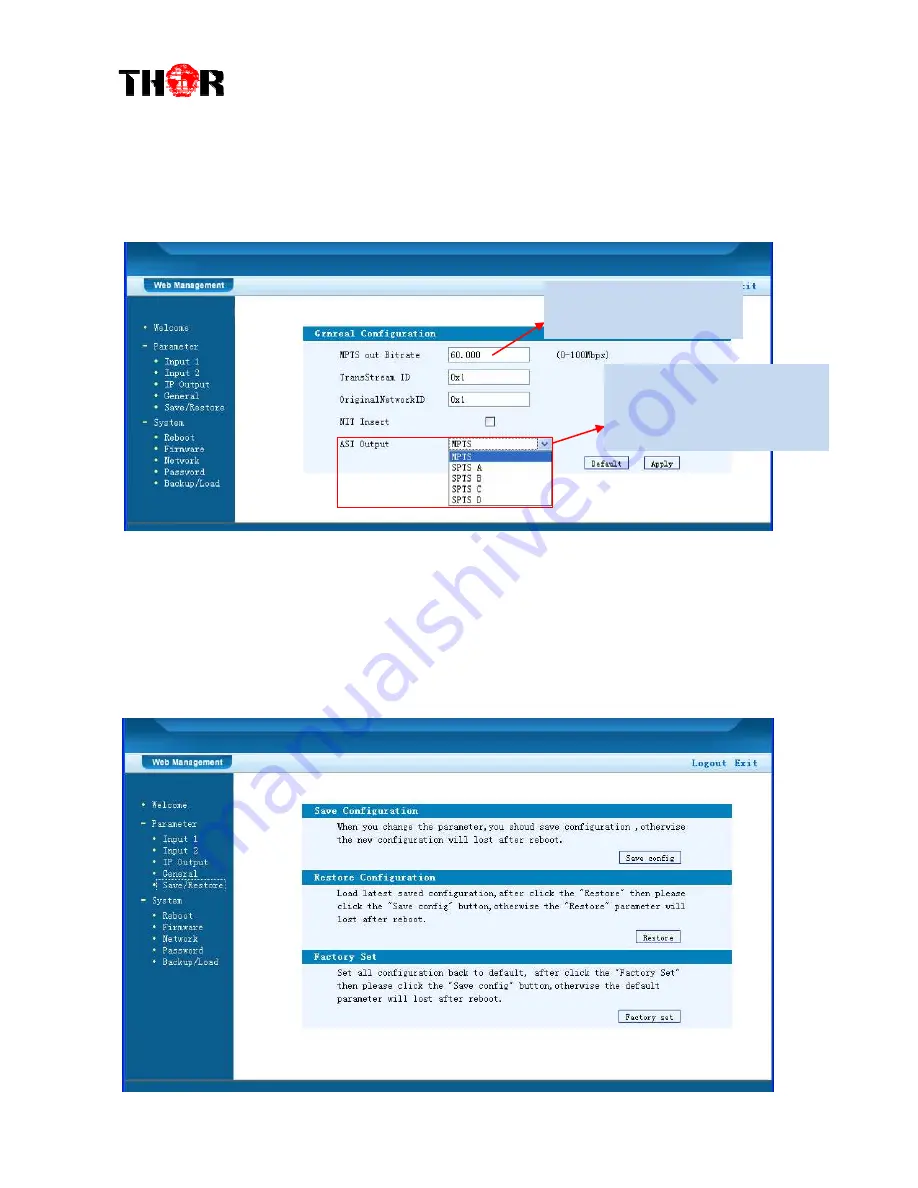
Clicking “General”  from the menu, it  will display  the interface as shown in Figure-5 

where to set the network info for the output TS. 


Figure-5


Save/Restore 

From  the  menu  on  left  side  of  the  webpage,  click  “Save/Restore”,  it  will  display  the 

screen as Figure-6 where to save or restore your configurations. 


Figure-6


Users  can  copy  a  stream  from 

the IP out streams (1 MPTS & 8 

SPTS) to output through ASI. 

To  set  the  max  output  bit 

rate for the ASI MPTS out 

Summary of Contents for H-2/4HD-EM

Page 1: ...FIBER PRO DVB H 2 4HD EM S H 2ch or 4ch HD SDI AC3 CC 608 708 Revision 1 3 Revised 2014...

Page 2: ...form without the written permission of Thor Broadcast The contents of this document are subject to revision without notice due to continued progress in methodology design and manufacturing Thor shall...

Page 3: ...ION LAYOUT 6 2 1 GENERAL PRECAUTIONS 7 2 2 POWER PRECAUTIONS 8 2 3 DEVICE S INSTALLATION FLOW CHART ILLUSTRATED AS FOLLOWING 8 2 4 ENVIRONMENT REQUIREMENT 8 2 5 GROUNDING REQUIREMENT 9 CHAPTER 3 OPERA...

Page 4: ...dio and Closed Caption 608 708 Also comes stock with dual power supply as a back up units is on standby to ensure your unit won t fail Structured to facilitate to the demanding needs of any broadcast...

Page 5: ...coding Rate Control Mode CBR VBR Audio encoding MPEG1 Layer II MPEG2 AAC MPEG4 AAC Dolby Digital AC3 Sample rate 48KHz Bit rate 64kbps 96kbps 128kbps 192kbps 256kbps 320kbps System Local interface LCD...

Page 6: ...en only one power supply is connected or one of the power supplies fails the device will give alarm sound and then press the alarm switch to turn off the alarm sound NMS port for the connection betwee...

Page 7: ...ry during installation For this reason please read all details listed below and make and use caution before proceeding to operate and use this electronic equipment 2 1 General Precautions Must be oper...

Page 8: ...tween 2 rows of machine frames should be 1 2 1 5m and the distance against wall should be no less than 0 8m Machine Hall Floor Electric Isolation Dust Free Volume resistivity of ground anti static mat...

Page 9: ...so it helps reject minor interference that may disrupt the devices ability to function smoothly General rule of them make sure the device is grounded when installing anywhere Always use copper wire Wh...

Page 10: ...H 2 4HD EM S H Chapter 3 Operation 3 1 LCD Tree Breakdown...

Page 11: ...eral Settings for Main Menu Press Lock key on the front panel to enter the main menu The LCD will display the following pages where user can configure the parameters for the device User can press UP D...

Page 12: ...and 2 2 Input 2 to represent the two SDI input modules respectively Each SDI input module support two program input connecters Under submenus 2 1 or 2 2 user could set the video audio parameters for...

Page 13: ...cable for rest part Low Delay This unit can achieve a low time delay from encoding to decoding terminal end to end NOTE The different combination of Video Format Video Bit rate Low Delay Mode the Reso...

Page 14: ...e bit rate from the options provided Audio Gain Users can adjust the audio gain in this menu Program Info Users can enable or disable the program output in the first sub menu and configure the other p...

Page 15: ...he IDs are in hexadecimal form Output Bit rate Users can set the max output bit rate for the ASI MPTS out Range 0 100 Mbps NIT Insert Users can insert your NIT with operations in the menu ASI Output U...

Page 16: ...vice connection in the network 4 1 NMS 4 2 IP Stream NMS 4 1 1 NMS IP 4 1 2 Subnet Mask 4 1 3 Gateway 4 1 4 MAC Address 4 1 5 Web NMS Port 4 1 6 Reset Password NMS IP 192 168 000 136 The IP address fo...

Page 17: ...Output 4 2 2 SPTS Output A 4 2 3 SPTS Output B 4 2 4 SPTS Output C 4 2 5 SPTS Output D System 5 1 Save Config 5 2 Load Saved CFG 5 3 Factory Reset 5 4 LCD Time out 5 5Version Save Configuration Yes No...

Page 18: ...IP address of this device is 192 168 0 136 We can modify the IP through the front panel Connect the PC Personal Computer and the device with an ethernet cable and use ping command to confirm they are...

Page 19: ...mation of the programs 1st 2ed ones from the 1st SDI encoding module as Figure 3 It automatically identifies and displays the signal source interface and real time encoding bit rate of corresponding i...

Page 20: ...to refer detailed explanation of terms on this interface Click this button to apply the default setting of Input 1 Click this button to apply the modified parameters This column is for setting the 1s...

Page 21: ...isplay the interface where to configure the output IP stream in MPTS or SPTS the as Figure 4 Figure 4 After setting the parameters click Apply to save the settings This device supports 1 MPTS 4 SPTS I...

Page 22: ...fo for the output TS Figure 5 Save Restore From the menu on left side of the webpage click Save Restore it will display the screen as Figure 6 where to save or restore your configurations Figure 6 Use...

Page 23: ...lly Figure 7 Update the Device Click Firmware from the menu it will display the screen as Figure 8 Here user can update the device by using the update file Click Browse to find the path of the device...

Page 24: ...isplays the network information of the device Here you can change the device network configuration as needed Figure 9 Change Password When you click Password it will display the password screen as sho...

Page 25: ...noted in the LCD window Backup Load Click Backup Load from the menu it will display the screen as in Figure 11 Backup Configuration To back up the device configuration file to a folder Load Configura...

Page 26: ...ion for the heat sink on the rear panel and other heat sink bores if necessary Checking the AC input within the power supply and ensure it is working the connection is correctly installed before switc...

Page 27: ...H 2 4HD EM S H Chapter 6 Packing List Thor H HD ME Encoder x 1 User Manual x 1 SDI Cables x 1 Power Cord x1...

Reviews: