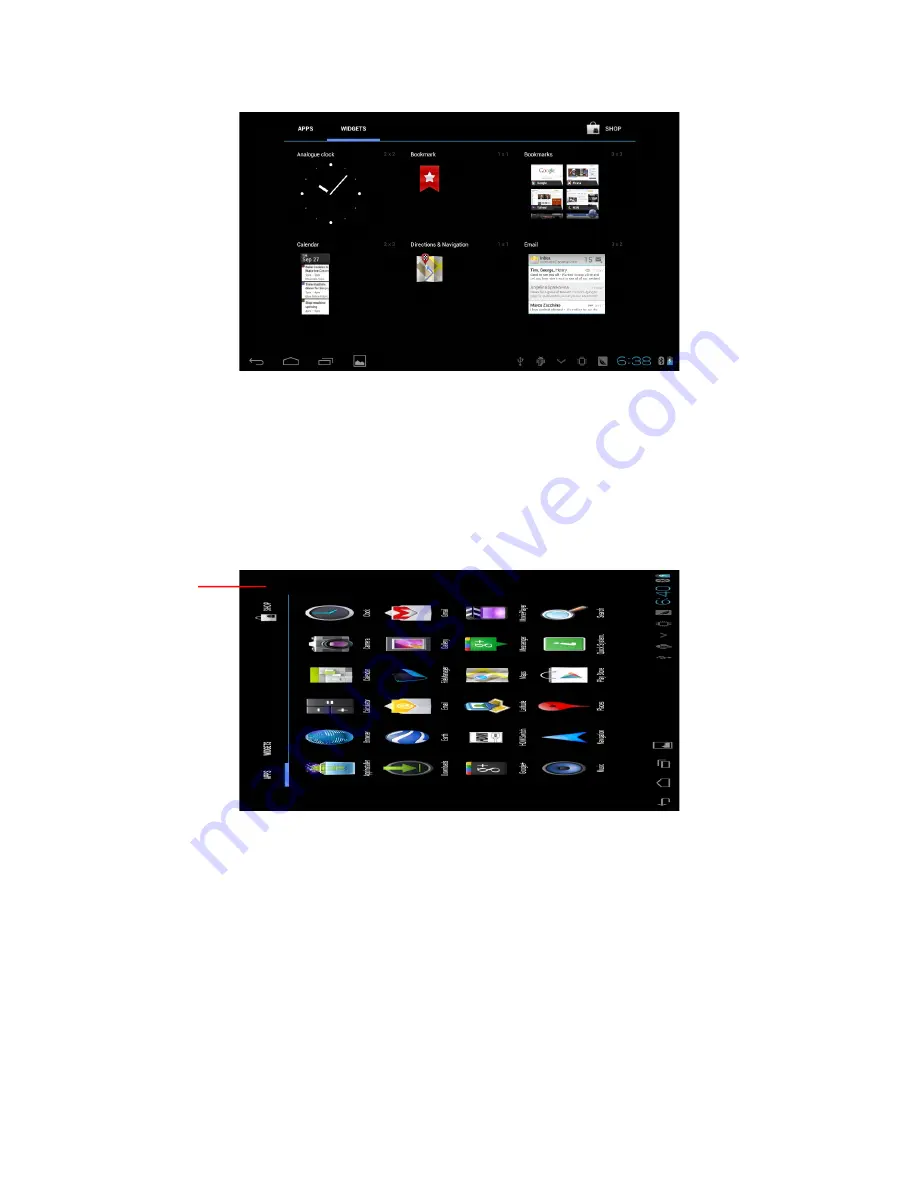
THOMSON Platium User Manual Download Page 14

2.7 Accessing Apps

How to launch an application on your tablet

1. Please click application program menu in the upper right hand corner of the 

homepage to display the APPS page.

2. Scroll left or right to view icons for your APPS.  Press the icon to launch the APP.

3. You can exit the APP by pressing the back key to the last interface, or press the 

homepage key to return homepage interface directly.

2.8 USB connection

Storage setting of Tablet

Before transferring data to or from your tablet, you must set storage mode first:

1. Connect  tablet  with  computer  by   using  the  included  Micro  USB  data  cable. 

Notice bar will show the notice prompt. 

2. Click status bar, options of status bar show.

3.

Among options of status, click to choose 

USB connected

, then click to open USB 

storage device.

4. At this time, USB has already been connected.


14

App
s

Summary of Contents for Platium

Page 1: ...Platium 10 1 Dual Core Tablet User Manual It is important to read this instruction manual prior to using your new product for the first time ...

Page 2: ...2 ...

Page 3: ...ng or Sliding 11 Drag 11 Rotate 12 2 6 Homepage Interface 12 Scrolling between homepage screens 12 Change desktop wallpaper 13 Add widgets 13 2 7 Accessing Apps 14 How to launch an application on your tablet 14 2 8 USB connection 14 Storage setting of Tablet 14 Copy data to storage card 15 Tablet storage memory 15 2 9 Character input 15 Use screen keyboard 15 Select the input method you need to us...

Page 4: ...he play list 21 5 2 Camera 21 Camera functions 21 Video function 22 5 3 HDMI 22 HDMI High definition video interface 22 5 4 Media Browser 23 View pictures 23 Edit and set the picture 23 Video preview and playback 24 6 Internet 25 Find texts within the webpage 25 Manage bookmarks 25 Use browser window 26 7 Other Applications 26 7 1 Alarm clock 26 7 2 Calculator 27 7 3 File Management 27 Browse file...

Page 5: ...ge and Input Method 29 Select language for the device 29 Keyboard and input method 30 8 6 About Tablet PC 30 View Tablet status 30 View system version 30 9 Installation and Management of Program 30 9 1 Installation 30 Install third party applications 30 9 2 Management and Uninstall 30 Management applications 30 Uninstall applications 31 9 3 Update Approach 31 10 System Upgrade 31 10 1 System Upgra...

Page 6: ...hould not use this unit Children should be monitored to ensure that they do not play with the charger The charger should always be readily accessible The device and charger should not be exposed to dripping or splashing water No objects filled with liquids such as vases shall be placed on the device Always leave a minimum distance of 10 cm around the unit to ensure sufficient ventilation Naked fla...

Page 7: ...ard an aircraft near medical equipment fuel chemicals or blasting sites INTERFERENCE All wireless devices are susceptible to interference which may affect their performance AUTHORISED PERSONNEL Only qualified people are authorized to install or repair this product ACCESSORIES Only use batteries chargers and other accessories which are compatible with this equipment Do not connect incompatible prod...

Page 8: ... increase the volume 5 Vol To decrease the volume 6 Power key Press to turn the device on or to turn the screen on and off Press and hold to access the power off menu 7 Micro USB2 0 Hi speed port Using micro USB to USB data can be tablet can be connected to the computer as device 8 HDMI High definition multimedia interface 9 DC input Used for connecting charging cable for charging the device batte...

Page 9: ...s User Manual reflects the version of the Android operating system on this product at the time of publication As Android is frequently updated there may be differences between the contents of this User Manual and the product Thank you 2 1 Battery Charging Your new Tablet has an internal rechargeable battery We recommend to charging the device fully before using for the first time Power adapter Con...

Page 10: ...s and hold the Power Key until the Tablet options menu appears 2 Press ok to turn off the Tablet 2 3 Turn the Screen On And Off When the Tablet is on you can turn off the screen to conserve battery power Simply press the Power Key once to turn the screen off Press the Power Key again to turn the screen back on Note The charging time will be longer when operating and charging at same time 10 ...

Page 11: ...click Click to Activate If you want to activate an item such as textbox or hyperlink in a webpage tap on the item with your finger tip Scrolling or Sliding Scrolling or sliding is done by sliding your finger tip along the screen rapidly up or down or left to right Drag To press and hold item with your finger tip and slide your finger to the desired location on the screen Lift your finger to releas...

Page 12: ...other menus on the tablet The background wallpaper can be changed to suit your personal tastes using included wallpapers or one of your own photos Scrolling between homepage screens Your tablet homepage is comprised of 5 screens that can be scrolled back and forth to provide an extended space for application icons shortcuts and widgets You can scroll between the multiple home pages by sliding your...

Page 13: ...screen to provide information such as weather or time or provide quick actions like frequently called numbers etc To add widgets to your home page 1 Click application program menu in the upper right corner of the homepage 2 After entering application program menu click WIDGETS button on the top left of interface 3 Press and hold the widget you want The system will return back homepage while holdin...

Page 14: ...e last interface or press the homepage key to return homepage interface directly 2 8 USB connection Storage setting of Tablet Before transferring data to or from your tablet you must set storage mode first 1 Connect tablet with computer by using the included Micro USB data cable Notice bar will show the notice prompt 2 Click status bar options of status bar show 3 Among options of status click to ...

Page 15: ...ers the touch screen virtual keyboard will appear on the screen The following input methods are provided for the keyboard to select 1 Android keyboard 2 Input method of a third party user can install additional keyboards from the Google Play store Select the input method you need to use According to presetting Tablet will display Android keyboard when you want to input characters 1 Press menu key ...

Page 16: ...ng on the button located to the right of the home button Figure 1 Switch input capital and small letters 2 Switch character input mode and symbol figure input mode 3 Click to insert space 4 Click to execute carriage return 5 Click and press on to delete characters on the left of the cursor 6 Click here to switch input method 16 ...

Page 17: ...he procedure Click the Back Key to return to the homepage interface or click the Homepage key to instantly exit the application and return to the homepage Factory Default In the event your tablet produces a serious system error or the password is forgotten the Factory Default can be used to reset the tablet to the original configuration There are two methods of setting the Factory Default 1 On the...

Page 18: ...shment 3 1WIFI Connection Your Tablet is equipped with WiFi networking To connect a WiFi network 1 On the homepage interface click and select the menu key and pop up the menu setting 2 Click and select the System Setting 3 Click Wi Fi and ensure Wi Fi is switched to On 4 After opening Wi Fi a list of nearby Wi Fi networks will appear on the right 5 Select the Wi Fi network you wish to connect to a...

Page 19: ...ext button 3 Input E mail address and password of your E mail account 4 Click and select Next button to select that your E mail type either is POP3 or IMAP 5 Click and select Next button again to inspect whether the send receive server of E mail is available 6 Input the name of account and display the name of E mail to be sent and then click and select OK 7 If the E mail is available automatically...

Page 20: ...9 Select the attachment that you will send such as picture and video 10 After clicking and selecting the Send send out the E mail 5 Multi media 5 1 Music The included Music App organizes your music files in four views as Artist Albums Songs Play List and Playing Select the view from the top of the app to display the contents You can view and search music using the Artist Song or Album views The Pl...

Page 21: ...t add onto the play list 5 Click and select the Newly established 6 Input the name of play list 7 Click and select the Save Delete the play list 1 Click and select the music 2 Click and select the songs 3 Press the songs that you will add onto the play list 4 Pop up the music setting menu click and select Delete 5 2 Camera Camera functions 1 Click and select the camera 2 The system enters into the...

Page 22: ... color effect white balance and video quality 4 Switch 720P and 480P high definition video recording 5 Click and select the video recording button end the video recording and observe the previewed video 5 3 HDMI HDMI High definition video interface The Tablet and the high definition television are connected by a standard HDMI cable This interface supports the picture with highest quality of 1080p ...

Page 23: ...and can be used to view and edit photos and to watch videos View pictures 1 Click the folder containing the pictures that you want to see 2 Select the picture you want to see and the system will automatically view in full screen mode 3 Drag the picture to left or to right to browse the previous or the next picture 4 Double click the picture to zoom in or zoom out the picture Edit and set the pictu...

Page 24: ...ck Rotate to left or Rotate to right Cut 1 Press the Menu key to show the menu options and then click Cut 2 Click and drag relevant area to adjust the cutter 3 Click and drag the cutter to adjust the size 4 Adjust the size and click Save 5 Click Return to go back to the picture browse Video preview and playback The Media Browser will scan all video files in the Tablet and SD card and preview the p...

Page 25: ...n Click here to add a web page as bookmark in Fig 7 2 and a Bookmark this page window pops up click OK to set the page you want as the bookmark Open bookmark 1 Enter the interface similar to the following picture by clicking the icon Click here to enter the Manage bookmarks as in fig 7 2 in the browser interface 2 Click the bookmark that you want to open the web page Edit bookmark 1 Enter the inte...

Page 26: ...s you have visited appear above the address bar 2 Click the window that you want to switch to the page you want Set browser In the browser interface press the Menu key and click Set to set the browse 7 Other Applications 7 1 Alarm clock 1 Click clock icon in the main interface 2 Enter program interface Fig 8 2 3 Click the time periods need to set and the alarm setup menu pops up 4 After setup clic...

Page 27: ...te the files and folders or to create sharing and FTP server to achieve resource sharing Cut and copy files 1 In the file browser press and select the file you want to operate 2 Pop up operating menus including Cut Copy Delete Rename Move to Copy to Play music Select all Set home directory and Attributes etc 3 Click Cut or Copy file or folder 4 Click into the folder you want to paste and pop up me...

Page 28: ... 1 Sound and Display Volume setting Setting Sound Volume Screen key tone and screen lock alert tone You can set the Tablet to emit sound when you use the soft keyboard or touch screen as well as lock the screen Setting Sound the Screen key tone and screen lock alert tone Display settings Adjust screen brightness Click Setting Display Brightness and drag the brightness bar to left or to right to ad...

Page 29: ...LASH memory Safe uninstall of SD card Safe removal of the SD card can effectively protect and prolong the service life of the SD card Setting Storage Uninstall SD card 8 4 Date and Time Adjust the date time and time zone 1 Setting Date and time settings Select time zone Set date and click Settings when finish 2 You can choose Automatically determine date and time which automatically uses the time ...

Page 30: ...applications Additional third party Android applications are available from the Internet Download and copy 3rd party applications to the SD card and insert into the Tablet Method 1 1 Click File Manager to find the applications need to install in the SD card 2 Click the applications that you want to install 3 Pop up installation option and click Install 4 Operate after completion in accordance with...

Page 31: ...elevant websites to your computer 2 Prepare the system upgrade tool a TF card with storage capacity 512MB 10 2 Restore Factory Settings When significant error occurs or the unlock password is forgotten factory settings can be restored by resetting The restore of the factory settings will lead to the lost of downloaded applications and user setups so do remember to back up your data 1 Press the Men...

Page 32: ...et button next to the power port to reset the system 5 Unable to create e mail or register applications Ensure your network is properly connected to the Internet Ensure the e mail is set up correctly Ensure your system time and the local time are consistent Appendix 1 Specification Product Parameter Type Details Descriptions Basical par ameter Tablet model PLATIUM CPU type RK3066 CPU speed 1 5GHz ...

Page 33: ... XVID MP4 MPEG DIVX XVID WMV MOV MKV RMBV MPEG KFLV HD2160 max Audio Support MP3 WMA WAV OGG APE DTS etc need license Games Support to the third party programs Input method Andriod keyboard photos Support browsing BMP JPG GIF PNG Office software Support reading and editing office files Support browsing PDF 33 ...

Reviews: