


A Q
Qu
uiicckk--S
Stta
arrtt G
Gu
uiid
dee to setting up your D
DTTII6
63
30
00
0--1
16
6
D
Diig
giitta
all TTeelleevviissiio
on
n R
Reecco
orrd
deerr
Important Notice
Did the retailer check your postcode for Digital TV reception?
If not, you should contact your retailer or try one of the following to ensure you
live in a FREEVIEW coverage area:
• Text your postcode to 83331 (standard rates apply)
• Visit the websites
www.freeview.co.uk
or
www.dtg.org.uk/consumer
• Call FREEVIEW on 08708 809980
P
Plleea
assee n
no
ottee::
In order to receive the best digital signals you may need an aerial upgrade.
Call our Aerial Helpline number on 0800 5428265 for more information.
G
Ge
ettttiin
ng
g S
Stta
arrtte
ed
d
S
Stte
ep
p 1
1 -- U
Un
np
pa
acck
kiin
ng
g
Unpack your Digital Television Recorder (DTR) and check you have all the
following accessories:
•
Remote Control
•
SCART lead
•
Aerial lead
•
Mains lead
•
User Manual
•
Remote control TV set-up codes
•
2 x AA batteries (p
plla
accee tth
heessee iin
ntto
o yyo
ou
urr R
Reem
mo
ottee C
Co
on
nttrro
oll a
ass ssh
ho
ow
wn
n)
F
Fo
olld
d o
ou
utt >
>
IIM
MP
PO
OR
RTTA
AN
NTT:: D
Diisscco
on
nn
neecctt tth
hee p
po
ow
weerr tto
o a
allll yyo
ou
urr eexxiissttiin
ng
g eeq
qu
uiip
pm
meen
ntt..
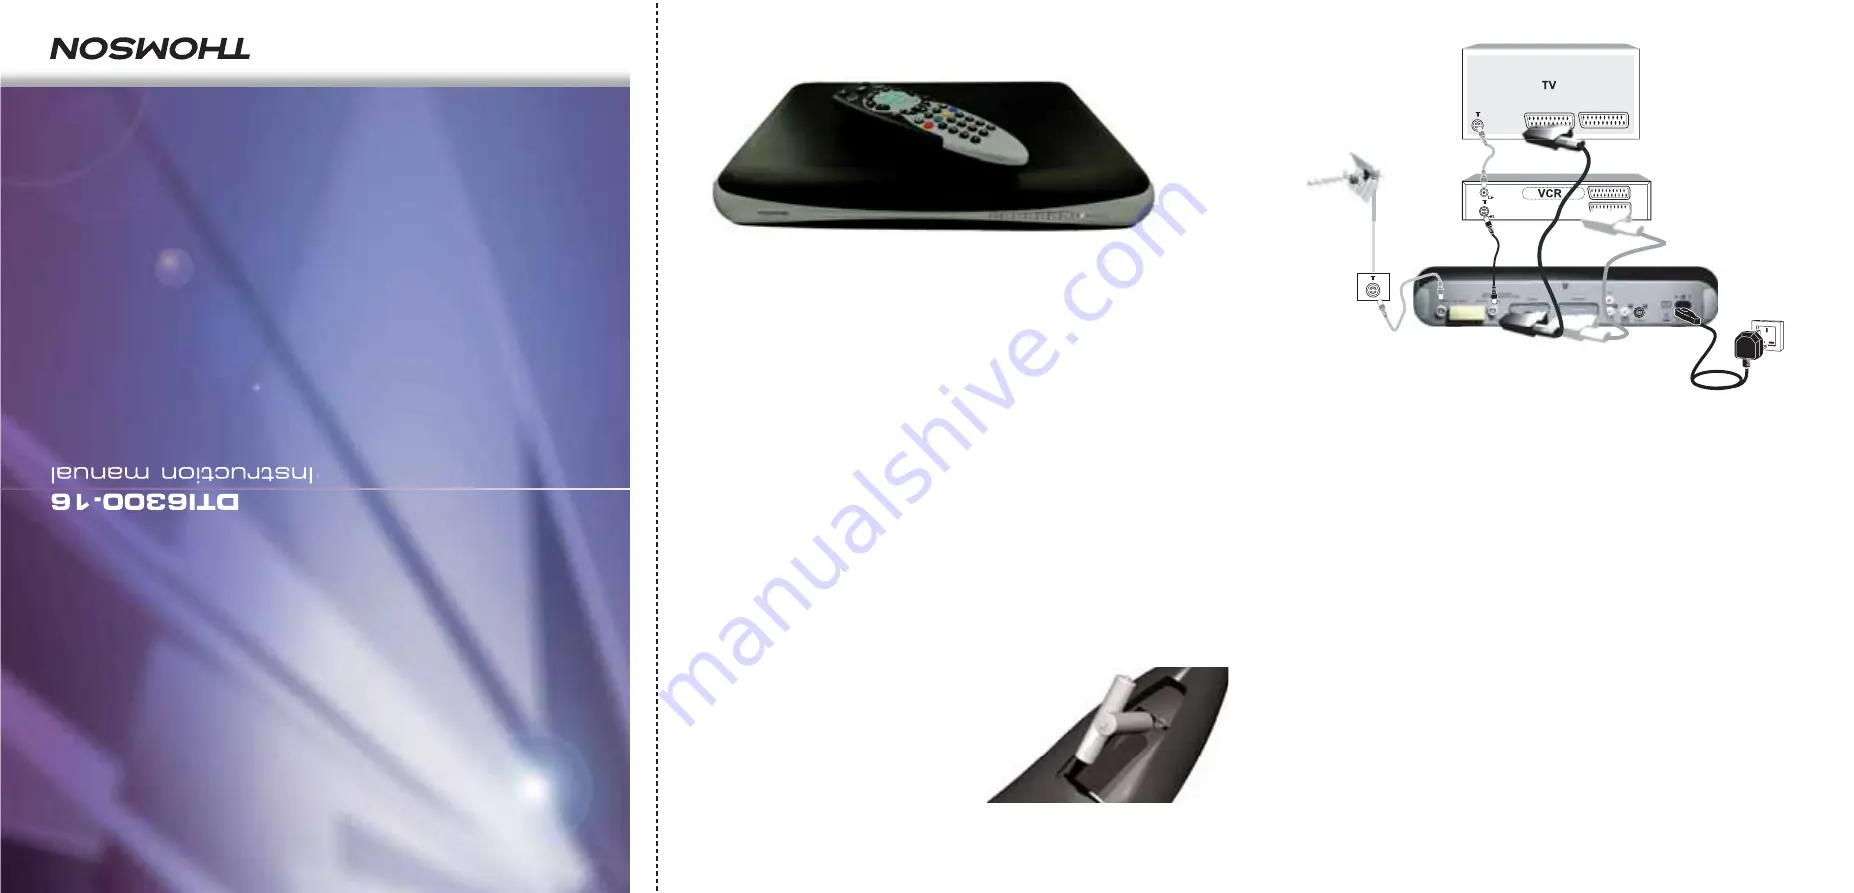
Place your DTR in your preferred position and connect it to your TV following these
simple steps :-
A
Unplug the aerial cable from your VCR (or TV) and plug it into the A
Aeerriia
all IIn
n
socket of your DTR.
B
Using the aerial lead supplied, connect the R
RFF O
Ou
utt socket on your DTR to the
A
Aeerriia
all IIn
n socket of your VCR (or TV).
C
Using the scart lead supplied, connect the TTV
V S
SC
CA
AR
RTT socket on your DTR to the
A
AV
V1
1//E
EX
XTT1
1//A
AU
UX
X1
1 scart socket at the back of your TV.
D
Finally, now connect the mains lead to the M
Ma
aiin
nss IIn
np
pu
utt socket on your DTR and
switch on at the mains. Reconnect the power to all your existing equipment.
Turn your TV ON.
S
Stte
ep
p 3
3 -- IIn
nsstta
alllliin
ng
g yyo
ou
urr cch
ha
an
nn
ne
ellss a
an
nd
d 1
14
4 D
Da
ayy P
Prro
og
grra
am
mm
me
e G
Gu
uiid
de
e
Press the D
DTTR
R button on your remote control. The D
DTTR
R button will momentarily
flash. This will confirm that the remote control is working correctly.
Now wait for the light on the front of your DTR to turn from Amber to Green.
B
Blla
acckk LLeea
ad
dss:: Provided
(See accessories list).
G
Grreeyy LLeea
ad
dss: Not Provided
A
Aeerriiaall:: Directed towards a
transmitter, transmitting
digital terrestrial signals.
A
A
C
Co
on
nttiin
nu
ue
ed
d o
ov
ve
err >
>
S
Stte
ep
p 2
2 -- C
Co
on
nn
ne
eccttiin
ng
g u
up
p yyo
ou
urr D
DTTR
R
D
D
B
B
C
C


