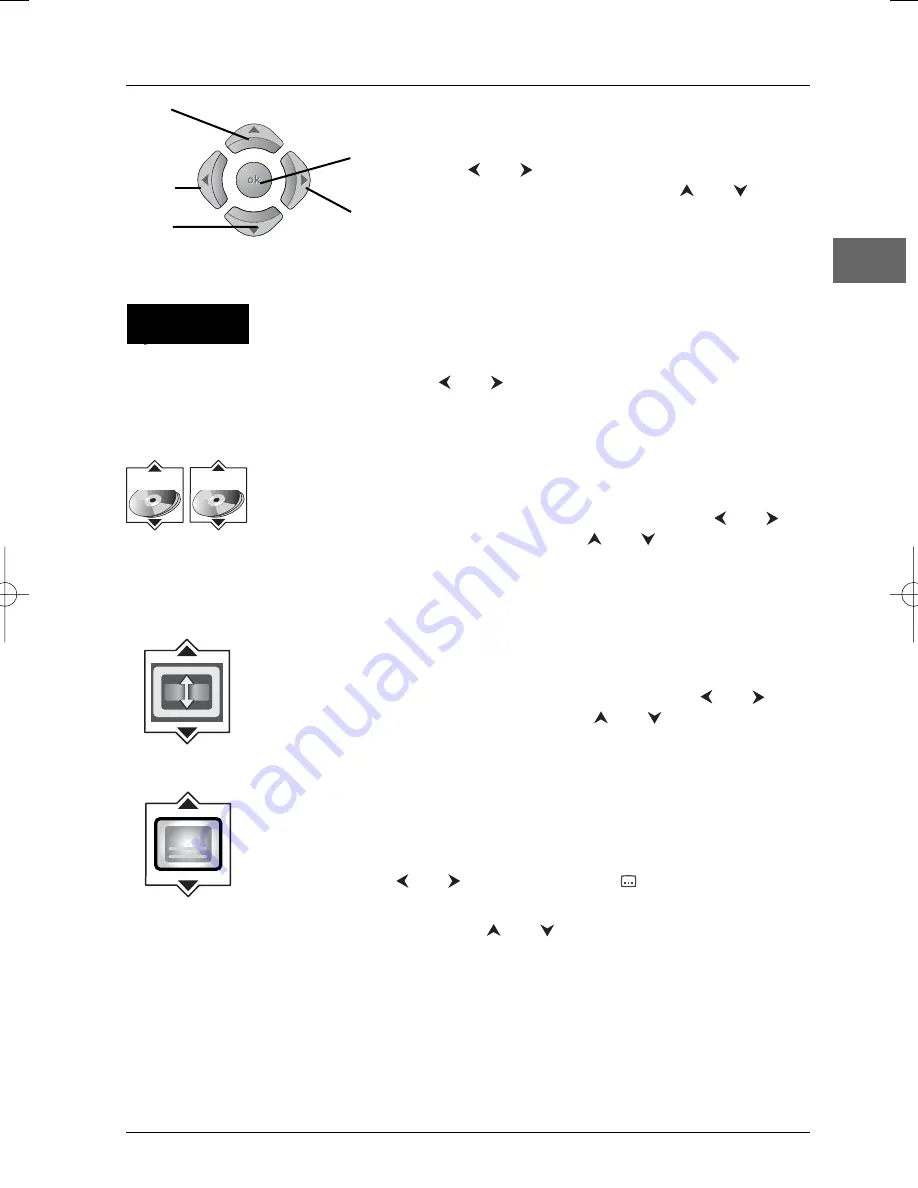
THOMSON DTH226 Manual Download Page 13

Playing discs

13

EN

Press the 

INFO

button on the remote control while a

disc is playing to display the 

Info

menu.

Use the 

and

buttons on the remote control to

select the icon you want.Then use the 

and 

buttons to select an option and press 

ok

to confirm your

selection.

Direct access (DVD)

To directly access a location on the disc which does not correspond to the
start of a title or chapter, press the 

INFO

button, then select the time

indication icon with the 

and

buttons, then enter a time with the

numeric buttons (format hh:mm:ss).

Title/Chapter (DVD) / Track (audio CD and VCD)

To directly access a title or a chapter (DVD), a track (audio CD and VCD),
press the 

INFO

button, then select one of these icons with the 

and

buttons, and then choose a number using the 

and 

buttons or enter a

number directly with the numeric buttons.

Note: Many discs only have one title.

Screen fit (DVD)

To reframe the DVD image according to the screen format of your TV set,
press the 

INFO

button and select the screen fit info with the 

and

buttons.Then select a screen format using the 

and 

buttons:

Maximum

,

Enhanced

or 

Normal

.

Subtitles (DVD)

Subtitles are disabled by default.You enable the subtitle function as follows:

1.

While the disc is playing, press the 

INFO

button, then select the subtitle

info using the 

and

buttons, or press the 

button on the remote

control in order to access the subtitle info directly.

2.

Select a language using the 

and 

buttons.

3.

To disable the subtitle function, select the 

Off

option.

Note:

When you change the language of the subtitles using the 

Info

menu your choice of

language only applies for the disc currently being played. When you eject the disc
and switch off the player, the subtitles will be displayed again in the subtitle language
you selected in the 

Languages

menu (see page 23).

PLAY

0 1 : 4 9 : 3 7

T : 1

C: 12

Right

Up

Left

Down

ok

Time indication

icon

Title/Track and

Chapter icons

Subtitles icon

Screen fit icon

DTH226_EN  7/07/03  9:18  Page 13

Summary of Contents for DTH226

Page 1: ...the same time 17 Chapter 3 Menus Player menus 18 The Play Mode menu 19 Start 19 Random play 19 Program play 19 AutoPlay 19 IntroScan 19 The Parental Control menu 20 Lock 20 Password 20 Ratings limits...

Page 2: ...one is likely to cause condensation on some components inside the appliance Let the condensation disappear of its own accord before turning the appliance on again Before moving the player make sure th...

Page 3: ...ts full capacity CD Rs should be preferably used instead of CD RWs rewritable CDs as in certain cases CD RW playback may be faulty Use reliable good quality CD write software Close all other applicati...

Page 4: ...also connect the DVD player to the receiver s second Scart socket Notes Depending on the video recorder or satellite or cable receiver this type of connection may affect the quality of the pictures pr...

Page 5: ...n set s AUDIO L and R sockets using audio cables provided Note If your television set only has one audio socket connect it to the DVD player s left socket white Coaxial digital audio output COAXIAL DI...

Page 6: ...type of disc loaded CD audio CD VCD Video CD SVCD Super Video CD Appears when a disc is being played Appears when a disc is in pause Appears when the sound is in DTS Appears when the sound is in Dolby...

Page 7: ...s Info menu appears as a bar at the top of the screen while the disc is playing During this time press the INFO button on the remote control to display and hide the Info menu Player menu If no disc h...

Page 8: ...nfo menu see page 14 green Access the subtitle function of the Info menu see page 13 INFO yellow Access the Info menu see page 12 TITLE blue Access the disc menu purple Access the camera angle functio...

Page 9: ...text function available 0 9 Select a channel For 2 digit channels first press 0 Functions in VCR mode VCR Select the video recorder Adjust the sound volume mute Mute and restore the sound RETURN Exit...

Page 10: ...n on the remote control to open the disc tray 2 Put the disc in with the printed side upwards in the case of a single sided disc 3 Press OPEN CLOSE again to close the disc tray Play starts automatical...

Page 11: ...ress the PAUSE button once PAUSE is displayed 2 Press the REV or FWD button a number of times to vary the speed and direction of the slow motion Changing chapter While the disc is playing press the or...

Page 12: ...ns on the remote control to scroll through the options Note When one of the icons is greyed out this means that the relevant function is not available on the disc being played The invalid symbol indic...

Page 13: ...creen fit DVD To reframe the DVD image according to the screen format of your TV set press the INFO button and select the screen fit info with the and buttons Then select a screen format using the and...

Page 14: ...option using the and buttons then press ok DVD play modes standard program title repeat chapter repeat A B repeat Notes Program Play mode is only available if a programmed list has been created see p...

Page 15: ...fferent camera angles for specific scenes 1 To change the camera angle press the INFO button then select the camera angle icon with the and buttons or press the button on the remote control 2 Choose t...

Page 16: ...sing the and buttons on the remote control then press ok to display the list of files or press PLAY to start playing all the files contained in the folder 5 Select a file using the and buttons then pr...

Page 17: ...can also select a folder containing JPEG and mp3 files using the and buttons then press PLAY In this case the player starts playing the pictures and music at the same time beginning with the first fil...

Page 18: ...Other menu options also followed by arrows can be used to enable or disable an option Example when you select the option AutoPlay from the Play mode menu each time you press the ok button you enable...

Page 19: ...dio CD select a track using the and buttons or select All to start playing all the tracks 1c mp3 and WMA CD select a folder using the and buttons then press the button to access the list of files then...

Page 20: ...option 4 Enter your password 5 Select the Lock function and press ok to confirm Password 1 To change the password select this option and press ok to confirm 2 Enter the four digits of your new passwor...

Page 21: ...format films in full on a 16x9 screen 2 Press ok to confirm Front Display This option lets you choose how the front display of the DVD player appears Four settings are available Dim for Movies the fr...

Page 22: ...r DTS must be selected Select one or two option s Dolby Digital or and DTS depending on the disc format and the type of sound you want to obtain then press ok to confirm Notes DTS is a digital sound c...

Page 23: ...sc menus choose the language using the and buttons and press ok to confirm Audio 1 To change the dialogue language choose the language using the and buttons and press ok to confirm 2 To change the lan...

Page 24: ...The picture is of poor quality with snow or lines Check the connections see pages 4 and 5 There is no sound or the sound is of poor quality Check the connections see pages 4 and 5 It may be necessary...

Page 25: ...ect it from the mains supply To completely isolate the equipment remove the plug from the mains socket as some components remain connected to the electrical supply If you notice any burning or smoke d...

Page 26: ...ding circular motions which could cause scratches and interference during playback Guarantee The type and production number of your appliance are printed on the guarantee certificate delivered with yo...

Reviews: