background image

26

2 / INSTALLING YOUR APPLIANCE

EN

• 

Filtering mode

- Using the supplied screws and screw anchors,
fix the upper flue bearing bracket to the ceiling and/
or wall, checking that it is aligned with the hood
(Fig.5).
- Fix the air baffle (Fig. 10R) to the upper decorative
flue by means of the proper screws.
- Fit the adapter flange (F) on to the air baffle
(Fig.10)
- Connect a flexible pipe that fits the air baffle
(Fig.10T) locking it with a metal hose clamp (pipe
and clamps are not provided).
- Plug in the hood.
- Draw  the set of the flues near the upper part of
the hood and fix the pipe to the flange.
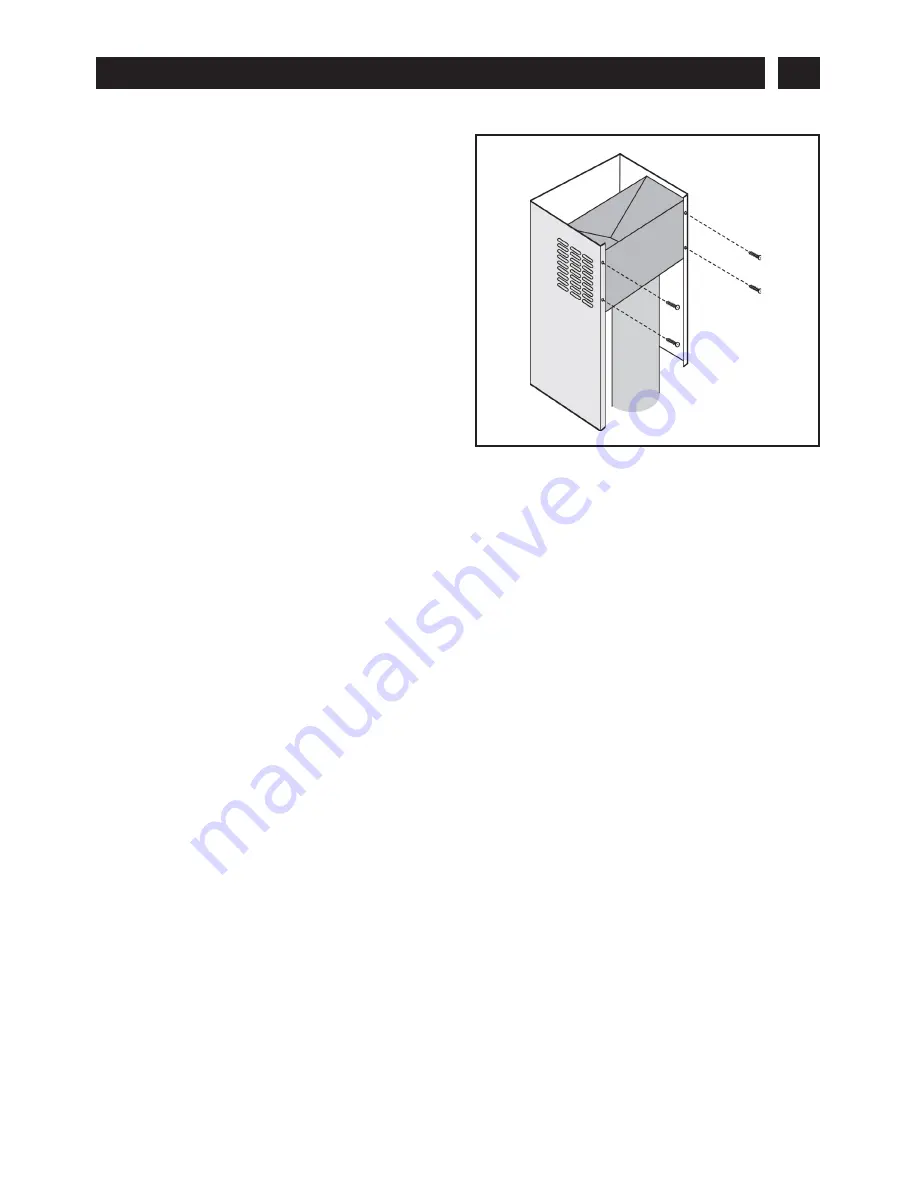
- Fix the decorative flue to the bracket by the
screws provided (Fig. 8A).
- Fix bottom side of the decorative flue to the hood
by the screws provided. Screws must be worked
from the inside of appliance (Fig. 9A).

fig. 10

Summary of Contents for DST61XD

Page 1: ...FR GUIDE D INSTALLATION ET D UTILISATION EN INSTRUCTIONS FOR INSTALLATION AND USE DE MONTAGE UND GEBRAUCHSANWEISUNG Hotte aspirante Cooker hood Dunstabzugshaube ...

Page 2: ...entendu dans un souci permanent de satisfaire le mieux possible vos exigences vis à vis de nos produits notre service consommateurs est à votre disposition et à votre écoute pour répondre à toutes vos questions ou suggestions coordonnées à la fin de ce livret Etconnectez vousaussisurnotresiteoùvoustrouvereztousnosproduits ainsi que des informations utiles et complémentaires THOMSON Dans le souci d...

Page 3: ...___________________________ 09 Recyclage _______________________________________ 10 3 UTILISATION DE VOTRE APPAREIL Description des commandes ________________________________ 11 4 ENTRETIEN ET NETTOYAGE DE VOTRE APPAREIL Nettoyage des filtres à graisse ______________________________ 12 Changement du filtre charbon _______________________________ 12 Nettoyage et entretien de la carrosserie ________...

Page 4: ...aire fonctionner des foyers gaz sans récipients de cuisson au dessous de la hotte les flammes aspirées risqueraient de détériorer l appareil Les fritures effectuées sous l appareil doivent faire l objet d une surveillance constante Les huiles et graisses portées à très haute température peuvent prendre feu Respectez la fréquence de nettoyage et de remplacement des filtres L accumulation de dépôts ...

Page 5: ...cyclage des appareils qu organise votre fabricant sera ainsi réalisé dans les meilleures conditions conformément à la directive européenne 2002 96 CE sur les déchets d équipements électriques et électroniques Adresser vous à votre mairie ou à votre revendeur pour connaître les points de collecte des appareils usagés les plus proches de votre domicile Nous vous remercions pour votre collaboration à...

Page 6: ... DESCRIPTION DE VOTRE APPAREIL 1 A L ATTENTION DE L UTILISATEUR FR Fentes 5 A Cheminée B Commandes C ...

Page 7: ...an de cuisson L appareil peut être utilisé soit en version à évacuation extérieure soit en version à recyclage L appareil est livré pour fonctionner en recyclage le filtre à charbon actif est monté d origine Option Ref AK716AE1 pour le modèle DST61XD Option Ref AK719AE1 pour le modèle DST91XD UTILISATION EN VERSION EVACUATION Vous possédez une sortie vers l exterieur fig 1 Votre hotte peut être ra...

Page 8: ... tous les pôles du réseau avec une distance d ouver ture entre les contacts d au moins 3 mm ces dispositifs de séparation du réseau doivent alors être prévus dans l installation fixe Cet appareil est livré avec un câble d alimentation H 05 VVF à 3 conducteurs de 0 75 mm2 neutre phase et terre Il doit être branché sur réseau 230 240 V monophasé par l intermédiaire d une prise de courant normalisée ...

Page 9: ...e ligne sur le mur à la verticale de votre plan de cuisson Tracez sur le mur les 4 premiers trous que vous devrez percer en respectant les mesures indiquées à la Fig 3 percez 4 trous et y placez les 4 chevilles fournies en équipement Fixez les étriers au mur au moyen des vis et des chevilles en dotation Fig 4 Avant d accrocher la hotte assurez vous que les vis de fixation des étriers A sont déviss...

Page 10: ...r la sortie d air puisse tourner librement MONTAGE DE LA CHEMINEE Evacuation extérieure Au moyen des chevilles et des vis en dotation fixez l étrier supérieur de support de la cheminée au plafond et ou au mur de manière à ce qu il soit aligné avec votre hotte Fig 5 Raccordez le conduit pour l évacuation de l air à la bouche de sortie d air de la hotte utilisez un tuyau souple et bloquez le sur la ...

Page 11: ... un tuyau souple spécial au deflecteur Fig 10T en le bloquant à l aide d un collier métallique le tuyau et le collier ne sont pas fournis Effectuez le raccordement électrique de la hotte au moyen du câble d alimentation Approchez la cheminée décorative au haut de la hotte et fixer le tube d évacuation de l air à la bride Fixez la cheminée décorative à l étrier à l aide des vis de fixage latérales ...

Page 12: ...che D touche moteur III vitesse E voyant lumineux de fonctionnement du moteur fig 11 Conseil Ce guide d installation et d utilisation est valable pour plusieurs modèles De légères différences de détails et d équipements peuvent apparaître entre votre appareil et les descriptions présentées 3 UTILISATION DE VOTRE APPAREIL FR A B C D E ...

Page 13: ... et sécher Ce nettoyage peut être effectué dans un lave vaisselle en prenant soin de ne pas mettre le filtre en contact avec de la vaisselle sale ou avec couverts en argent Démontage du filtre à graisse fig 12 Enlever le filtre à graisse en poussant l arrêt et en le faisant tourner vers l extérieur CHANGEMENT DU FILTRE A CHARBON Si l appareil est utilisé en version recyclage il faut remplacer le f...

Page 14: ...s abrasifs CHANGEMENT DE LAMPE Attention Avant toute intervention la hotte doit être mise hors tension soit en retirant la prise soit en actionnant le disjoncteur Pour le remplacement des lampes halogènes dévissez la bague dans le sens contraire aux aiguilles d une montre et ôtez l ampoule Fig 14 Montez une ampoule de même type ATTENTION Ne pas toucher l ampoule à main nue fig 14 ...

Page 15: ...filtre retient les vapeurs grasses et les poussières Il est l élément assurant une part im portante de l efficacité de votre hotte Dans le cas de taches persistantes utilisez une crème non abrasive puis rincez à l eau claire Avec un nettoyant ménager du commerce puis rincez abondamment et séchez Ce nettoyage peut être effectué dans votre lave vaisselle en position verticale ne pas mettre en contac...

Page 16: ...é effectivement sélectionnée Vérifiez que la vitesse moteur sélectionnée est suffisante pour la quantité de fumée ou de vapeur dégagée la cuisine est suffisamment aérée pour permettre une prise d air le filtre à charbon n est pas usagé hotte en version recyclage Vérifiez que il n y a pas de coupure de courant le dispositif à coupure omnipolaire ne s est pas enclenché 5 ANOMALIES DE FONCTIONNEMENT ...

Page 17: ...15 PIÈCES D ORIGINE Lors d une intervention d entretien demandez l utilisation exclusive de pièces détachées certifiées d origine 16 6 SERVICE APRÈS VENTE ET RELATIONS CONSOMMATEURS FR fig 15 RELATIONS CONSOMMATEURS Pour en savoir plus sur tous les produits de la marque informations conseils Consulter votre facture pour connaître les contacts SAV Fagor Brandt SAS société par actions simplifiée au ...

Page 18: ...es driers fridges and freezers that you can coordinate with your new THOMSON hood Visit our website where you will find all of our products as well as useful and complementary information THOMSON As part of our commitment to constantly improving our products we reserve the right to make changes to them based on technical advances to their technical and functional features and appearance Warning Be...

Page 19: ...c flues Ducting mode _____________________________________ 25 Filtering mode ____________________________________ 26 3 USING YOUR APPLIANCE Description of the control panel ______________________________ 27 4 CARING FOR AND CLEANING YOUR APPLIANCE Cleaning the grease filters __________________________________ 28 Changing the charcoal filter _________________________________ 28 Cleaning and caring ...

Page 20: ...or operate gas rings under the hood without placing cookware on them the flames sucked up into the hood can damage the appliance When frying food under the appliance you must carefully monitor the preparation at all times Oils and grease brought to very high temperatures can catch fire Respect the recommended frequency of cleanings and filter replacements The accumulation of grease deposits may ca...

Page 21: ...other waste This way the appliance recycling organised by your manufacturer will be done under the best possible conditions in compliance with European Directive 2002 96 EC on Waste Electrical and Electronic Equipment Contact your town hall or your retailer for the used appliance collection points closest to your home We thank you doing your part to protect the environment Warning Installation sho...

Page 22: ...21 DESCRIPTION OF YOUR APPLIANCE 1 NOTICES TO THE USER EN Air exhaust grids A Telescopic flues B Controls C ...

Page 23: ...m an cooking hob This appliance can be installed in either duction version or filtering version Theapplianceissuppliedinthefilteringversion thecharcoalfilterisinstalled Ref AK716AE1forthemodel DST61XD Ref AK719AE1 for the model DST91XD USING THE DUCTING MODE If you posses an outlet to the exterior fig 1 Your hood can be connected to this outlet using a flue Ø 150mm that is enamelled in aluminium f...

Page 24: ... the electricity main with a contact opening distance of at least 3mm such separating device ensuring disconnection from the main must be included in the fixed installation This appliance is delivered with a H05VVF power cord that has three 0 75mm2 conductors neutral phase and ground It must be connected to the main power supply which should be a 230 240V single phase current via a CEI60083 standa...

Page 25: ...ine with your hob Mark the first 4 holes to be drilled in the wall respecting the distances indicated in Fig 3 Drill the 4 holes and fit the screw anchors provided Apply the supplied brackets to the wall using the relative screws and screw anchors Fig 4 Before installing the hood check that the bracket fixing screws A have been sufficiently slackened to allow the hood itself to be fitted in place ...

Page 26: ...bracket by the screws provided Fig 8A Fix bottom side of the flue to the hood by the screws provided Screws must be worked from the inside of appliance Fig 9A Tip For optimal use of your appliance we recommend that you connect the hood to a 150 mm diameter flue not delivered with the appliance Minimise the number of angles and bends and the lengths of the flue In the event that the hood will be op...

Page 27: ... the adapter flange F on to the air baffle Fig 10 Connect a flexible pipe that fits the air baffle Fig 10T locking it with a metal hose clamp pipe and clamps are not provided Plug in the hood Draw the set of the flues near the upper part of the hood and fix the pipe to the flange Fix the decorative flue to the bracket by the screws provided Fig 8A Fix bottom side of the decorative flue to the hood...

Page 28: ...ton Button C second speed button Button D third speed button E motor on light Tip This guide to installation and use is valid for several models Minor differences in details and fittings may emerge between your appliance and the descriptions provided 3 USING YOUR APPLIANCE EN fig 11 A B C D E ...

Page 29: ...r then rinse fully and dry They may be cleaned in a dishwasher making sure that the filter does not come into contact with dirty dishes or silver tableware Removing the grease filter fig 12 Remove the grease filter by pushing the catch and turning it outwards CHANGING THE CHARCOAL FILTER If using the hood in the filtering version the charcoal filter will periodically have to be replaced Frequency ...

Page 30: ...ULB Warning Before carrying out any work the power supply to the hood must be turned off either by unplugging it or by using the circuit breaker switch If the halogen light bulbs need changing slacken the ring nut in an anticlockwise direction and removethebulbitself Fig 14 Replacewithabulb of the same type CAUTION Do not handle glass bulb with bare hands fig 14 ...

Page 31: ...soft cloth This filter traps fatty vapours and dust This component plays an important role in ensuring the effectiveness of your hood In the event of tough stains use a non abrasive cream then rinse with clean water Use a commercial household cleaning product then rinse abundantly and dry These filters can be cleaned in a vertical position in your dishwasher Do not alow them touch dirty dishes or ...

Page 32: ...e The charcoal filter is not worn hood operating in filtering mode Ensure that The power is not cut off The single pole cut off device was not activated 5 TROUBLESHOOTING EN 6 AFTER SALES SERVICE EN Any maintenance on your equipment should be undertaken by either your dealer or another qualified mechanic who is an authorized agent for the brand appliances When making an appointment state the full ...

Page 33: ...chetrocknern Kühlschränken Gefrierschränke Tiefkühltruhen die Sie mit Ihrer neuen THOMSON Dunstabzugshaube abstimmen können SiekönnenunsauchimInternetunterwww thomson line combesuchen wo Sie unsere jüngsten Innovationen sowie nützliche und ergänzende Informationen finden THOMSON Da wir unsere Produkte ständig verbessern möchten behalten wir uns das Recht vor ihre technischen funktionellen und ästh...

Page 34: ...hre Abluftversion _____________________________________ 40 Umluftversion ____________________________________ 41 3 VERWENDUNG DES GERÄTS Beschreibung der Bedienelemente ____________________________ 42 4 PFLEGE UND REINIGUNG DES GERÄTS Reinigung des Fettfilters ____________________________________ 43 Wechsel der Kohlefilter _____________________________________ 43 Reinigung und Instandhaltung der A...

Page 35: ...r Dunstab zugshaube Gerichte zu flambieren oder die Gaskochstellen einzuschalten ohne dass ein Kochgeschirr darauf steht die angesaugten Flammen könnten das Gerät beschädigen Frittiervorgänge unter der Dunstab zugshaube müssen ständig überwacht werden 1 FÜR DEN BENUTZER DE Die auf sehr hohe Temperaturen aufgeheizten Öle und Fette können Feuer fangen Die Häufigkeit der Reinigung und des Ersatzes de...

Page 36: ...Gebrauch nicht mit dem übrigen Hausmüll entsorgt werden dürfen Das von Ihrem Hersteller in die Wege geleitete Recycling kann somit in Übereinstimmung mit der europäischen Richtlinie 2002 96 CE über Elektro und Elektronik Altgeräte unter optimalen Bedingungen erfolgen Ihre Gemeindebehörden oder Ihr Händler informieren Sie gerne über die zu Ihrem Wohnort am nächsten liegenden Sammelstellen Wir danke...

Page 37: ...36 1 FÜR DEN BENUTZER DE BESCHREIBUNG DES GERÄTS Schlitze A Teleskoprohre B Bedienelemente C ...

Page 38: ...n einem Abstand von mindestens 65 cm über der Kochfläche montieren Dieses Gerät kann entweder in Abluft oder in Umluftversion installiert werden Das Gerät wird in Umluftversion mit installiertem Kohlefilter geliefert Kohlefilter Kennz Nr AK716AE1 model DST61XD AK719AE1 model DST91XD VERWENDUNG IN ABLUFTVERSION Abzug nach draußen Abb 1 Ihre Abzugshaube wird über eine Abluftleitung Ø 150 mm emaillie...

Page 39: ... mit einer Kontaktöffnungsweite von mindestens 3 mm gewährleistet ist dann müssen diese Trennvorrichtungen im festen Installationsteil vorgesehen werden Das Gerät wird mit einem Netzkabel des Typs H 05 VVF mit 3 Leitern mit 0 75 mm Neutral Phase und Erde geliefert Es ist für den Anschluss an Einphasennetz mit 230 240 V über genormte Steckdose nach IEC 60083 vorgesehen die nach der Installation ent...

Page 40: ... Löcher auf der Wand dabei sind die in Abb 3 angegebenen Maße zu beachten Die 4 Bohrungen ausführen und die mitgelieferten Dübel einstecken Die im Lieferumfang enthaltenen Bügel mit den mitgelieferten Schrauben und Dübeln an der Wand anbringen Abb 4 Bevor nun das Gerät mit den rechteckigen Öffnungen in der Geräterückwand in die Haken eingehängt wird ist darauf zu achten daß die Feststellschrauben ...

Page 41: ...der Haube herstellen Das obere Teils des Teleskopkamins wird nach oben gezogen und am oberen Kaminbefestigungsteil festgeeschraubt Abb 8A Das Unterteil des Teleskopkamins wird von unten mit dem Gerätegehäuse verschraubt Abb 9A Tipp Zur Optimierung des Gerätebetriebs empfehlen wir den Anschluss an ein Leitungsrohr mit Durchmesser 150 mm nicht mitgeliefert Zahl der Rohrbögen und Länge der Leitung so...

Page 42: ...uftweiche montieren Abb 13 Ein flexibles Rohr am Luftleitblech anschließen Abb 10T und mit einer Metallschelle befestigen Rohr und Schelle werden nicht mitgeliefert Über das Versorgungskabel die Stromversorgung der Haube herstellen Den Röhrensatz dem oberen Haubenteil näherbringen und das Abluftrohr am Flansch befestigen Das obere Teils des Teleskopkamins wird nach oben gezogen und am oberen Kamin...

Page 43: ...er II Geschwindigkeit D Schalter III Geschwindigkeit E Motorkontrolleuchte Tipp Dieses Installations und Gebrauchshandbuch gilt für mehrere Modelle Es kann vorkommen dass Ihr Gerät sich in einigen Details und Ausrüstungselementen von der Beschreibung unterscheidet 3 VERWENDUNG DES GERÄTS DE fig 11 A B C D E ...

Page 44: ... normalem Haushaltsreiniger waschen gründlich ausspülen und abtrocknen Die Reinigung kann auch in der Spülmaschine erfolgen Dabei darauf achten dass der Filter weder schmutzige Teller noch Silberbesteck berührt Ausbau des Fettfilters Abb 12 Fettfilter entfernen indem der Halter niedergedrückt und der Filter nach außen gedreht wird WECHSEL DER KOHLEFILTER Wird das Gerät in Umluftversion verwendet m...

Page 45: ...ittel oder schwämme zu verwenden WECHSEL DER LAMPE Achtung Vor Inangriffnahme die Abzugshaube ausschalten indem der Stecker gezogen oder der Schalter betätigt wird Um Halogenlampen zu ersetzen die Nutmutter gegen den Uhrzeigersinn ausschrauben und die Lampe entfernen Abb 14 Mit Lampen derselben Art ersetzen ACHTUNG Neue Lampe keinesfalls mit bloßen Händen anfassen fig 14 ...

Page 46: ...mpfe und Staubpartikel Es ist ein wich tiges Element zur Sicher stellung eines wichtigen Teils der Wirksamkeit der Dunstabzugs haube Bei hartnäckigen Flecken eine nicht scheuernde Creme an wenden und dann mit klarem Wasser abspülen Mit einem handelsüblichen Haushaltsprodukt dann reichlich abspülen und trocknen Diese Reinigung kann im Geschirr spüler in vertikaler Position erfolgen Nicht mit schmut...

Page 47: ...ube funktioniert nicht Die Leistung der Abzugshaube ist mangelhaft Die Haube ist im Laufe des normalen Betriebs von selbst ausgegangen ANZEICHEN BEHEBUNG Dabei überprüfen dass Es liegt kein Stromausfall vor Es wurde eine Geschwindigkeit gewählt Dabei überprüfen dass Die gewählte Motorgeschwindigkeit reicht für die anfallende Menge an Rauch oder Dämpfen aus Die Küche ist ausreichend belüftet um ein...

Page 48: ...04307942 ...

Reviews: