background image

13

Manual channel set-up

Follow the procedure given on this page if you find that some channels have not been stored during the initial
set-up. This can happen if you are setting up cable network channels. Setting up channels manually requires

every setting for a particular channel to be entered, one at a time.

@

 MANUAL INSTALLATION

Return
Standard

EURO…

Frequency

150.75MHz

Programme name

BBC2

Fine-tuning

------|----------

Store on programme

02

Decoder

o

Teletext char. set

1…

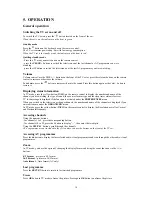
Display the 

OVERVIEW


menu by pressing the

MENU

 button.

Select the 

Installation


option and press 

OK


to

confirm.

Select the relevant country and press 

OK

.

Select the 

Manual Installation


option from the

INSTALLATION


menu and press 

OK

 to confirm.

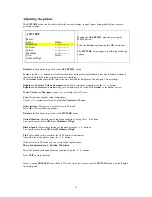
1.


Select the

 Standard

 option and then the relevant standard for your country using the 

!

 / 

ÿ

 buttons.

Note: the following standards are available to choose from: 

UK 

for the UK and Ireland, 

FR 

for France and

Luxembourg, 

DK 

for Eastern Europe ,the Middle East and Asia, 

EURO 

for Western Europe, Australia and New

Zealand.

2.


Select the 

Frequency


option. Use the 

!

 or 

ÿ

 button to start the search in ascending or descending order.

When a channel is found pictures appear.

Note : If the channel name is found,it is displayed next to 

Programme name

 option.

3.


If the picture is not clear you can adjust the setting. You do this by selecting the 

Fine tuning

 option and

adjusting it with the 

!

 / 

ÿ

  buttons.

4.


If the channel is encrypted and you want to connect a decoder, select the 

Decoder


option and check the box

by pressing the 

OK

 button.

5.


Then select the 

Teletext char. set


option and choose the character set that will be used for Teletext on this

channel using the 

!

 / 

ÿ

  buttons. The following character sets are available:

1 :Western Europe
2 : Eastern Europe
3 : Russian and Bulgarian
4 : Greek
5 :Arabic
6 : Ukrainian

7 : Belarussian

The character set selected determines how characters are displayed on Teletext screens.

6.


Select the 

Store on programme


option to assign a number to the channel. Enter the number using the

numeric buttons. Press the 

OK

 button to confirm.

Important: as soon as you change a setting in the 

MANUAL INSTALLATION 

menu the channel number

starts flashing under the 

Store on programme


option .To confirm your change you must select the 

Store on

programme


option and press 

OK

. If you do not confirm the change it will be cancelled when you change

channel or put the television into standby mode.

Repeat this procedure (2 to 6) to find other channels.

Automatic update:

Auto update 

allows you to set up channels just launched or any channels that are missing or wrongly set up.

You can access the menu by selecting the 

Automatic update

 line in the 

INSTALLATION

 menu.

Return

: returns to the 

INSTALLATION 

menu

.

Standard

: Select the relevant standard for your country using the 

!

 / 

ÿ

 buttons.

Start

: Press 

OK

 to start the auto update function.

The Frequency is incrementing for showing the progress of the search, “

New pr. found

” is incremented each

time a PR that was not already installed is found. When the highest frequency is reached, the auto update will

stop. Or if you press 

EXIT

 button, you will stop the auto update searching also.

Summary of Contents for 15LCDM03B

Page 1: ...ich may result in fire electric shock or other hazards Moisture in rooms where the set is installed should not exceed 85 humidity Leave the condensation to evaporate before turning the TV on again 6 Cleaning Unplug this product from the wall outlet before cleaning Do not use liquid cleaners or aerosol cleaners Use a damp cloth for cleaning Clean the screen with a glass care cleaner and the rest of...

Page 2: ...o be used with another power supply voltage the power cable must be changed Consult your product dealer The socket outlet should be installed near the equipment and easily accessible The power supply voltage rating of this product AC adaptor is AC100 240V The power cord attached conforms to the following power supply voltage Use only the power cord designated by our dealer to ensure safety and EMC...

Page 3: ...or impacted upon by other objects Be careful not to be injured by broken glass pieces in case the LCD panel breaks 23 Pixel defect The LCD panel is a very high technology product giving you finely detailed pictures Occasionally a few non active pixels may appear on the screen as a fixed point of blue green or red Please note that this does not affect the performance of your product For added prote...

Page 4: ...se expose it to the elements l Do not place heavy objects on top of the TV l If the power cord is damaged or frayed in any way electrical shock and or fire may result l Please do not place objects on the power cord and keep the cord away from heat emitting devices Should the power cord become damaged in any way please contact your dealer for a replacement cord l Do not remove the cover of the TV f...

Page 5: ...e power cord plug immediately l A short circuit may occur which could cause fire Contact an Authorized Service Center for any repairs that need to be made IV CAUTION When using the LCD TV To turn off the main power be sure to remove the plug from power outlet The power outlet socket should be installed as near to the equipment as possible and should be easily accessible Be sure to disconnect all c...

Page 6: ...d and it can be used in any ambient light environment This manual will explain how to use your LCD TV as well as its features benefits and other important information Please be sure to read this manual before installing or operating your LCD TV especially the safety precautions The LCD TV shown in the User Manual is the 15 model Cosmetic of 20 model is different I SUPPLIED ACCESSORIES Make sure th...

Page 7: ...own Place the batteries with their terminals corresponding to the and indications in the battery compartment Precaution on battery use Improper use of batteries can result in a leakage of chemicals and or explosion Be sure to follow the instructions below l Place batteries with their terminals corresponding to the and indications l Only use the battery types specified l Do not use rechargeable bat...

Page 8: ... certified BS1362 5 amp fuse 4 Connect the outside aerial or cable network to the socket at the back of the TV set The LCD TV shown in the illustration is the 15 model 20 model is different The aerial socket 75 Ohms VHF UHF cable can be used for connecting an external aerial or other equipment fitted with a modulator video recorder satellite receiver etc We recommend that you do not connect other ...

Page 9: ...To control the volume This function is also available in VCR and DVD modes To switch the sound off and back on again RETURN To return to the previous menu or the previous program PR PR To change channels EXIT To exit a menu MENU To access the OVERVIEW menu To select menu options To set functions change values enable and disable functions and to select the picture format in TV mode OK To confirm a ...

Page 10: ...fter five seconds press the PLAY button again to continue the search for the next set of codes Repeat this operation until the appliance goes into standby mode There are 20 sets of codes 4 When the appliance goes into standby mode press the standby button on the front to switch it on again Then press the REV button to put it back in standby mode and if necessary keep pressing until the appliance g...

Page 11: ...or the country whose channels you want to receive if live near its borders 4 Confirm with OK The AUTOMATIC INSTALLATION menu is displayed 5 The Standard option is selected Select a suitable standard using the ÿ buttons Note the following standards are available to choose from UK for the UK and Ireland FR for France and Luxembourg DK for Eastern Europe the Middle East and Asia EURO for Western Euro...

Page 12: ...g channels Select the option Select programme Display the channel number to be deleted using the PR PR buttons or the 0 9 keys Select the Delete programme option and press the OK button to delete the channel Once this channel has been deleted the bottom help line will show The programme has been deleted message Naming or renaming channels Select the Select programme Display the number of the chann...

Page 13: ...e Decoder option and check the box by pressing the OK button 5 Then select the Teletext char set option and choose the character set that will be used for Teletext on this channel using the ÿ buttons The following character sets are available 1 Western Europe 2 Eastern Europe 3 Russian and Bulgarian 4 Greek 5 Arabic 6 Ukrainian 7 Belarussian The character set selected determines how characters are...

Page 14: ...e of sound the zoom or format type and the sleep timer status if active TV lock message is displayed if the function is activated under the PREFERENCES menu When you switch on the television or change channels the number and name of the channel are displayed if you entered its name under the ORGANISER menu In PC mode press the yellow button INFO on the remote control to display the Resolution as w...

Page 15: ...ally stored under Personal in the Preset option Sound type this option is used to select the appropriate sound type The available options depend on the programme you are watching The table at the bottom of this page indicates the sound types available for each type of broadcast Auto volume leveling Tick the box using OK button if you want to keep the same sound level on all the channels Internal S...

Page 16: ... are automatically stored under Personal in the Preset option Preset Colour and Sharpness options are not displayed in PC mode Tone this options controls colour temperature Use the ÿ buttons to select between Cold Neutral and Warm Other settings This option is not displayed in PC mode Press OK to access following options Return use the buttons to go back to the PICTURE menu Noise Reduction adjust ...

Page 17: ... this option allows to adjust the backlight of your LCD TV Using the ÿ buttons you can choose between Soft Normal and Bright Sleep timer 1 Select the Sleep timer option 2 Set an automatic shut off time from 0 to 4 hours in 15 minute intervals by using the ÿ buttons Set the time to 00 00 to disable this function TV Lock This function allows the parents either to lock the LCD TV set by putting it in...

Page 18: ...gain hidden answers press the green button to reveal a hidden answer for example in games Press the green button again to hide the answer ZOOM press the yellow button once to zoom in on the top part of the screen a second time to zoom in on the bottom part of the screen and a third time to return to normal display MIX mixed display press the blue button to display Teletext against a transparent ba...

Page 19: ...ng the numeric buttons To exit this mode allowing direct access to subpages display a new page press the or ÿ button or change channels Alarm page In some countries Spain Benelux etc you can set a time to display certain Teletext pages alarm pages To do this display the relevant alarm page and enter subpage mode Enter the time instead of the subpage number e g 1705 for 17 05 and press EXIT The pag...

Page 20: ...INCH sockets AV2 input at the bottom of the LCD TV set These can mainly be used to connect camcorders VHS or 8 mm format To display images from the connected appliance select AV2 using AV button on the remote control Audio L R and S video socket AV2 input at the bottom of the TV set These can mainly be used to connect camcorders S VHS or Hi 8 format To display images from the connected appliance s...

Page 21: ...utput terminal on the computer To display images from the connected computer select PC using AV button on the remote control Note 1 The display native resolution is 1024 x 768 If the signal resolution exceeds the native resolution it may not be possible to show fine detail with sufficient clarity 2 An adapter is required to use the PC cable D sub 15P to connect a Macintosh computer to the set 3 So...

Page 22: ...eck whether the contrast setting is too high l The DVD player is set for a high level output l The video signal has not been terminated properly somewhere in the system The image appears too washed out or the darkest areas of the image appear too bright l Check whether Brightness is set too high l The DVD player may be set at too high a brightness level If xxx searching appears the image or signal...

Page 23: ...untains or buildings The picture is spotted l There may be interference from automobiles trains high voltage lines neon lights etc l There may be interference between the antenna cable and power cable Try positioning them further apart There are stripes on the screen or colors fade l Is the unit receiving interference from other devices Transmission antennas of radio broadcasting stations and tran...

Reviews: