background image

7.17  Songs

7.17.1 

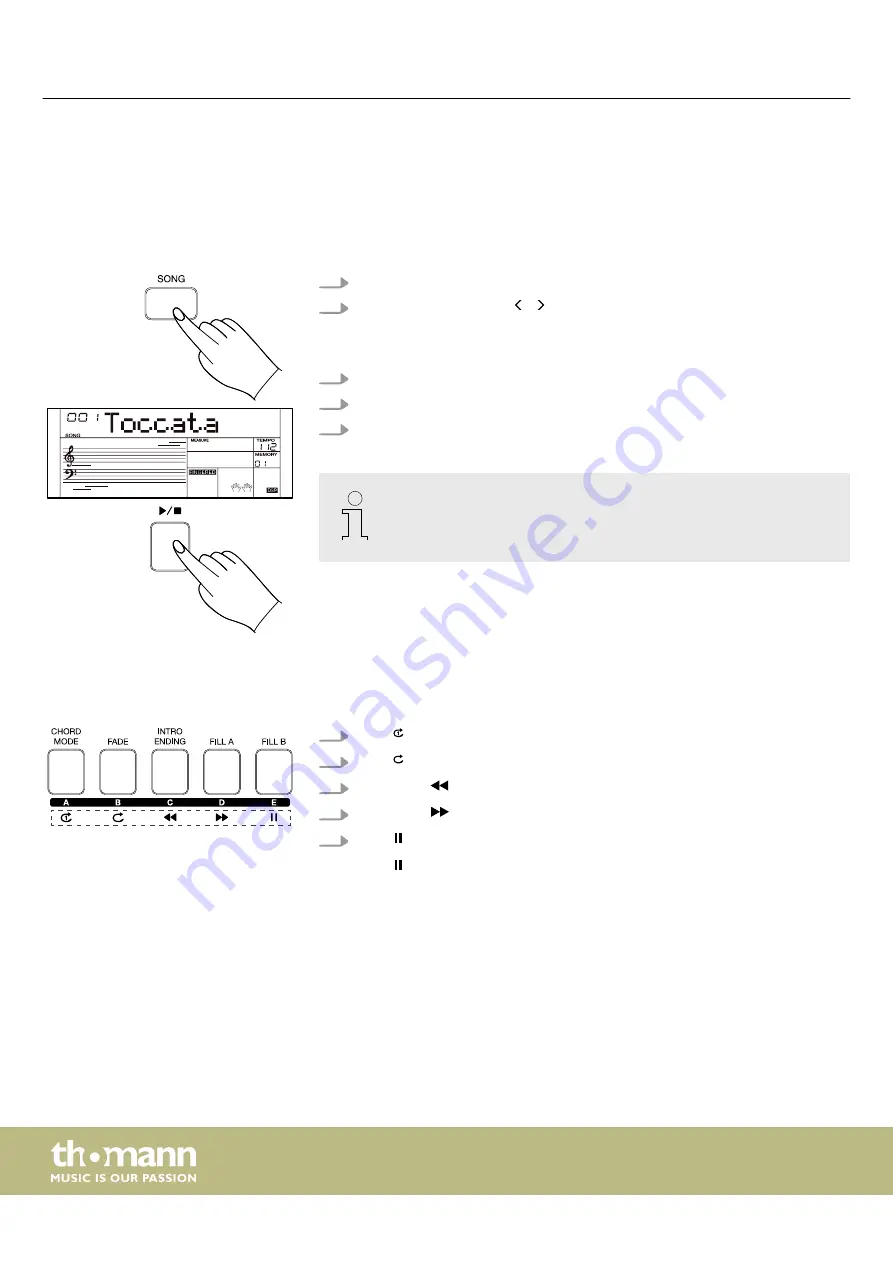
Selecting, playing and stopping songs

The keyboard offers a total of 180 songs. Each song can be practised in learning

mode.
1.

Press 

[SONG]

 to activate the song mode.

2.

Use the rotary control or   /   of the numeric keypad to select the desired

song.

ð

The display shows the current song.

3.

Press 

[START/STOP]

 to start the playback of the selected song.

4.

Press 

[START/STOP]

 again to stop the playback of the selected song.

5.

Press 

[STYLE]

 or 

[RECORD]

 to exit the song mode.

By default, all songs are played in an endless loop. You can change the play‐

back mode in the function menu (see 

Ä

 Chapter 7.24 ‘Function menu’

on page 49).

7.17.2 

Playback mode

The songs can be played in four different modes.
1.

Press   to play the current song in a loop.

2.

Press   to play all songs in a loop.

3.

Hold down 

 to rewind the currently playing song.

4.

Hold down 

 to fast-forward the currently playing song.

5.

Press   to pause the playback of the currently playing song.
Press   again to resume playback.

Operating


keyboard

36

Summary of Contents for Startone MK-400

Page 1: ...MK 400 keyboard user manual ...

Page 2: ...Musikhaus Thomann Thomann GmbH Hans Thomann Straße 1 96138 Burgebrach Germany Telephone 49 0 9546 9223 0 E mail info thomann de Internet www thomann de 14 07 2021 ID 515755 ...

Page 3: ...7 Layer mode 23 7 8 Split mode 24 7 9 Piano mode 24 7 10 TWINOVA 25 7 11 DSP effects 25 7 12 Sampler 26 7 12 1 Recording a sample 26 7 12 2 Playing a sample 27 7 12 3 Deleting samples 27 7 13 Part Effects 27 7 13 1 Harmony mode 27 7 13 2 Arpeggio mode 28 7 14 Styles and automatic accompaniment 28 7 14 1 Starting Auto Accompaniment rhythm track only 29 7 14 2 Starting Auto Accompaniment all tracks ...

Page 4: ...c functions 44 7 21 2 Playing files 44 7 21 3 Loading files 45 7 21 4 Saving files 45 7 21 5 Formatting SD card 46 7 22 Performance Memory 46 7 22 1 Selecting a memory location 46 7 22 2 Calling up information 46 7 22 3 Selecting a bank 47 7 22 4 Resetting the Performance Memory 47 7 23 Mixer 47 7 24 Function menu 49 7 25 MIDI functions 50 7 25 1 What is MIDI 50 7 25 2 USB connection 51 7 26 Facto...

Page 5: ...s of further information and details on the following points Download This manual is also available as PDF file for you to download Keyword search Use the search function in the electronic version to find the topics of interest for you quickly Online guides Our online guides provide detailed information on technical basics and terms Personal consultation For personal consultation please contact ou...

Page 6: ...tion you will find an overview of the meaning of symbols and signal words that are used in this manual Signal word Meaning DANGER This combination of symbol and signal word indicates an immediate dangerous situation that will result in death or serious injury if it is not avoided CAUTION This combination of symbol and signal word indicates a possible dangerous situation that can result in minor in...

Page 7: ... components are missing or damaged CAUTION Possible hearing damage Using headphones for a prolonged period and at high volume can cause hearing damage Avoid using the device at high volume especially when using headphones NOTICE Operating conditions This device has been designed for indoor use only To prevent damage never expose the device to any liquid or moisture Avoid direct sunlight heavy dirt...

Page 8: ...s n 310 albums n 30 mix patterns n 24 performance memory locations n Record and playback function n Layer and Split mode n Harmony mode n Metronome n Reverb and Chorus effects n DSP effects n DJ effects n Master EQ n Mixer n Sequencer n Transpose function n Battery operation possible n Speaker 2 15 W n Connections SD card USB to device sustain pedal headphones Aux in micro phone n Automatic shutof...

Page 9: ... is observed when inserting batteries Inserting batteries 1 Open the battery compartment cover on the underside of the device and insert six AA size batteries Pay attention to the correct polarity Always use batteries of the same type and do not use new and used batteries at the same time 2 Turn the volume control counterclockwise to the minimum before inserting the batteries into the keyboard Thi...

Page 10: ...The batteries do not have to be removed from the keyboard when using the power adapter Assembly instructions keyboard 10 ...

Page 11: ...USER SOUND SIDECHAIN 1 28 29 56 499 560 COMBI 567 580 DRUMS 581 585 USER SOUND SIDECHAIN ö 6 7 9 0 1 2 3 4 5 8 1 Main switch Turns the device on and off 2 MASTER VOLUME Rotary control to adjust the overall volume Overview Left control panel Connections and operating elements MK 400 11 ...

Page 12: ...to play all preprogrammed songs in a loop 9 INTRO ENDING Style mode Press the button to play an intro or ending MIX mode Press the button to select section C Hold down the button to activate the slicer in section C Song modus Press the button to rewind the currently playing song during playback 10 FILL A Style mode Press the button to play the Fill In Pattern A fill bars MIX mode Press the button ...

Page 13: ...the piano mode 21 STORE Hold down the button and press one of the M1 M4 buttons to select the memory location on which you want to save your settings 22 BANK Button to call up the Performance Memory menu 23 M1 M4 Performance Memory menu Press one of the buttons to call up the memory location with the settings saved on it Quick Settings menu Press one of the buttons to call up the sound setting tha...

Page 14: ...to activate deactivate the TWINOVA function 32 LAYER Button to activate deactivate the Layer mode 33 CHORD REF Button to activate deactivate the Chord reference function MIX mode Press the button to mute or unmute the T1 KICK kick track during playback 34 SD CARD Button to call up the SD card menu MIX mode Press the button to mute or unmute the T2 SNARE snare track during playback 35 MIXER Button ...

Page 15: ...setting Buttons for setting a value or parameter Press and simultaneously to reset the current parameter to the default setting By default the touchpad controls the vibrato depth and speed when no effect LED is lit Press MODE repeatedly to select one of the five groups of effect sets The corre sponding LED lights After selecting the effect sets you can control the selected effects in real time usi...

Page 16: ...R FILE Recording file display 44 Treble clef right hand 45 Bass clef left hand 46 T1 T6 Track display in mix mode 47 Lights up when the device is connected to a computer via USB port 48 Lights up when an SD card is inserted 49 MEASURE Time signature display 50 BEAT Beat display within the bar 51 Chord display 52 FINGERD FULL RANGE FADE A B Display of fingering fade and A B Display Connections and ...

Page 17: ... when an album is selected 59 LED TOUCH Lights up when the velocity sensitivity is being adjusted 60 LED SUSTAIN Lights up when a Sustain pedal is connected 61 LED MIX CTRL Lights up when Mix mode is activated a b c d e f 62 SD Slot for SD cards with up to 128 GB capacity 63 USB interface to connect a computer 64 SUSTAIN Connection socket for the Sustain pedal 65 PHONES Output socket for headphone...

Page 18: ...k sockets unbalanced 67 MIC IN Input socket for a microphone designed as 1 4 jack socket unbalanced The signal of the connected microphone is reproduced via the built in loudspeakers of the keyboard 68 12V Connection socket for the 12 V plug in power supply Connections and operating elements keyboard 18 ...

Page 19: ...es not supplied to the output mutes the speakers Never operate the headphones at high volume as this can permanently damage your hearing Use the AUX IN connection socket to connect a for example CD or MP3 player to the keyboard So you can playback music through the internal speakers of the key board and simultaneously play along to it Connect the cable to the AUX IN connec tion socket on the rear ...

Page 20: ...ower for condenser micro phones the connection is only suitable for dynamic microphones NOTICE To prevent damage to the speakers turn the volume down to Mini mum before you connect a microphone to the keyboard Disconnect the microphone from the keyboard when it is not in use Microphone Connection options keyboard 20 ...

Page 21: ...e keyboard is not being used for 30 minutes it switches off automatically To turn it back on again press You can deactivate the automatic switch off or set the desired time for the keyboard to switch off automatically 30 minutes 60 minutes in the function menu see Ä Chapter 7 24 Function menu on page 49 7 2 Adjusting the volume Use the rotary control MASTER VOLUME to set a pleasant volume 1 Turn t...

Page 22: ...ngs 3 Press DEMO or again to stop playback and exit demo mode 7 4 Using the Sustain pedal By using a Sustain pedal you can make your playing more expressive and let tones linger after you lift your fingers from the keys of the keyboard The sustain effect is activated when you step on the pedal and deactivated when you release it 1 Connect a Sustain pedal to the connection socket on the back of the...

Page 23: ...1 indicator and the currently selected sound 2 Use the rotary control of the numeric keypad or the numeric buttons to select the desired sound The sound list is available for download on the product page of our homepage www thomann de 7 7 Layer mode With the layer mode you can set the layering of sounds 1 Press LAYER to activate the Layer mode ð The display shows the R2 indicator and the currently...

Page 24: ...nd The sound list is available for download on the product page of our homepage www thomann de 3 Press SPLIT again to disable the Split mode When using Layer and Split mode only the area to the right of the split point plays the layered sounds Use the mixer to adjust the volume of the R and L parts 7 9 Piano mode You can use the Piano mode to simulate playing an acoustic piano 1 Press PIANO to act...

Page 25: ...et tings to the default setting Layer split mode and TWINOVA mode cannot be used at the same time 7 11 DSP effects With the built in digital effects you can give your music more expression and depth in many ways e g by using reverb effects or adding harmonies You can switch the digital effects on or off in the function menu see Ä Chapter 7 24 Function menu on page 49 1 The DSP effects are activate...

Page 26: ...ound has been successfully recorded the display shows Finished ð The user sound has been saved When the volume of the sound reaches the trigger level of the micro phone recording will start automatically When the volume of the sound drops below the trigger level or when the recording time reaches two seconds the recording will automatically stop and the user sound will be saved Pitch correction is...

Page 27: ...ess to turn the keyboard off 2 Hold down on the numeric keypad and turn on the keyboard ð All samples are being deleted 7 13 Part Effects The keyboard offers the effects Harmony and Arpeggio These effects are used to enhance or change the sound of the right hand 7 13 1 Harmony mode In harmony mode additional intervals are added to the notes played by the right hand 1 Press HARMONY to activate harm...

Page 28: ...layed by the right hand do not sound simultaneously but one after the other at short intervals This is called a broken chord 1 Press SUSTAIN and HARMONY simultaneously to enable the Arpeggio mode ð The display shows the ARP indicator 2 Press SUSTAIN and HARMONY simultaneously again to disable the Arpeggio mode 7 13 2 1 Arpeggio split point When using the arpeggio the keyboard is divided into two a...

Page 29: ...and while playing with your right hand 7 14 1 Starting Auto Accompaniment rhythm track only 1 Press STYLE to activate the Style mode ð The display shows the currently selected style 2 Use the rotary control of the numeric keypad or the numeric buttons to select the desired style 3 Press to start the auto accompaniment rhythm track 4 Press again to stop the auto accompaniment rhythm track Operating...

Page 30: ... the same time it is called a chord That is the basis of a harmony Each note of a chord determines which chord it is In music the basic chords are mostly triads The chord is determined by the notes it contains The lowest note is the root This is followed by the third and the fifth The root denotes the chord e g C major and is the most important tone The name of the chord e g minor or major depends...

Page 31: ...he basic position it forms an inversion and is therefore called an inverse chord 7 14 6 Chord detection modes With a chord detection mode you can determine how the fingered chords are inter preted within the auto accompaniment Press CHORD MODE to activate the chord detection The keyboard then automatically recognizes the single or multiple finger chords played 7 14 6 1 Single fingered You can play...

Page 32: ...he same time 7 14 6 2 Multi fingered In this mode you can play chords with normal fingering Using the example of the root C the illustration shows which chords can be played The notes in brackets are optional These chords are recognized even without pressing these keys on the keyboard Major seventh chord C7 Minor Seventh Chord Cm7 Operating keyboard 32 ...

Page 33: ... 4 You can change the time for fade in and fade out in the function menu see Ä Chapter 7 24 Function menu on page 49 7 14 8 Tempo Each style of the instrument is programmed with a preset standard tempo 1 Press TEMPO or TEMPO to change the tempo ð The display shows the set tempo 2 Press TEMPO and TEMPO simultaneously on the numeric keypad to reset the current settings to the default setting When St...

Page 34: ... the panel settings including sound and effects that correspond to the current style Each style has four preset Q S settings The memory function is not available when the quick setting function is used 7 15 Metronome 7 15 1 Turning the metronome on and off 1 Press METRO to turn the metronome on ð The beat indicator on the display flashes and the metronome beat can be heard 2 Press METRO again to t...

Page 35: ...ring MIDI recording the metronome beat will not be recorded However if you turn on the metronome during audio recording the metronome beat will be recorded 7 16 Albums This function allows you to make the most of settings related to song playback For each song in the album the keyboard automatically sets the best setting for style tempo and sound 1 Press STYLE and SONG simultaneously to call up th...

Page 36: ...e playback of the selected song 5 Press STYLE or RECORD to exit the song mode By default all songs are played in an endless loop You can change the play back mode in the function menu see Ä Chapter 7 24 Function menu on page 49 7 17 2 Playback mode The songs can be played in four different modes 1 Press to play the current song in a loop 2 Press to play all songs in a loop 3 Hold down to rewind th...

Page 37: ... learning mode ð The display shows LESSON 1 In this mode it is only rated whether you play the notes at the right time but not whether you hit the right notes 2 Press SONG and LESSON repeatedly at the same time to choose which hand L R or both you want to play with 3 Press the START STOP button to start practising 4 If you have selected R the right hand voice is muted and you have to play the righ...

Page 38: ...until you play them correctly on the key board 1 Press LESSON again to enter the learning mode 3 ð The display shows LESSON 3 In this mode it is rated whether you play the right notes at the right time The practising song continues only when both is correct 2 Press SONG and LESSON repeatedly at the same time to choose which hand L R or both you want to play with 3 Press the START STOP button to st...

Page 39: ...n and the MIX CTRL LED lights up The sync start function is activated 2 Press START STOP or any key in the chord section of the keyboard to begin playing the mix pattern 3 Press on the numeric keypad to change the mix pattern 4 While the mix pattern is playing press START STOP to stop playback 5 Press STYLE or SONG to exit the mix mode 7 18 1 Mix sections 1 While the mix pattern is playing press o...

Page 40: ...ult settings ð The current mix pattern display and the MIX CTRL LED turn off 7 19 Chord reference display 1 Press CHORD REF to call up the chord reference screen ð The display shows ChordRef The Fingered mode is activated 2 Press one of the C6 B6 keys on the keyboard to set the desired root of the chord 3 Press one of the C4 B5 keys on the keyboard to set the desired chord type minor or major The ...

Page 41: ...ernal memory as a user song or save it to an SD card 7 20 1 1 Preparing MIDI recording 1 Press RECORD to call up the recording menu ð The display shows the current number and name of the user song e g 001 RecSong If there is no user song the display shows No File 2 Use the rotary control or of the numeric keypad to select a memory loca tion for the user song on which you would like to save your re...

Page 42: ...ect a user song with on the numeric keypad 3 Press to play the recording 4 Press again to stop playback When all memory locations are occupied the recording is stopped immediately and saved If you are recording with accompaniment the recording will stop as soon as the end section of the accompaniment is over Please note that if you record again to that memory location the orig inal data will be ov...

Page 43: ...lay temporarily shows RECSTART The RECORD button LED lights up and the display shows AUDIOREC Any sounds you hear from the keyboard such as B sounds styles song playback or vocals from the connected microphone etc are recorded 7 20 2 2 Stopping audio recording 1 Press RECORD while recording to stop recording 2 The recording is saved to the selected storage location for the user song under the name...

Page 44: ...is not yet detected by the keyboard the display shows WAIT As soon as the SD card has been detected by the keyboard the display shows If the SD card cannot be detected the display shows DiskErr and returns to the previous screen 3 Use the rotary control to select one of the Save Load or Format menus 4 Press to continue the selection or to return to the previous display 5 Press SD CARD SONG or STYL...

Page 45: ...display shows Sure Press to confirm overwriting Press to cancel the process and return to the previous display Overwritten data cannot be restored 7 21 4 Saving files 1 Press SD CARD to call up the SD card s playback menu 2 Use the rotary control to select the Save menu 3 Press to save all user songs to the SD card under UserSong00X_NUB mid UserSong00X corresponds to the name and number of the use...

Page 46: ...ged 7 22 Performance Memory With this function you can save all the settings you have made on the keyboard and call them up again with a single keypress 7 22 1 Selecting a memory location Hold down STORE and press one of the M1 M4 buttons to save the cur rent settings you have made on the keyboard to the selected memory location This process overwrites all previous settings saved on the selected m...

Page 47: ...xer This menu is used to adjust the volume of the various style elements 1 Press MIXER to call up the mixer menu ð By default the display shows the mixer parameters available for the cur rent mode For example if you are in Song mode the display shows MusicVol 2 Use the rotary control to select the desired parameter that you want to change 3 Use on the numeric keypad to adjust the desired parameter...

Page 48: ...Phrase 1 volume Phrase1 xxx 0 127 Phrase 1 Phrase 2 volume Phrase2 xxx 0 127 Phrase 2 Sound R1 volume Upper1 xxx 0 127 Sound R1 Sound R2 volume Upper2 xxx 0 127 Sound R2 Sound L volume Lower xxx 0 127 Sound L Music volume Song SD card Accompani ment MusicVol xxx 0 127 Music Song SD card Accompaniment Microphone volume Mic Vol xxx 0 127 Microphone Metronome volume MetroVol xxx 0 127 Metronome The a...

Page 49: ... 3 4 5 2 3 Transposing xxx Transpos 12 to 12 0 4 Split point xxx Split Pt 1 to 61 19 5 Metronome xxx Beat 0 2 to 9 4 6 Pedal xxx Ped 001 Ped Sust 002 Ped Soft 003 Ped St T 004 Ped Mem 001 Ped Sust 7 Equalizer xxx EQ 001 EQ Flat 002 EQ Pop 003 EQ Rock 004 EQ Class 005 EQ Jazz 006 EQ Dance 001 EQ Flat 8 Octave shift xxx Octave 2 to 2 0 9 Reverb effect xxx Rev 001 Rev Room1 002 Rev Room2 003 Rev Room...

Page 50: ...ec WAV 001 Rec MIDI 20 Twinova octave shift xxx TwinoOct 2 to 2 0 21 Fade Time xxx FadeTime 1 to 20 10 22 Digital effects xxx DSP OFF ON ON 23 Slicer xxx Slicer 1 to 2 default 1 1 24 Touchpad control xxx Pad 001 Pad Rele 002 Pad Hold 001 Pad Rele 25 Song playback xxx SongLoop 001 ALL OFF ALL 26 Pitch Bend xxx Pitch Co OFF ON ON 27 Automatic shutoff xxx PowerOff OFF 030 060 030 7 25 MIDI functions ...

Page 51: ...luded 3 USB precautions Heed the following guidelines when connecting a keyboard to a computer via USB Otherwise the keyboard or the computer may crash which can result in data loss If a crash should occur turn off computer and keyboard and restart both after a few seconds If the computer is in standby or hibernation wake the computer before connecting the USB cable Establish the USB connection be...

Page 52: ...hannels No No Pitch Bend No Yes Control Change 0 1 5 6 7 10 11 64 65 66 67 80 81 91 93 120 121 123 Yes Yes No Yes Yes No No Yes No Yes Yes No No Yes Yes Yes No Yes Yes Yes Yes Yes Yes Yes Yes Yes Yes Yes Yes Yes Yes Yes Yes Yes No Yes Bank Select Modulation Portamento Time Data Entry Volume Pan Expression Sustain Pedal Portamento ON OFF Sostenuto Pedal Soft Pedal Reverb Program Chorus Program Reve...

Page 53: ...o No System Real Time Clock Yes No Commands No 1 No Aux Messages Local ON OFF No No ALL Notes OFF No No Active Sensing No Yes System Reset No No 1 When the accompaniment starts an FAH message is sent When the accompani ment ends an FCH message is sent POLY MONO OMNI ON Mode 1 Mode 2 OMNI OFF Mode 3 Mode 4 MIDI channel modes MIDI implementation chart MK 400 53 ...

Page 54: ...t with Sync Start function can only be started by pressing a key in the left hand chord area Some notes on the keyboard sound wrong Reset the tuning to the default setting and restart the key board The keyboard is not detected when connected to a computer Check the USB cable for correct connection Connect the USB cable to another USB port on the computer The pedals do not work Check if the pedal c...

Page 55: ...ngs 180 songs 5 user songs Mix patterns 30 mix patterns Albums 310 albums 500 user albums Effects DSP effects part effects Reverb Chorus Controller Sustain pedal touchpad Pitch adjustment Transposing 12 12 Octave transposing 2 2 Voices 50 50 Functions Pedal support Sustain Metronome 0 2 9 bell on off Tempo 30 280 Loudspeaker load capacity 2 15 W Speaker 2 12 cm Voltage supply external plug in powe...

Page 56: ...Colour Black Ambient conditions Temperature range 0 C 40 C relative humidity 20 80 non condensing Technical specifications keyboard 56 ...

Page 57: ... and in hifi use Instrument cables with two conductors one core plus shielding are typical rep resentatives of the unbalanced transmission One conductor is ground and shielding while the signal is transmitted through the core Unbalanced transmission is susceptible to electromagnetic interference especially at low levels such as microphone signals and when using long cables 1 Signal 2 Ground shield...

Page 58: ... national or local regulations regarding hazardous waste To protect the environment dispose of empty batteries at your retail store or at appropriate collection sites This product is subject to the European Waste Electrical and Electronic Equipment Directive WEEE in its currently valid version Do not dispose with your normal household waste Dispose this device through an approved waste disposal fi...

Page 59: ......

Page 60: ...Musikhaus Thomann Hans Thomann Straße 1 96138 Burgebrach Germany www thomann de ...

Reviews: