background image

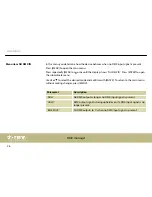
This menu offers the option to display you the device version.
Press 

[MENU]

 to open the main menu.

Press repeatedly 

[MENU]

 or   or   until the display shows 

‘VERSION’

. Press 

[ENTER]

 to display

the device version.
To return to the main menu, press 

[MENU]

.

Menu item VERSION

Operating


DMX manager

28

Summary of Contents for Stairville DM 44

Page 1: ...DM 44 DMX manager user manual ...

Page 2: ...Musikhaus Thomann Thomann GmbH Hans Thomann Straße 1 96138 Burgebrach Germany Telephone 49 0 9546 9223 0 E mail info thomann de Internet www thomann de 15 12 2015 ID 365433 ...

Page 3: ...7 1 3 Symbols and signal words 8 2 Safety instructions 10 3 Features 15 4 Installation 16 5 Starting up 17 6 Connections and controls 19 7 Operating 23 7 1 Setting parameters 24 7 2 Menu overview 29 8 Technical specifications 32 9 Plug and connection assignments 33 Table of contents DM 44 3 ...

Page 4: ...10 Protecting the environment 34 Table of contents DMX manager 4 ...

Page 5: ...uctions and all other instructions Keep the manual for future reference Make sure that it is available to all those using the device If you sell the unit please make sure that the buyer also receives this manual Our products are subject to a process of continuous development Thus they are subject to change General notes DM 44 5 ...

Page 6: ...yword search Use the search function in the electronic version to find the topics of interest for you quickly Online guides Our online guides provide detailed information on technical basics and terms Personal consultation For personal consultation please contact our technical hotline Service If you have any problems with the device the customer service will gladly assist you General notes DMX man...

Page 7: ...ts and values displayed on the device are marked by quotation marks and italics Examples 24ch OFF References to other locations in this manual are identified by an arrow and the specified page number In the electronic version of the manual you can click the cross reference to jump to the specified location Example See Ä Cross references on page 7 Letterings Displays Cross references General notes ...

Page 8: ...ation of symbol and signal word indicates an immediate dangerous situation that will result in death or serious injury if it is not avoided NOTICE This combination of symbol and signal word indicates a pos sible dangerous situation that can result in material and environmental damage if it is not avoided Warning signs Type of danger Warning high voltage General notes DMX manager 8 ...

Page 9: ...Warning signs Type of danger Warning danger zone General notes DM 44 9 ...

Page 10: ...ns is considered to be improper and may result in personal injury or property damage No liability will be assumed for damages resulting from improper use This device may be used only by persons with sufficient physical sensorial and intellectual abilities and having corresponding knowledge and experience Other persons may use this device only if they are supervised or instructed by a person who is...

Page 11: ...he like from the unit They could swallow the pieces and choke Never let children unattended use electrical devices DANGER Electric shock caused by high voltages inside Within the device there are areas where high voltages may be present Never remove any covers There are no user serviceable parts inside Do not use the device if covers protectors or optical components are missing or damaged Safety S...

Page 12: ...t modify the mains cable or the plug Failure to do so could result in electric shock death or fire If in doubt seek advice from a regis tered electrician NOTICE Risk of fire Do not cover the device nor any ventilation slots Do not place the device near any direct heat source Keep the device away from naked flames Safety instructions DMX manager 12 ...

Page 13: ...connecting the device ensure that the input voltage AC outlet matches the voltage rating of the device and that the AC outlet is protected by a residual current circuit breaker Failure to do so could result in damage to the device and possibly injure the user Unplug the device before electrical storms occur and when it is unused for long periods of time to reduce the risk of electric shock or fire...

Page 14: ...duct may possibly react with the coating of your parquet linoleum laminate or PVC floor and after some time cause permanent dark stains In case of doubt do not put the rubber feet directly on the floor but use felt pad floor protectors or a carpet Safety instructions DMX manager 14 ...

Page 15: ...o electronic isolated DMX inputs n four opto electronic isolated DMX outputs n Splitter function n Merger function n Boost function n Operating modes DMX in HTP LTP Blackout Merge n Operating modes DMX out Null Hold Blackout n Time function n 19 rack mountable Features DM 44 15 ...

Page 16: ...ackaging or your own packaging material suitable for transport or storage respectively NOTICE Possible data transmission errors For error free operation make use of dedicated DMX cables and do not use ordi nary microphone cables Never connect the DMX input or output to audio devices such as mixers or ampli fiers The unit has been designed for rack mounting in a standard 19 rack it occupies one rac...

Page 17: ...arting up Create all connections while the device is off Use the shortest possible high quality cables for all connections Take care when running the cables to prevent tripping hazards Starting up DM 44 17 ...

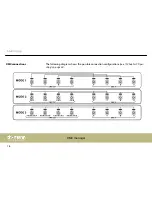
Page 18: ...The following diagram shows the possible connection configurations see Ä Chapter 7 Oper ating on page 23 DMX connections Starting up DMX manager 18 ...

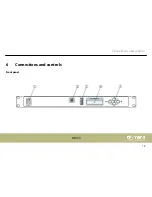
Page 19: ...6 Connections and controls Front panel Connections and controls DM 44 19 ...

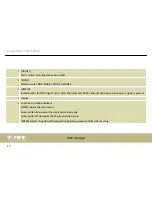
Page 20: ...dicator LED of a channel lights up red as soon as a signal is present 4 Display 5 Function and control buttons MENU opens the main menu Arrow button increases the displayed value by one Arrow button decreases the displayed value by one ENTER selects an option of the respective operating mode confirms the set value Connections and controls DMX manager 20 ...

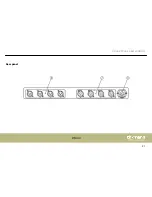
Page 21: ...Rear panel Connections and controls DM 44 21 ...

Page 22: ...6 DMX IN 4 3 pin DMX input 7 DMX OUT 4 3 pin DMX output 8 IEC chassis plug for the mains cable with fuse holder Connections and controls DMX manager 22 ...

Page 23: ...ENTER to open the selected menu Change the currently displayed value with or and confirm any new values again with ENTER To return to the main menu without making changes press MENU All settings are retained when the power fails or if the device is disconnected from the power supply Main menu Operating DM 44 23 ...

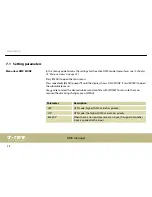
Page 24: ... MODE Press ENTER to open the subordinate menu Use or to select the desired subitem and confirm with ENTER To return to the main menu without making changes press MENU Parameter Description HTP HTP mode highest DMX value has priority LTP HTP mode the highest DMX value takes priority BACKUP When there is no signal present at an input the signal of another input is applied to this input Menu item DM...

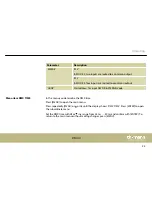
Page 25: ...DMX B in MERGE mode In this menu you determine the DMX time Press MENU to open the main menu Press repeatedly MENU or or until the display shows DMX TIME Press ENTER to open the subordinate menu Set the DMX time with or in a range from 25 ms 50 ms and confirm with ENTER To return to the main menu without making changes press MENU Menu item DMX TIME Operating DM 44 25 ...

Page 26: ...rdinate menu Use or to select the desired mode and confirm with ENTER To return to the main menu without making changes press MENU Parameter Description NULL No DMX output as long as no DMX input signal is present HOLD DMX output signal is being upheld even if a DMX input signal is no longer present BLACKOUT All DMX outputs to 0 when no DMX input signal is present Menu item NO DMX IN Operating DMX...

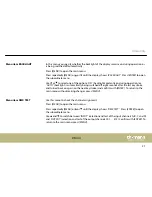
Page 27: ... seconds after the last keystroke and turned back on again on the next keystroke and confirm with ENTER To return to the main menu without making changes press MENU Use this menu to check the channel assignment Press MENU to open the main menu Press repeatedly MENU or or until the display shows DMX TEST Press ENTER to open the subordinate menu Use and to switch between INPUT selection and test of ...

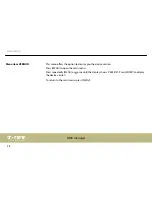
Page 28: ... you the device version Press MENU to open the main menu Press repeatedly MENU or or until the display shows VERSION Press ENTER to display the device version To return to the main menu press MENU Menu item VERSION Operating DMX manager 28 ...

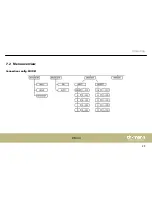
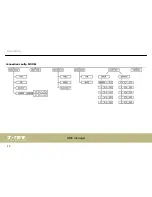
Page 29: ...7 2 Menu overview Connection config MODE 1 Operating DM 44 29 ...

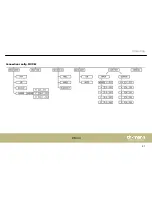
Page 30: ...Connection config MODE 2 Operating DMX manager 30 ...

Page 31: ...Connection config MODE 3 Operating DM 44 31 ...

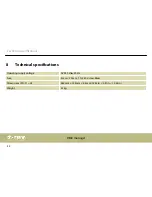
Page 32: ...ical specifications Operating supply voltage AC 230 V 50 Hz Fuse 5 mm 20 mm 1 A 250 V slow blow Dimensions W D H 482 mm 145 mm 44 mm 15 35in 5 31in 15 55in Weight 3 1 kg Technical specifications DMX manager 32 ...

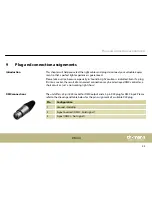
Page 33: ...s into a socket the result of an incorrect connection may be a destroyed DMX controller a short circuit or just a not working light show The unit offers a 3 pin XLR socket for DMX output and a 3 pin XLR plug for DMX input Please refer to the drawing and table below for the pin assignment of a suitable XLR plug Pin Configuration 1 Ground shielding 2 Signal inverted DMX cold signal 3 Signal DMX hot ...

Page 34: ...g Please follow the notes and markings on the packaging This product is subject to the European Waste Electrical and Electronic Equipment Directive WEEE Do not dispose with your normal household waste Dispose of this device through an approved waste disposal firm or through your local waste facility When discarding the device comply with the rules and regulations that apply in your country If in d...

Page 35: ......

Page 36: ...Musikhaus Thomann Hans Thomann Straße 1 96138 Burgebrach Germany www thomann de ...

Reviews: