


Revision A
December 2011
25
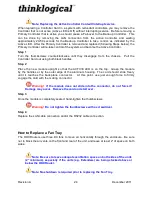
Step 1
Turn the four thumbscrews counterclockwise until they disengage from the chassis.
Step 2
Pull the Fan Tray module out using both black handles.
Step 3
Place the new module so that the aluminum housing is on the bottom. Hold the new Fan Tray
by the black handles and slide the aluminum housing into the black card guides.
Warning!
Do not operate the unit without a Fan Tray installed for greater
than 10 minutes.
Step 4
Hand-tighten the thumbscrews.
Warning!
Do not tighten the thumbscrews with a screwdriver.
How to Replace a Power Supply
Warning!
Disconnect the power cord before proceeding!
Note: No shutdown is required prior to replacing a Power Supply.
a. The Power Modules are universal input 120-240VAC 50-60Hz. Use the proper power
cord for your region (supplied with the unit). Although the HDX Router functions properly
with one Power Module, it is recommended that both Modules be used, preferably
connected to two independent power sources (for redundancy).
Step 1
Grasp the black handle with one hand.
Step 2
Slide the green tab to the left with the other hand.
Summary of Contents for HDX576
Page 2: ......
Page 8: ......
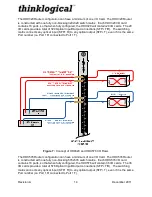
Page 15: ...Revision A December 2011 7 Figure 2 HDX576 Router Rear View...
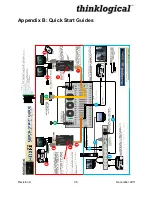
Page 43: ...Revision A December 2011 35 Appendix B Quick Start Guides...
Page 44: ...Revision A December 2011 36...
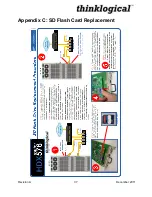
Page 45: ...Revision A December 2011 37 Appendix C SD Flash Card Replacement...
Page 46: ...Revision A December 2011 38...


